Sunflower and Flax Seeds Whole Wheat Cast Iron Bread
This post may contain affiliate links. Please read my disclosure policy.
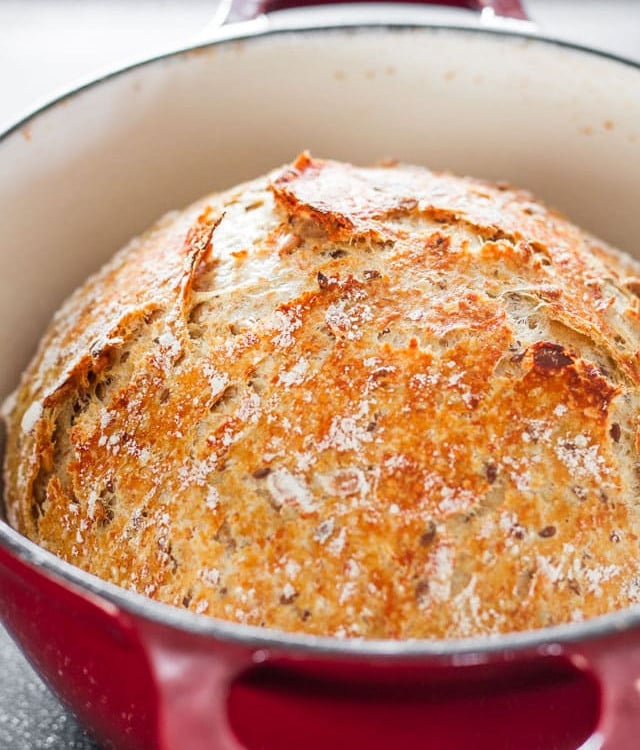
Sunflower and Flax Seeds Whole Wheat Cast Iron Bread – no kneading required and only a few ingredients turn into a super crusty delicious bread.

Ever since I’ve started making this easy no knead bread, I’ve never looked back and this is pretty much the only bread I ever make. It couldn’t get any easier. This is the 3rd variation I try, I’ve made one with only white flour, one with whole wheat flour and now I’m trying one with half white half whole wheat and I threw in some sunflower seeds and flax seeds. I have to say this is my favorite, simply because of the sunflower and flax seeds. I cannot tell you enough how easy this bread is.
We love this bread, whenever we want fresh bread, this is the bread we go to. I love the crust and it never fails to amaze me how great the crust is on this bread, it’s like a miracle, like magic. Nothing tastes and smells better, at least to me, than homemade fresh bread, straight out of the oven. If you’re patient enough you can wait until it’s cool to cut into it, or if you’re more the impatient kind like my husband, then you probably will just break into it and have at it.

So when I said this bread is easy to make I didn’t lie. The day before you want to eat the bread, all you need to do is mix all the ingredients in a big bowl, and by mixing I mean to roughly just mix them with a wooden spoon until somewhat incorporated. That’s it, you just cover the bowl and leave it until the next day, you need to let it sit for about 12 to 18 hours. Usually I’ll do mine the night before, takes no more than a couple minutes. This is when you also throw in the seeds or whatever else you want to add to the bread, like herbs, cheeses, or dried fruits like cranberries.

The next day all you need to do is shape the dough into a ball, but make sure you flour your hands really well. It doesn’t have to be perfect.

Before you place it in your dutch oven, you need to heat your dutch oven as you’re warming up your oven, this will prevent your bread from sticking to the bottom. Trust me I know, I forgot once to heat up the dutch oven and I had a hard time taking the bread out.

Cover it up with the lid and bake it for 30 minutes, remove the lid and bake for another 15 minutes and you end up with the most gorgeous little bread you’ve ever seen. Even if you’ve never made bread before this is a no fail recipe. Trust me.

Watch the video for the original No Knead Crusty bread:
Before You Begin! If you make this, please leave a review and rating letting us know how you liked this recipe! This helps our business thrive & continue providing free recipes.
Sunflower and Flax Seeds Whole Wheat Cast Iron Bread
Ingredients
- 2 cups whole wheat flour
- 2 cups all-purpose flour
- 2 teaspoon salt
- 1 teaspoon active dry yeast
- 2¼ cup water
- ⅓ cup sunflower seeds
- ⅓ cup flax seeds
Before You Begin! If you make this, please leave a review and rating letting us know how you liked this recipe! This helps our business thrive & continue providing free recipes.
Instructions
- In a big bowl mix flour, salt and yeast together. At this time you can add the sunflower and flax seeds and stir them around a bit. Pour water into the bowl and using a spatula mix it until it’s all incorporated. Cover the bowl with plastic wrap and let it sit on your counter for 12 to 18 hours.
- Preheat oven to 450℉. Add your ]cast iron pot to the oven and heat it as well until it's at 450℉.
- Remove pot from oven and remove the lid from it.
- Flour your work surface really well and make sure you flour your hands really well. With your floured hands gently remove the dough from the bowl and roughly shape it into a ball. Take the ball of dough and drop it into the pot. Cover the pot with the lid and place it back in the oven.
- Bake for 30 minutes with the lid on, after which remove the lid and bake for another 15 to 20 minutes until golden brown.
- Remove from the oven and let cool.
Notes
- Prep time does not include time to let the dough rise.
- Always check the expiration date on your yeast and make sure it hasn’t expired. All your yeast products whether it’s in a jar or a package should be stamped with a “Best if Used by” date. Always make sure you check this date, even when you purchase the yeast, who knows it could have been on the shelf past its expiry date.
- To keep your yeast fresh and longer lasting, unopened yeast packages or jars should be stored in a cool or dry place such as your cupboard. However, you can also store your yeast in the fridge or freezer. If you do store it in the freezer and need to use yeast for your baking, make sure you take out the amount you need and let it sit at room temperature for at least half hour before using.
- Once your yeast package or jar has been opened, you must refrigerate the yeast or freeze it in an airtight container.
- One thing to remember about your yeast, is that it is a living organism and over time it will lose activity, even if you’ve never opened the jar or package. So if you don’t bake often, buy the smaller yeast packages rather than a big jar of yeast.
- Why is my bread chewy: Usually your bread will be chewy when there isn’t enough gluten formation or you’re using a low-protein flour. Make sure you let your bread dough rest for at least 12 hours to give it enough time for gluten formation.
- Why is my bread dense: Usually bread will be too dense when there is too much flour. Keep in mind this dough will be pretty sticky, do not add more flour than specified. Other factors that come into play are humidity and age of flour. Little yeast, long rise, sticky dough are keys to a good, light loaf.
- I don’t have a Dutch oven, what can I use instead: If you don’t have a Dutch Oven, a covered metal pot would work as well, just make sure it can stand up to 450 F heat. A 4 quart Calphalon soup pot with lid would work as well. If your pot doesn’t have a lid, you can cover the pot with heavy-duty aluminum foil, just make sure you seal the pot well.
- How do I know when my bread is done baking: Tap the bottom! Take the bread out of the Dutch oven, turn it upside down and give the bottom a firm thump with your thumb, or a knock and if it sounds hollow it’s done.
Nutrition Information
Notice: Nutrition is auto-calculated for your convenience. Where relevant, we recommend using your own nutrition calculations.

I have been making this bread for several years. Like some other folks, I modified it a bit. I use 2 cups of Rye flour and 2 cups of AP Flour. In addition to the Sunflower and Flax Seeds, I also added Chia Seeds and Sprouted Pumpkin Seeds.
Since I don’t have a Dutch oven I use a Pampered Chef Bowl with a lid and a German Römertopf with a lid.
To prevent the bread from sticking to the vessels I use parchment paper.
I slice it after a day and freeze it 4 slices at a time in a ziplock bag.
If I’m in a hurry, I put the bread in the cold oven and turn on the pilot light, that way I have been able to bake it after only 4 hours of rising time.
I love your take on this, glad you’re enjoying the recipe!
I was so eager to try this bread I could only wait 45 minutes for it to cool. It tasted as great as it looked. I wondered how well it would turn out, as I made a few changes, some by mistake. I used an envelope of active dry yeast which I realized was 2 tsp and not the 1 tsp called for. I doubled the sesame seeds. When I took the dough out, I kneaded it a few times as I rounded it for the pot. Finally, I thought it looked done when I took the lid off, so I only let it further brown for 10 minutes rather than the 15-20, and it did “thump” hollow. Thanks for the easy and delicious recipe–will definitely use this again!
It looks great, enjoy!
This bread is over the top DELICIOUS!!!! I am OBSESSED
I made this exactly as written. It is fantastic! Thanks Jo!
My husband just said it is the best bread I’ve ever made 🙂
So glad you liked it and that’s quite the compliment!
I have made all your No Knead Bread recipes. They are all excellent. However, I wanted to make bread in a loaf pan and was wondering if any of the No Knead Bread recipes will work in the loaf Pans. I would flatten the dough after it rises and roll it and place it in the pan and then let it rise again. What do you think? Would this work in a loaf pan. Thanks.
Absolutely, you can adapt no-knead bread recipes for a loaf pan. Your method of letting the dough rise, then shaping and allowing a second rise in the pan should work great. It’s a versatile dough, so give it a try!
Thank you so much. You are always very helpful.
I have to say that this is absolutely one of the best breads I’ve ever eaten, and those who have received it as a gift rave about it as well. Because whole wheat tastes somewhat bitter to me, I add 1/3 cup of honey along with the water. No other adjustments. Thank you Joanna for this treat of a bread that is now my go-to.
I’m thrilled to hear the bread is a hit, and the addition of honey sounds like a delicious way to balance the flavors. So glad it’s become your go-to bread! 🍯🍞🌟
Do I need to increase the active dry yeast if I activate it first in honey and warm water?
No, you don’t need to increase the active dry yeast when activating it in honey and warm water. The honey will simply provide sugars for the yeast to feed on and become bubbly, ensuring it’s active and ready to use. Just proceed with the recipe as directed after activating the yeast.
Thank you so much for your quick reply. Appreciate your expertise.
If I add one cup of oats and 1/3 cup of pumpkin seeds do I have to reduce a cup of the whole wheat flour? Can I also add 2 TBSP of honey with the water?
Great additions! If you’re adding a cup of oats, I’d recommend reducing the whole wheat flour by about 1/2 cup to start. The oats will absorb some moisture, but not as much as flour. For the pumpkin seeds, no adjustment to the flour is necessary. And yes, you can definitely add 2 TBSP of honey with the water! It’ll give the bread a lovely hint of sweetness that’ll complement the seeds beautifully. Happy baking! 🍞🌻🍯🥰
Thank you so much for your helpful response. Love all your recipes, especially your bread and No Knead ones. Thanks again.
My pleasure, Ruth!
One other question. My sister follows your No Knead bread recipes except she said she adds 2 tsp of active dry yeast and does a slow rise in the fridge. How is this different than what I follow in your recipe?
Thanks.
Your sister’s adaptation with the extra yeast and a slow rise in the fridge will yield a different flavor and texture. The slow rise in the fridge, often called cold fermentation, develops a deeper flavor. Using more yeast can make the bread rise faster. In comparison, my recipe gives a specific balance of flavor and texture, but bread-making is very versatile, so both methods can yield delicious results!
Thank you for your detailed response. Appreciate the information.
I’ve been making this bread for a number of years now and it’s so easy and delicious. My modifications are this:
-2.5 cups AP flour
-1.5 cups WW flour
-2 tbsp sugar (but after recently rereading comments, I’ll try honey next time!)
-2/3 cup ancient grain blend (oat flakes, barley flakes, rye flakes, spelt flakes, oat bran, kamut flakes, millet, flaxseed, quinoa flakes)
-2 cups water (the 2 1/4 cups called for made my dough WAY too wet!)
I love this bread and so does everyone I give it to. I don’t bake anything else anymore, and make two at a time to make more efficient use of the oven. I wait a day before slicing to get more even slices, as the bread is less squishy. It freezes beautifully!
Wow, it sounds like you’ve really made this bread recipe your own! I love the modifications you’ve made, especially the ancient grain blend—what a wholesome touch! It’s always fantastic when a recipe can serve as a versatile base for personalization. I’m also glad to hear that you’ve had success with freezing it; that’s a great tip for others looking to make the most of their time and oven space. Thank you so much for sharing your experience and variations, and for making this recipe a regular part of your kitchen repertoire!
I used ground flax meal instead of flax seeds, and added 2tbsp more water as it seemed dry. I let it rise in the fridge for 18 hours, followed by an hour on the countertop and it came out great! Really delicious. I like it better than your plain half whole wheat bread which I usually make.
Jo, do you think it would come out ok if I subbed dark rye flour for the wheat?
I’ve never tried myself, but you should be able to. The only thing to keep in mind is that rye flour behaves differently than wheat flour. It has less gluten, the protein that gives wheat bread its structure and elasticity. This means that a bread made entirely from rye flour will be denser and won’t rise as much as a bread made with wheat flour. If you want to use rye flour in your no-knead bread, I’d suggest using a mix of rye and wheat flour. Try substituting about 1/3 of the total flour with rye flour and see how that works. You can adjust the proportion based on your preference for the flavor and texture of rye. Also, rye flour absorbs more water than wheat flour, so you may need to add a bit more water to the dough. Start with the usual amount, and then add more as needed to achieve the right consistency. It should be sticky and shaggy, but not too wet or dry.
It turned out great!! But how do you not get the bottom not to burn, mine did a bit. But otherwise it was delicious 😋
I’ve learned two things – try raising your oven rack higher or put a cookie sheet on the rack beneath the cast iron pan. Your lower heat is probably the culprit. But I haven’t made this yet.
This bread is so easy and so good! I replaced one cup of whole wheat flour with one cup of rolled oats. I didn’t change anything else, and it came out perfectly. Next time I’ll try replacing one of the cups of regular flour with rolled oats and see what happens.
Joanna, this bread has elevated you to goddess status. I added some honey and a few more seeds, these things making it my go-to bread. So YUMMY!
Finally tried this recipe. I added 1 Tbsp honey ( which I dissolved in the water. Delicious. So easy and great results. A definite keeper!