Classic Dinner Rolls
This post may contain affiliate links. Please read my disclosure policy.
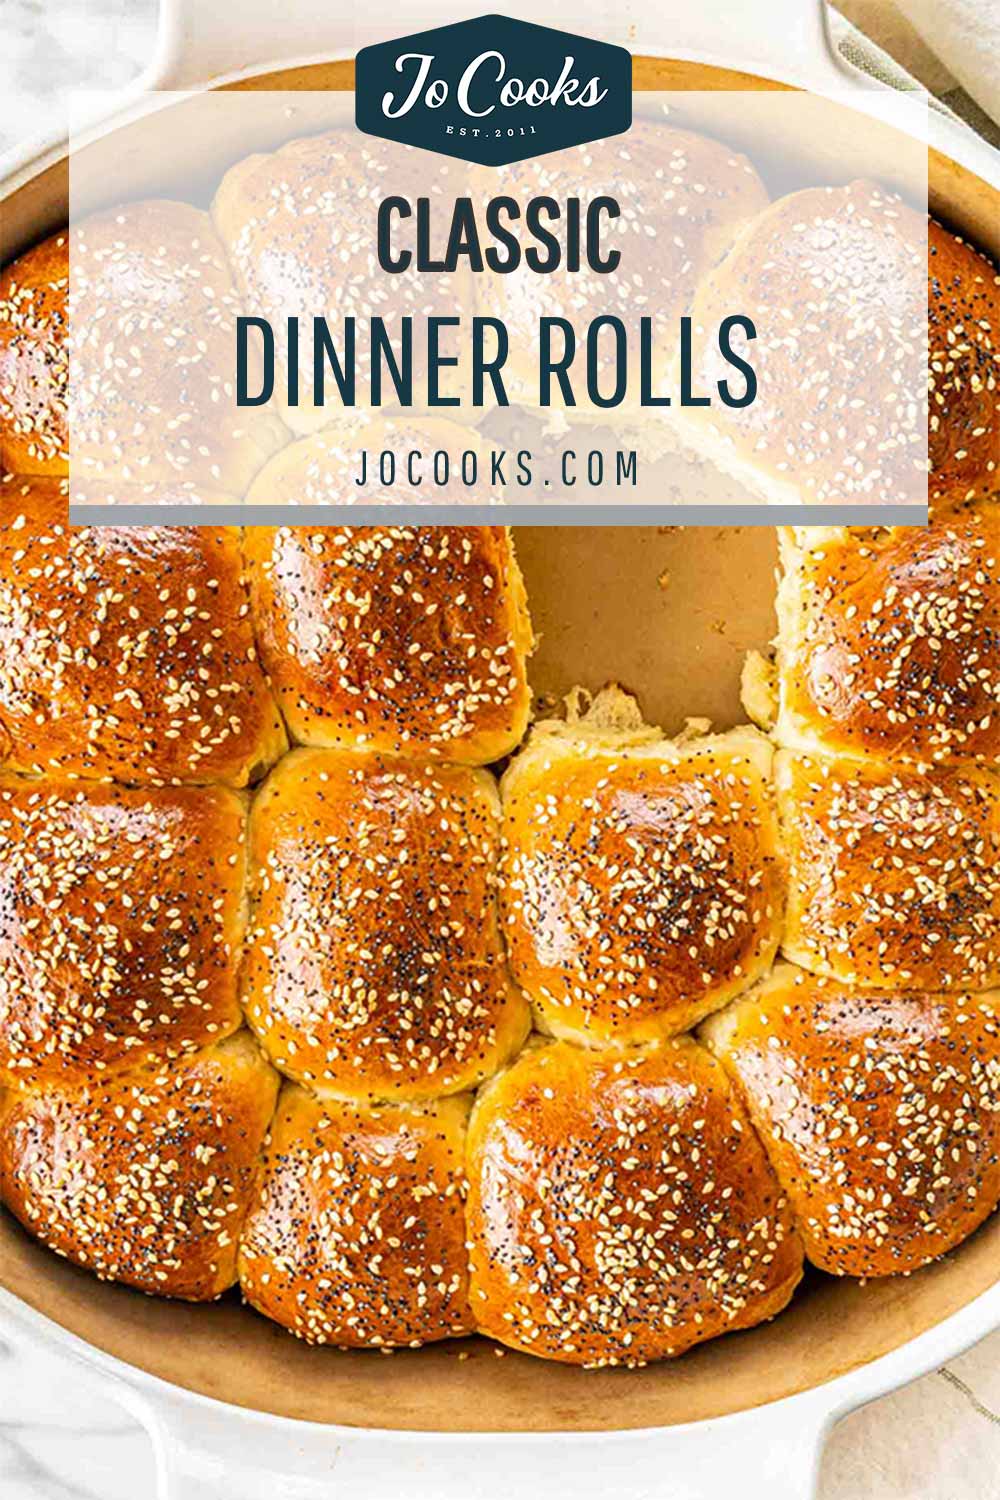
These Dinner Rolls are soft, fluffy, buttery, a classic no fail recipe that requires very little effort to make. The perfect addition to any meal! This is a classic recipe that I’ve been making for many years!
Classic Dinner Rolls Recipe
This recipe has been in my cooking/baking repertoire for at least a couple decades which is why I say it truly is a no fail recipe. Every single time I make these, I end up with gorgeous dinner rolls. They’re so good that most of the time they don’t even last until the next day.
There truly is nothing better than homemade dinner rolls. The smell in your house is divine, not to mention that when you pull these babies out of the oven, the satisfaction you get is worth the effort. However, very little effort is required for these dinner rolls.
Why You’ll Love These Dinner Rolls
- Simple Recipe! This is an easy 8-ingredient dough that comes together in a matter of minutes! And with the help of a stand mixer, there is very little effort involved or cleanup.
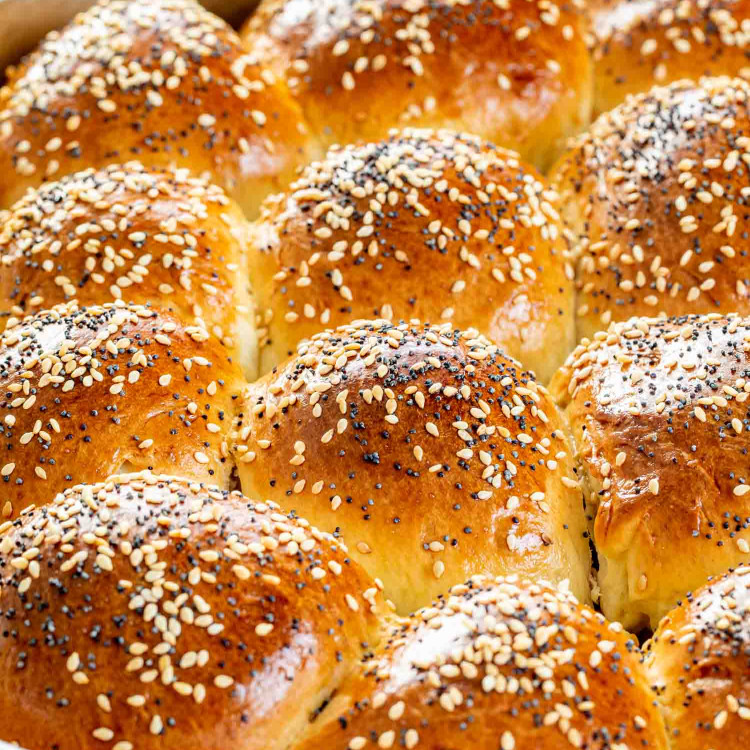
- Soft Delicious Rolls! These delicious classic dinner rolls are rich, buttery, super soft inside, and bake up perfectly golden brown every time.
- Dinner Ready! Dinner rolls go well with any meal from pasta or roasted meat to soup or salad. You can even make a batch and freeze them so they are ready at any time.
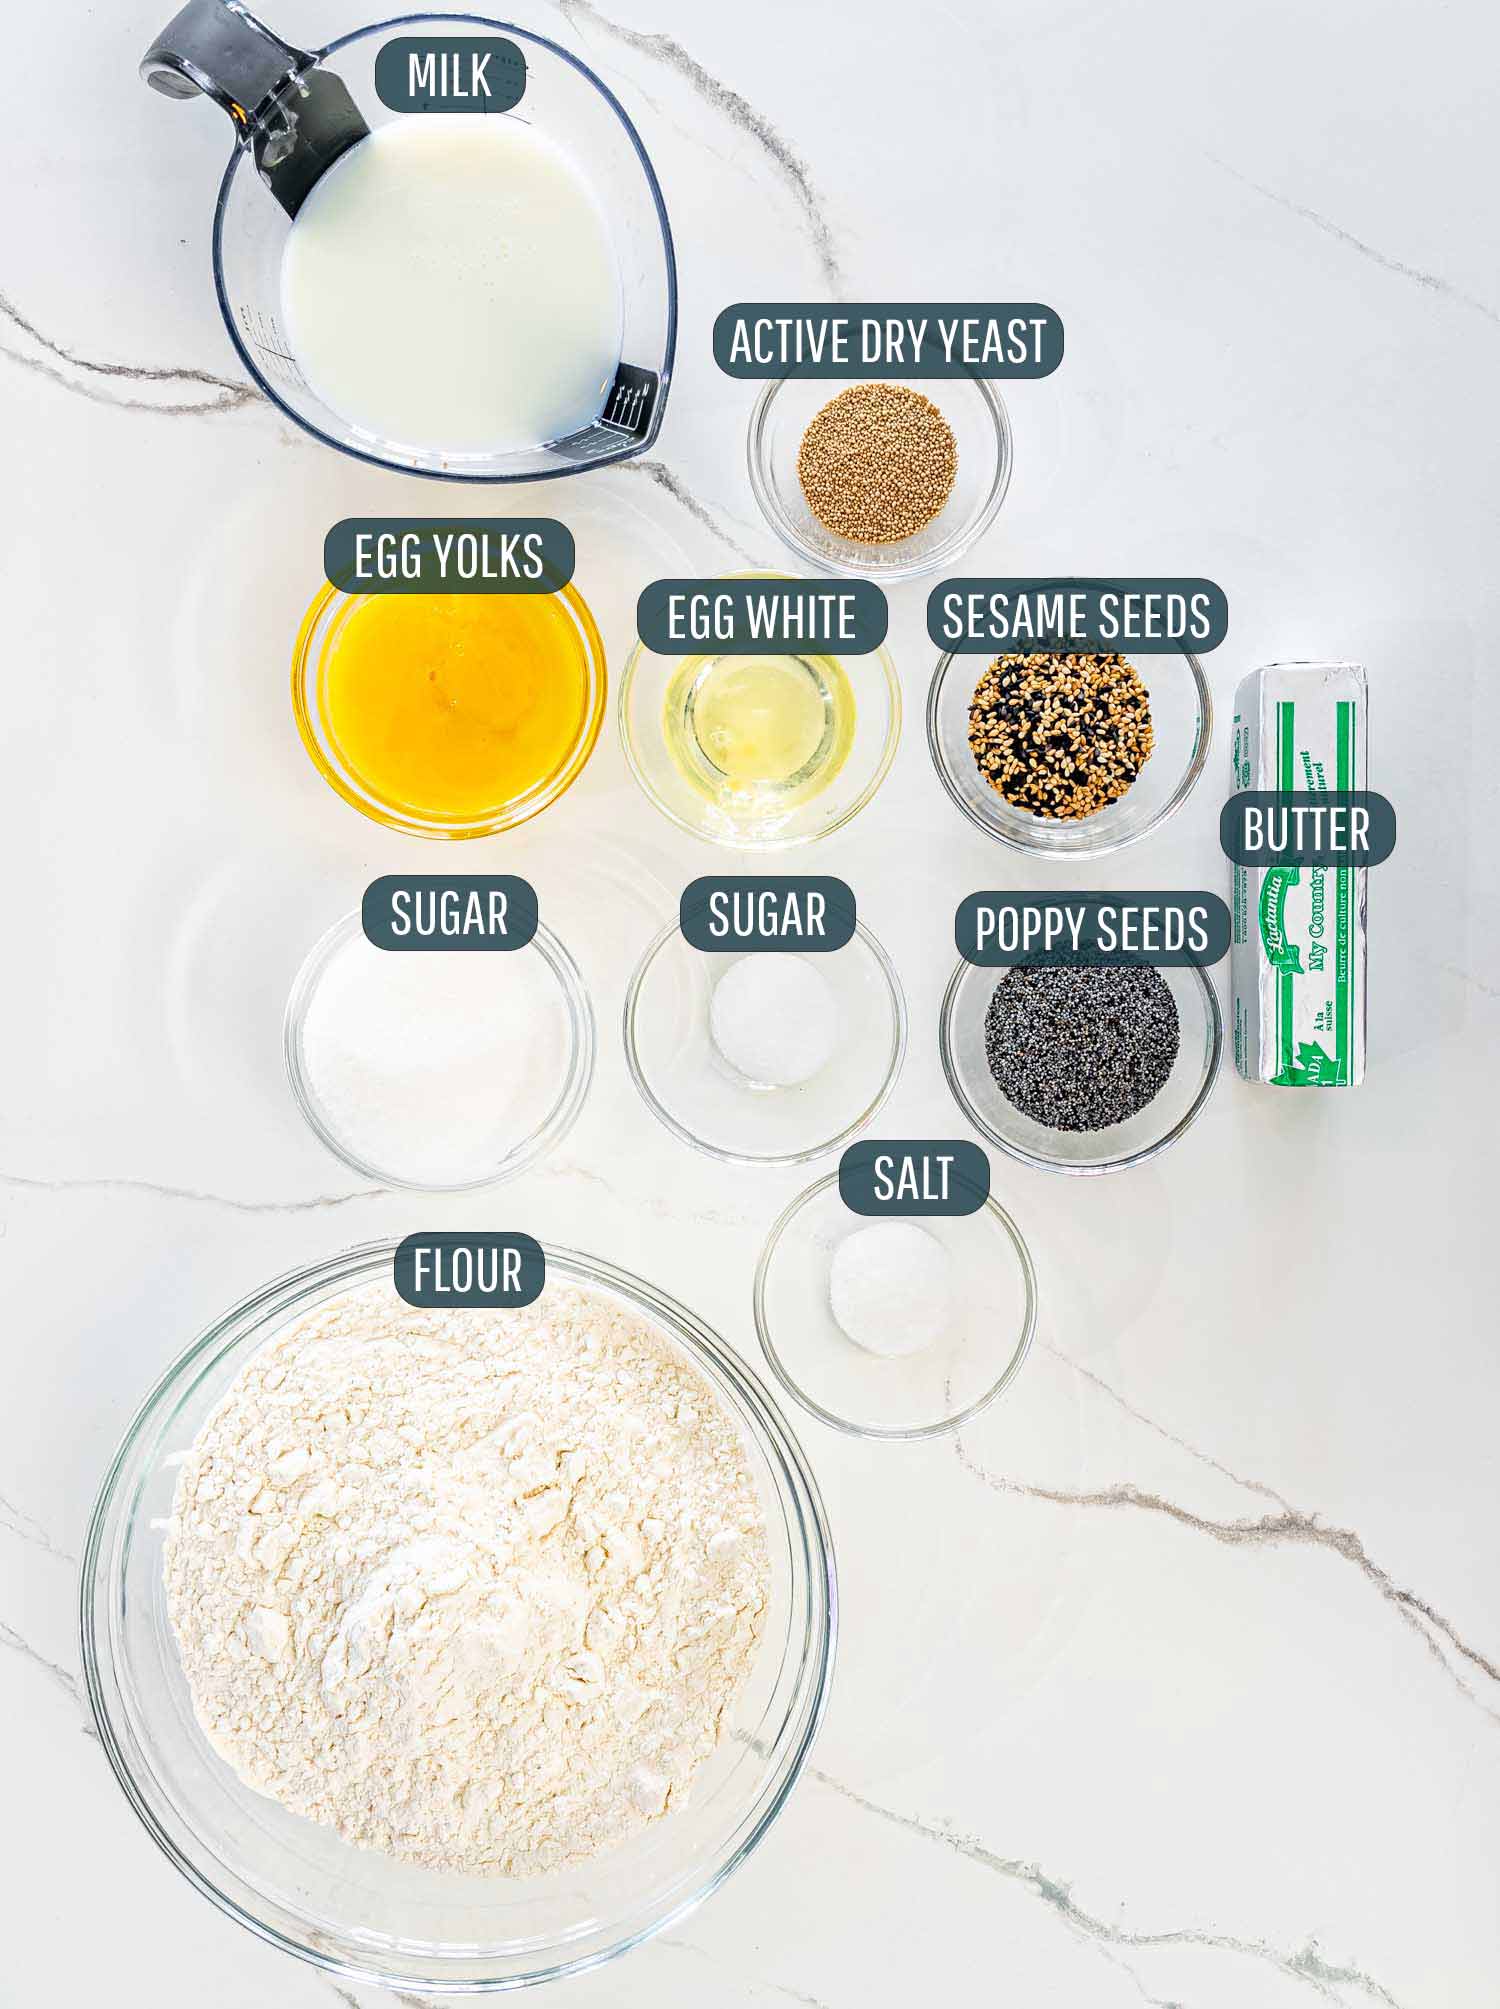
- Active Dry Yeast – Make sure to check the expiration date on your yeast. You can also use instant yeast if that’s what you have on hand, but you won’t need to activate it first.
- Sugar – I used granulated white sugar to feed the yeast and sweeten the dough a bit. Cane sugar will also work.
- Milk – You must use warm milk that is between 100°F and 110°F (38°C to 43°C). I like to use whole milk, but whatever is in your fridge will work.
- Butter – Always use unsalted butter to control the amount of added salt. The butter needs to be melted for this recipe.
- Egg Yolks – Used to add richness to the dough.
- Salt – A touch of salt is important to help develop the delicious flavor of the dough.
- Flour – Simple all-purpose flour is all you need.
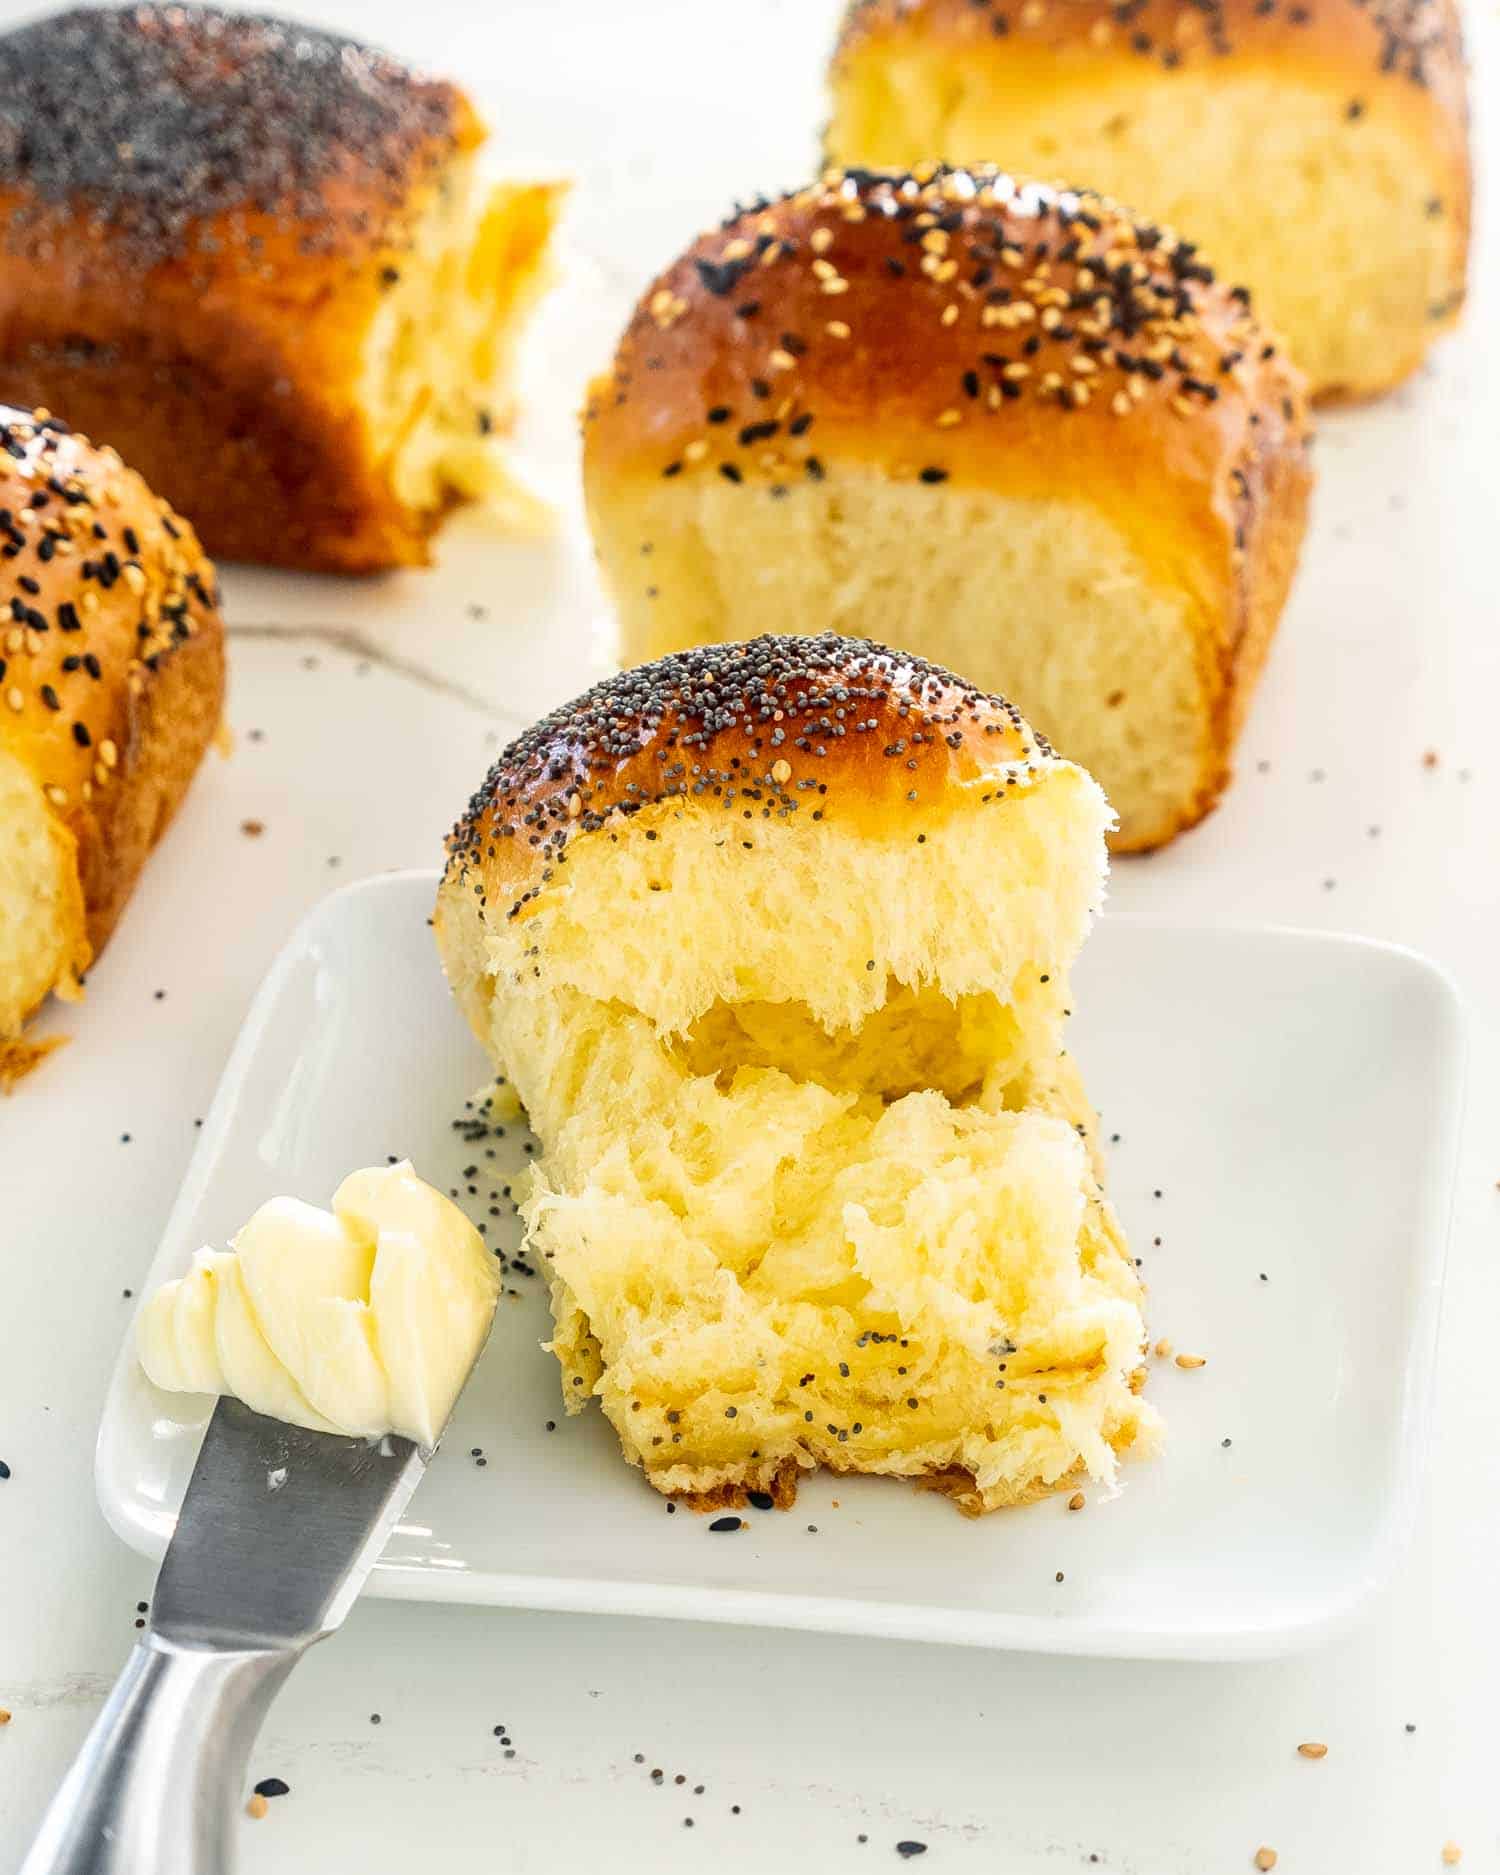
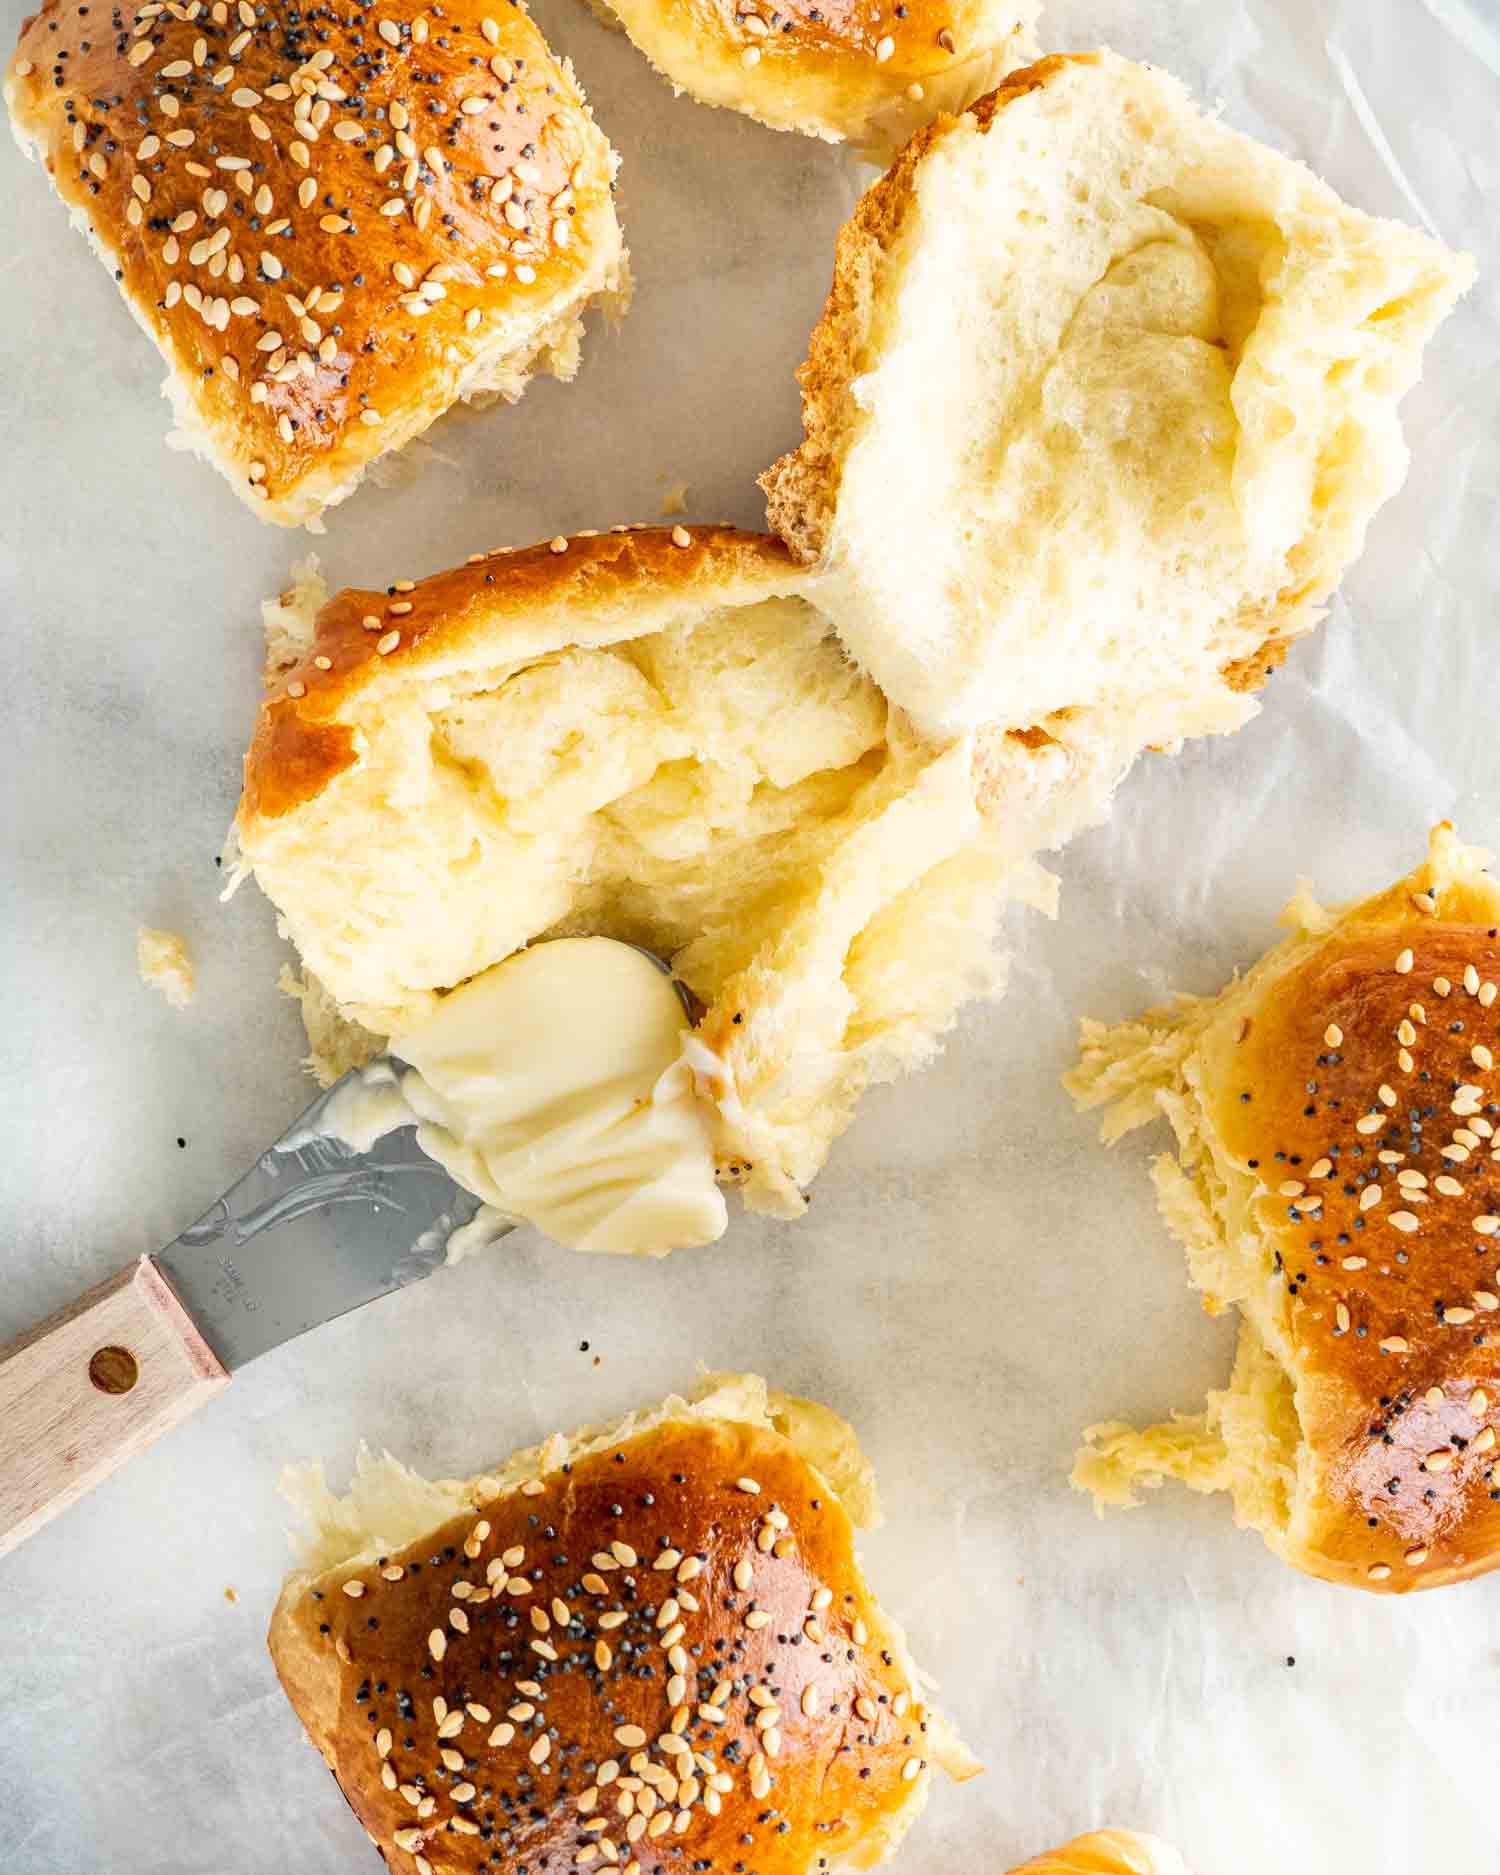
- Egg White – Used to make an egg wash that gives the rolls a nice glossy finish and adheres the seeds to the dough.
- Seeds – It’s optional, but I like to top my rolls with poppy seeds and sesame seeds.
Activate The Yeast
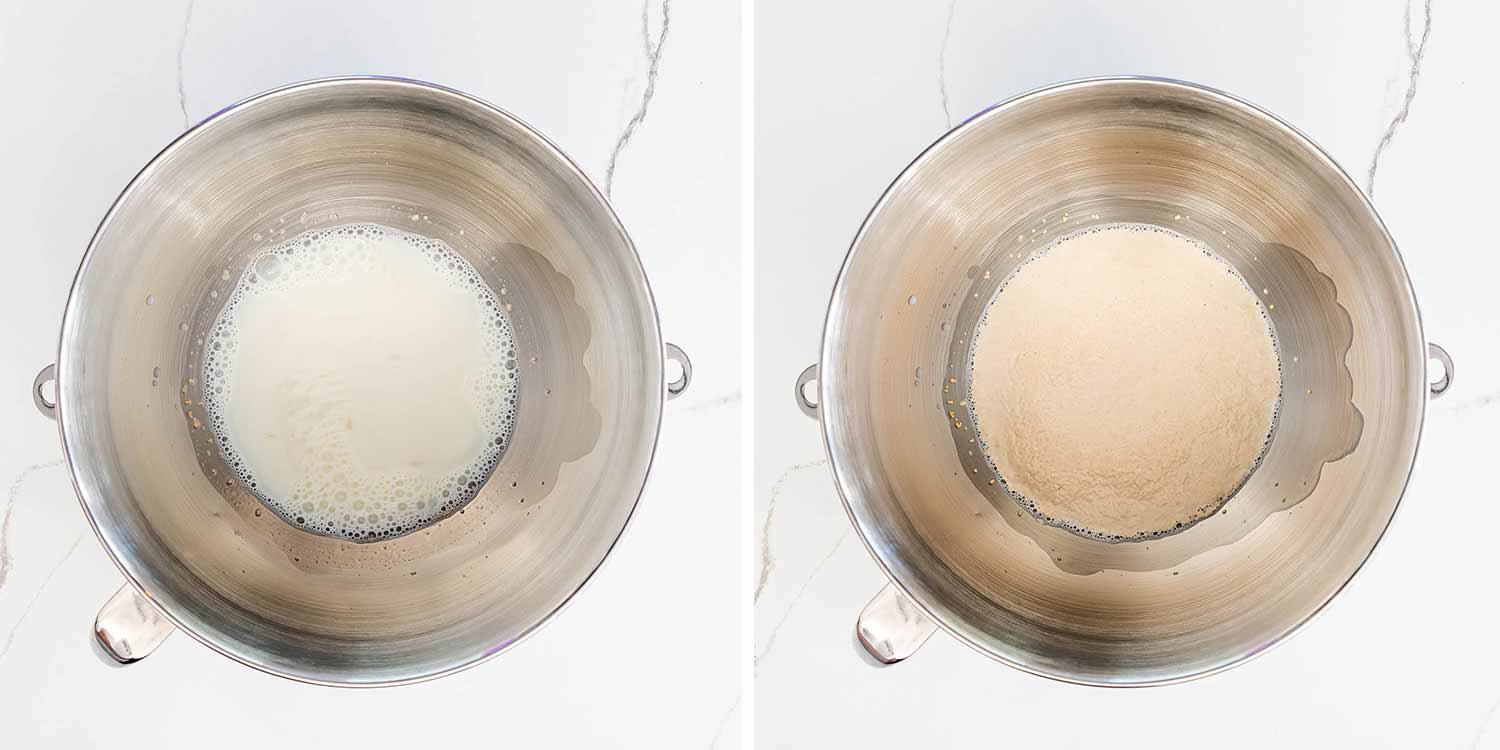
If using active dry yeast, activate the yeast first. You can also use instant yeast, and if doing so, you do not need to activate it. Just add it to the rest of the ingredients. Please note that the amounts of the ingredients don’t change. To activate the yeast mix it with a bit of sugar and warm milk. Give it a little stir and let it rest for 10 to 15 minutes, until it starts to froth up. See notes on yeast in the recipe card for more information.
Make The Dough
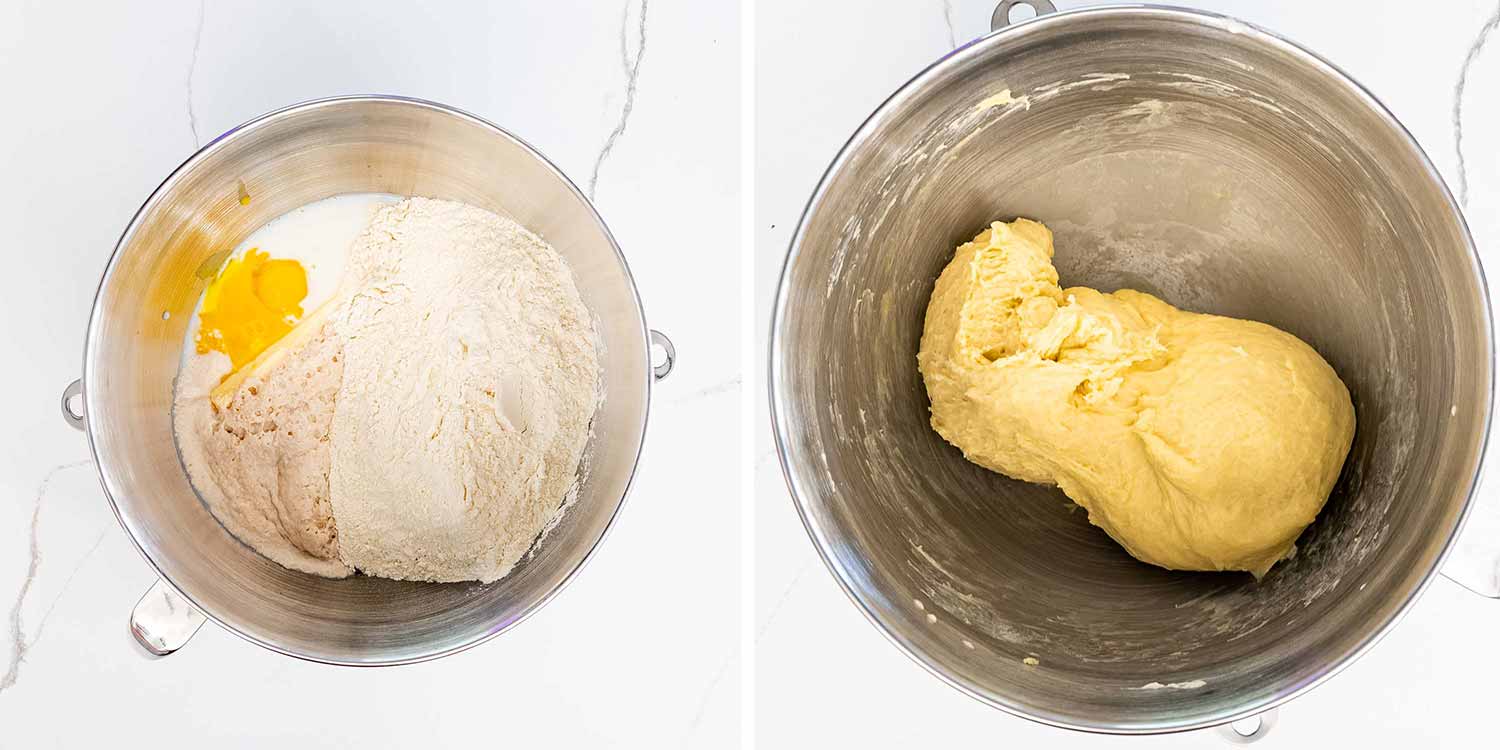
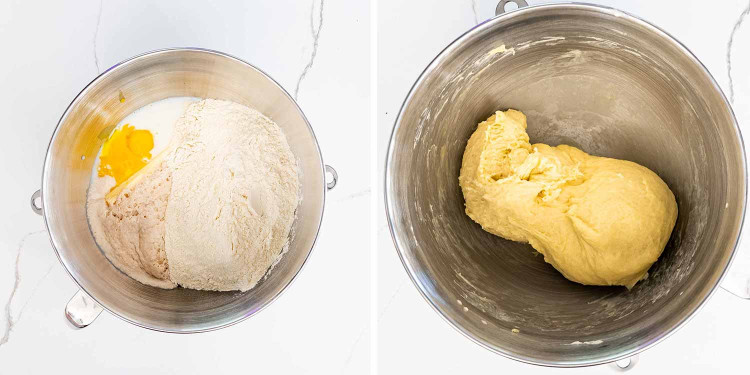
Add the rest of the ingredients to the bowl of your mixer and mix until the dough comes together and is pulling away clean from the sides of your bowl. The dough will be a little sticky, but not too much.
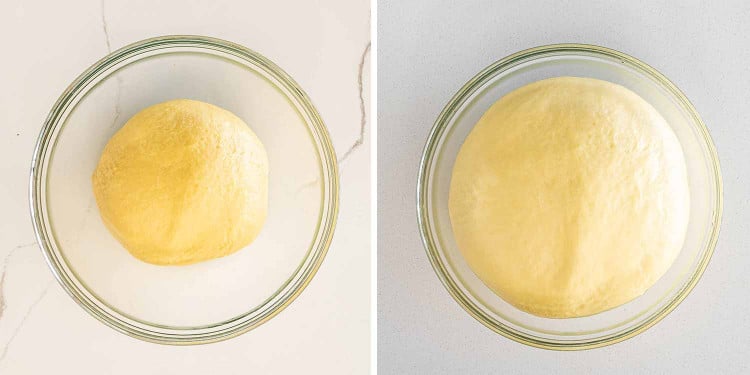
First Rise

You can let the dough rise in the bowl of my mixer or in another bowl. Just cover it with a damp towel or plastic wrap and let it rest in a warm environment until doubled in size.
Shape Into Rolls

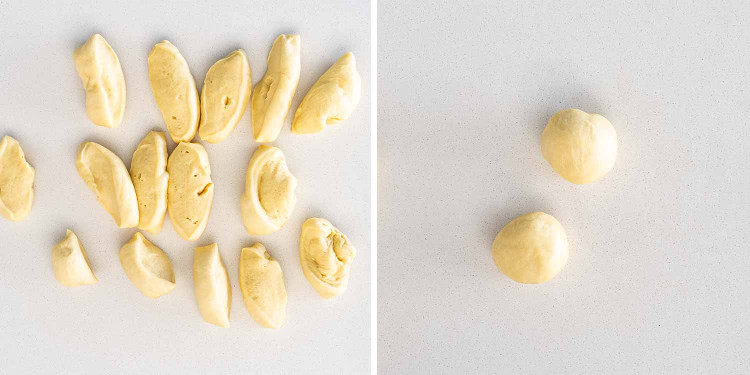
Once the dough has doubled in size, punch it down with your fist to deflate it a bit, then divide it into 16 equal size pieces. Shape it into rolls (watch video to see how) and place them into a baking dish.
Second Rise
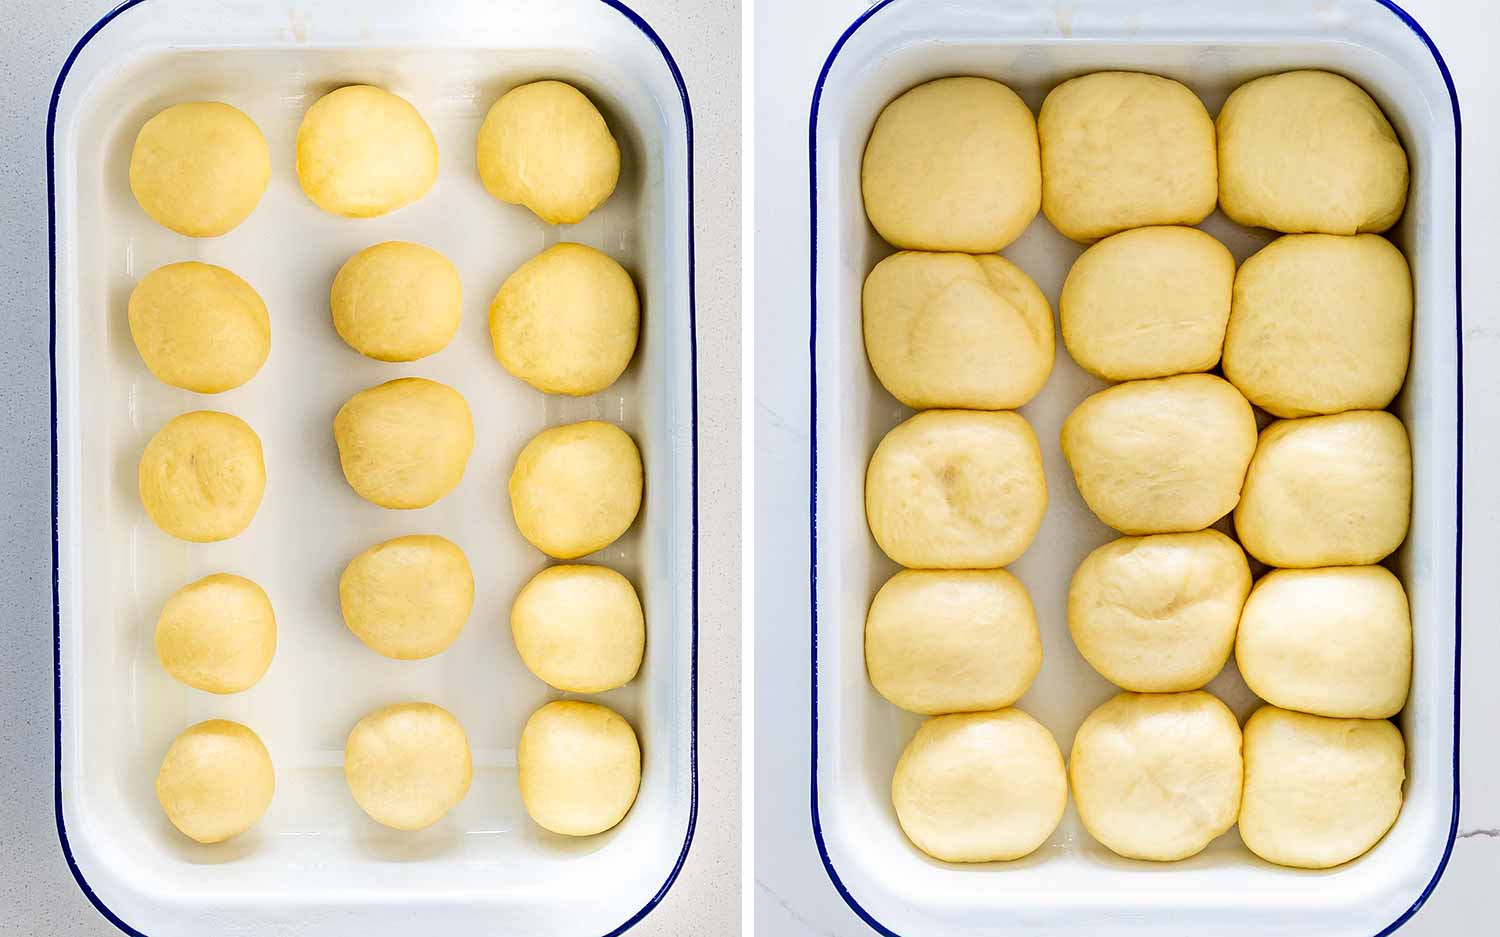
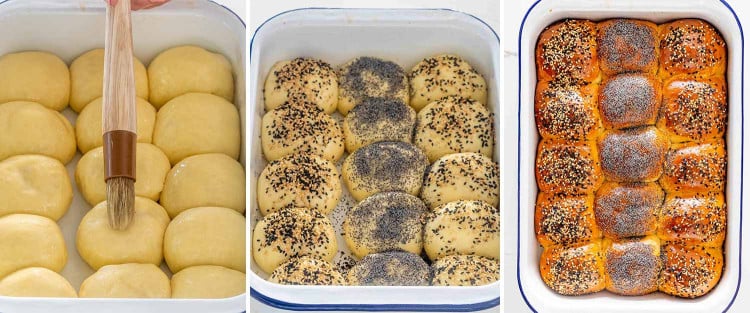
Cover the baking dish with plastic wrap and let the rolls rise a second time until doubled in size. It should take another 30 minutes or so.
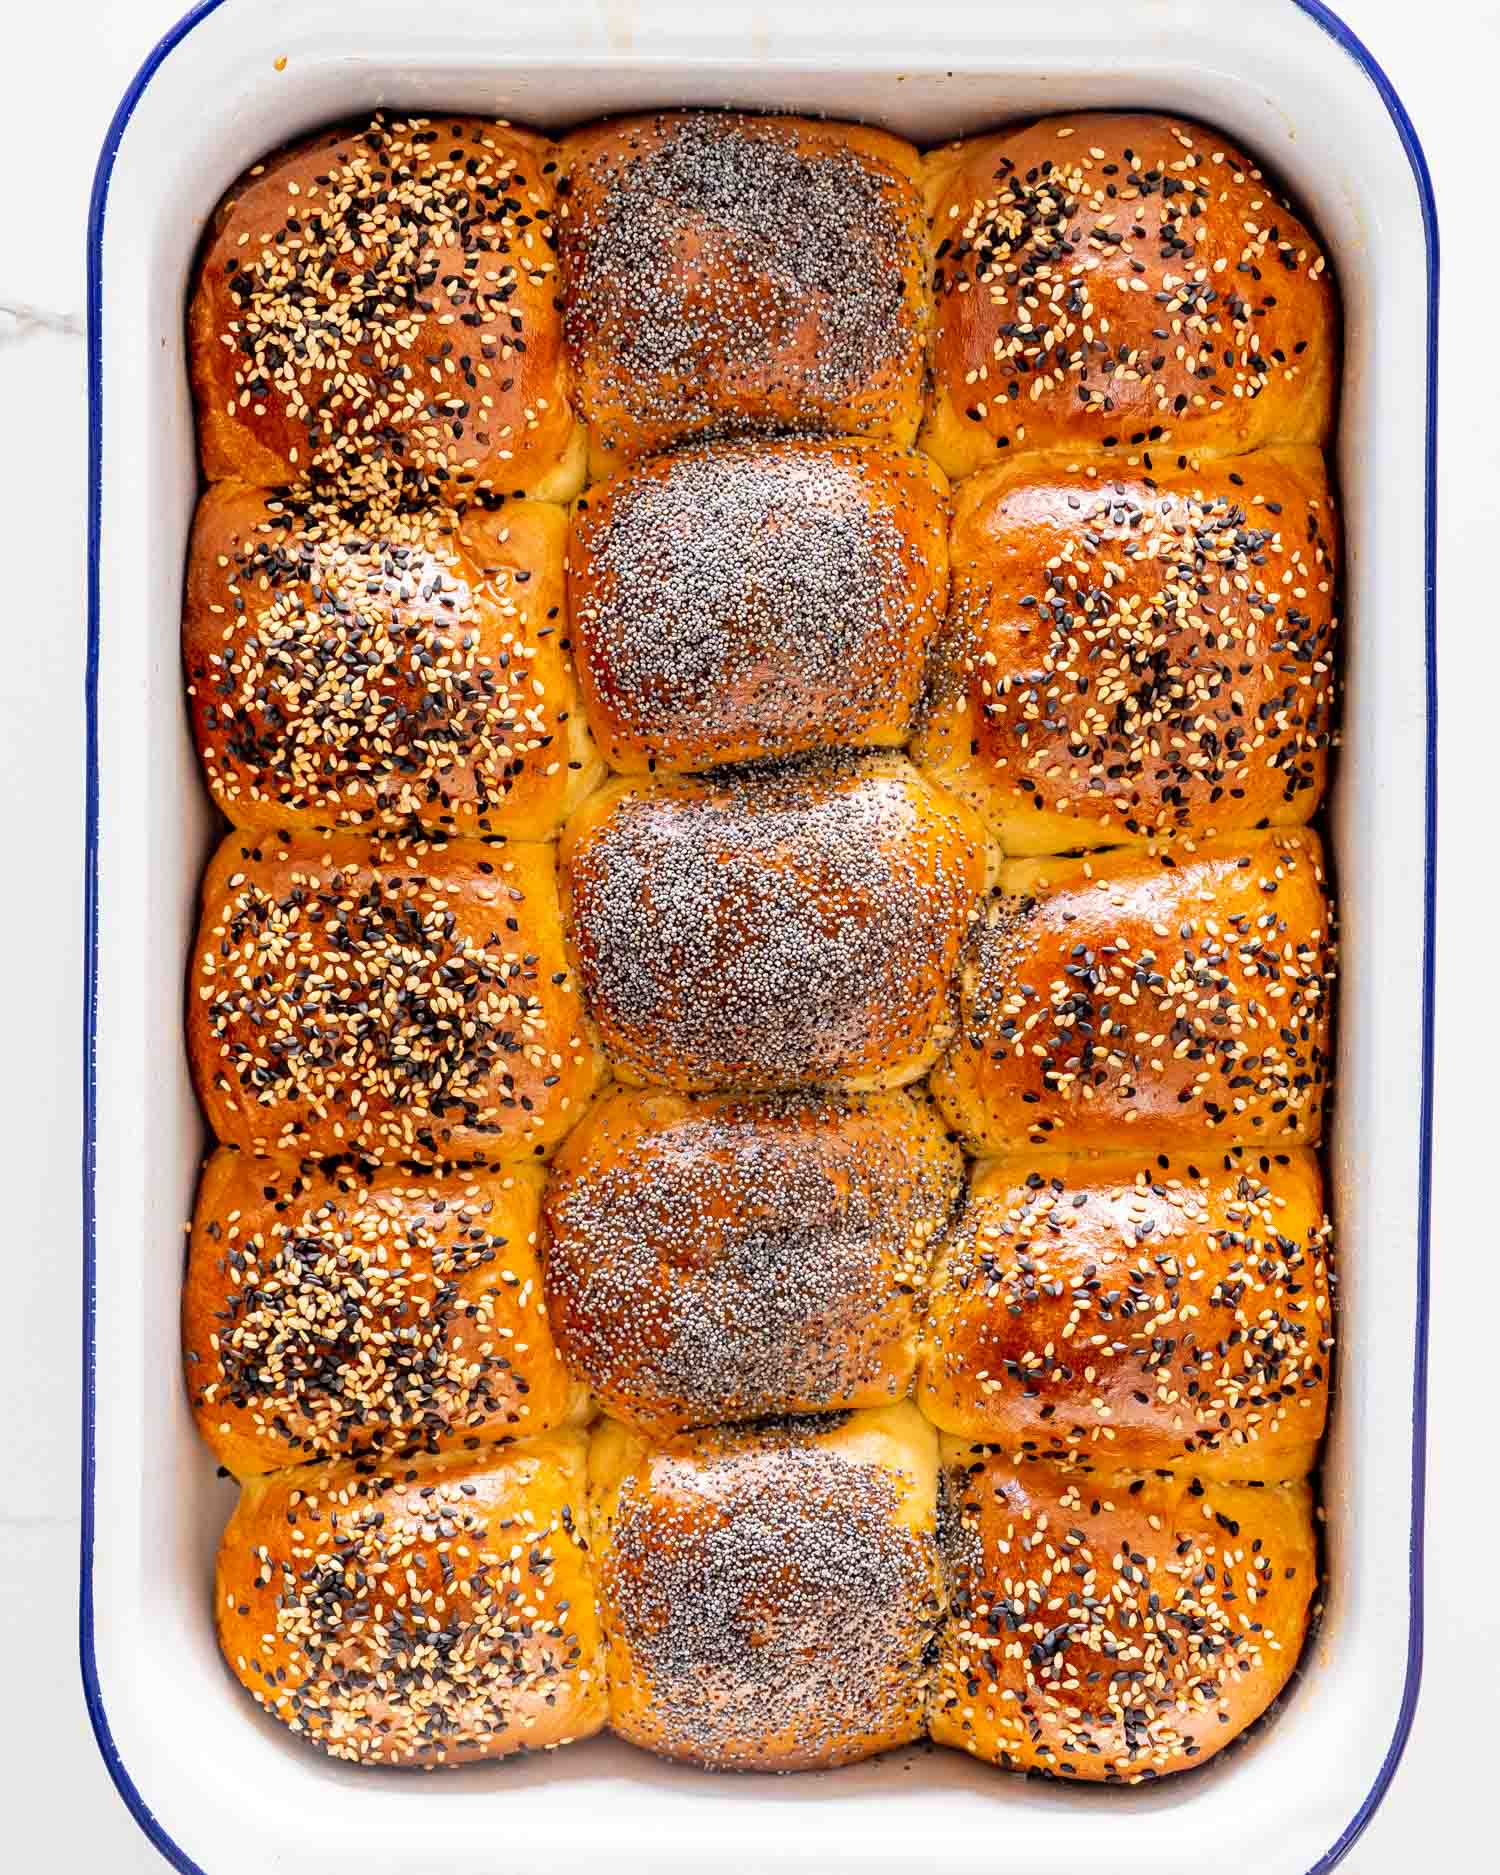
Top With Seeds And Bake

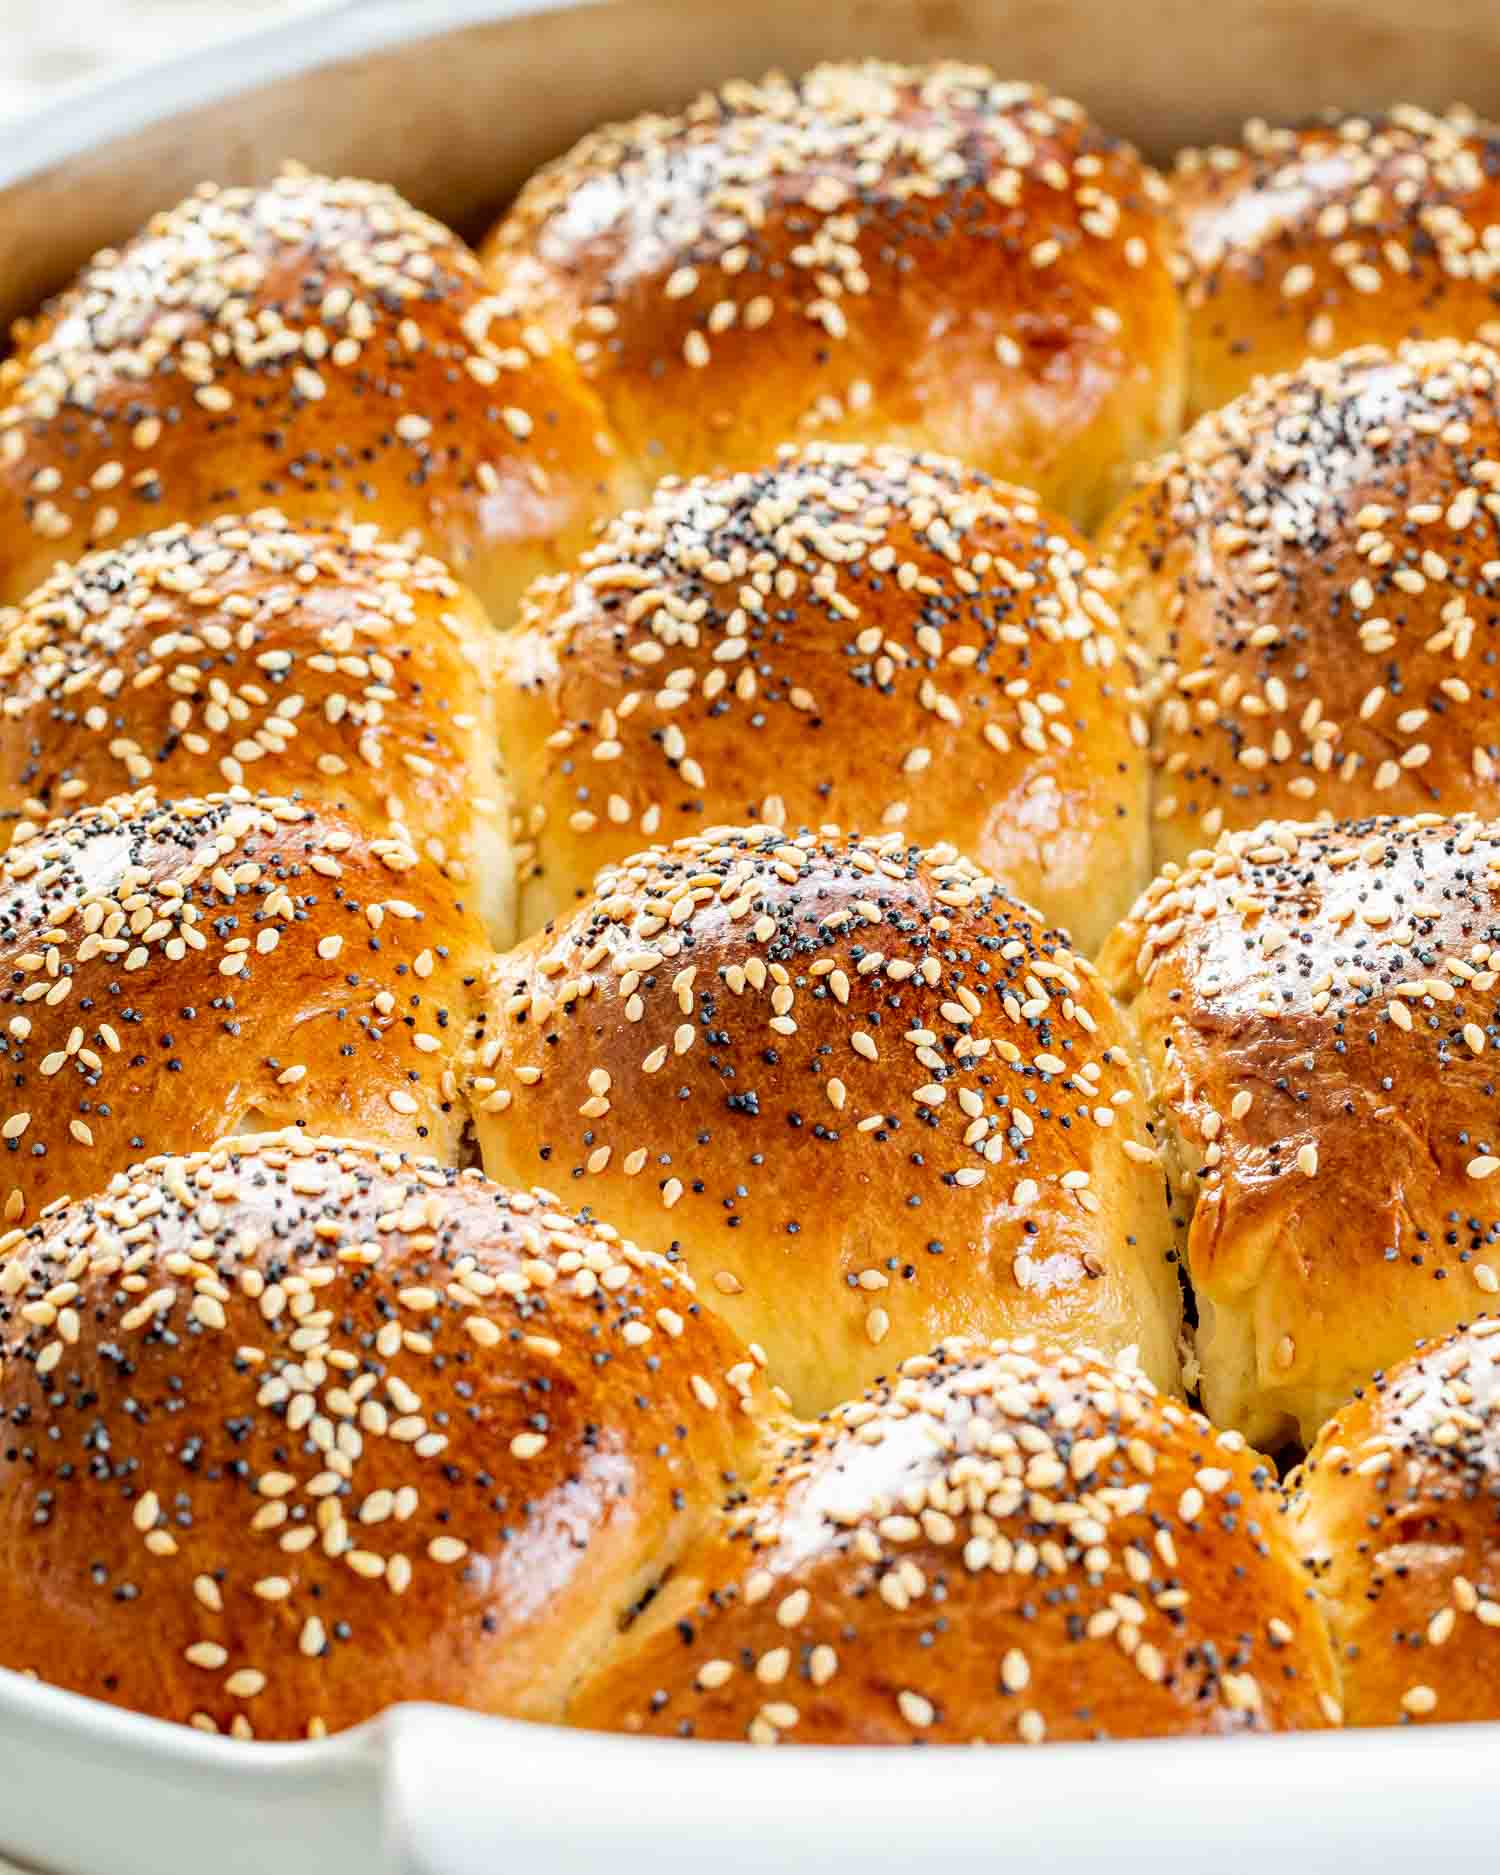
I like to brush my dinner rolls with a bit of egg to make them nice and shiny then sprinkle them with seeds such as poppy or sesame seeds. However, you can also brush the rolls with some melted butter. Bake the rolls in a preheated oven for about 30 minutes at 375°F (191°C) or until golden brown.
What If I Don’t Have A Stand Mixer?
No mixer, no problem. All you have to do is knead everything by hand. After you proof the yeast as instructed, if using active dry yeast, just add the rest of the ingredients to a large bowl and start by stirring everything with a wooden spoon until you can’t do it anymore. Transfer the dough to a clean work surface and knead by hand until all the flour is incorporated and you end up with a dough that is slightly sticky but soft to the touch.
Can I Use Instant Yeast?
Absolutely! It will even make your job easier since no proofing is required. That is basically the only difference between instant yeast and active dry yeast, no proofing required. Simply add the yeast to the rest of the ingredients and mix. Yes, you still need to add the milk, since that is most of your wet ingredients.
Expert Tips
- I’ve said this many times before but I’ll say it again and again and again. The secret to making great bread or dinner rolls is the yeast. If using active dry yeast, always make sure you proof the yeast first. This means that you’re proving that your yeast is alive. You usually proof it with warm water or milk, and sugar. When these 3 ingredients are combined, the yeast starts emitting bubbles of carbon dioxide.
- If your yeast doesn’t bubble up, do not continue with the recipe. Your bread or rolls will turn into a brick, it will not rise at all and it will all be a waste of ingredients. Also make sure that your water or milk is not too hot, if it’s over 140 F degrees, the yeast will die, which kind of defeats the purpose of proofing the yeast. The ideal temperature of the milk or water should be between 100-110°F.
- Resist the urge to add more flour to the dough, even if the dough seems sticky. Usually the ratio of flour to water is 2:1, so in this case if you add up all the wet ingredients together, you will get to that same ratio. While adding more flour will make the dough less sticky, you could end up with denser bread or rolls.
Develop The Gluten
While these rolls can be made “no knead” by just dumping all of the ingredients in a bowl and stirring them, the purpose of kneading is to develop gluten. By developing this gluten, your dough will rise nicely and you’ll end up with gorgeous high rolls instead of dense ones.
Allow Your Dough To Rise 2 Times
Most doughs require two rises. The first in the bowl and the second after shaping. These dinner rolls can be made the night before up until you shape them and place them in a baking pan. You can then cover them and place them in the fridge overnight. The rolls will continue to rise in the fridge but at a slower pace. The next morning, simply take them out from the fridge and let them come to room temperature before baking.
Give Your Rolls A Shiny Top
To get that nice golden, shiny top, brush your rolls with egg white or butter. Also, don’t be afraid to top them with your favorite seeds, such as poppy seeds, pepitas, sesame seeds, sunflower seeds, chia seeds, etc.
How To Store Leftover Dinner Rolls
Let the rolls cool completely. I usually place them on a cooling rack, and let them rest there until they come to room temperature, should take a couple hours. Wrap each roll in plastic wrap, tightly all around.
If you use a plastic storage bag, push out all the excess air from inside, the air will dry the bread quicker. You can keep them at room temperature for 2 to 3 days. If you refrigerate them, they will dry out at a faster rate.
How To Freeze Dinner Rolls
If you’re lucky enough to have some leftover dinner rolls, you can freeze them.
How To Freeze Unbaked Dinner Rolls
Make the dough then shape them into rolls immediately. Do not let the dough rise. Place the rolls on a baking sheet lined with parchment or wax paper. Cover the pan with plastic wrap and place the pan in the freezer. Leave them in the freezer until the freeze solid and are rock hard. Take the baking sheet out, place them in a freezer bag and back in the freezer they go. They should last about 2 weeks.
The day you want to serve them, place the frozen rolls on a baking sheet. Cover the pan and let them rise. Speed up the process by placing them in a warm oven. I usually preheat my oven to the lowest setting, then turn it off and let me dough rise in there, all nice and warm.
Once the rolls have doubled in size, brush them with egg or butter, top them with seeds if preferred and bake as instructed.
How To Freeze Baked Rolls
Bake the rolls as instructed. Let them cool completely in the pan, then wrap them tightly with aluminum foil. Do not use plastic wrap as it will make the rolls soggy. Place the foil-wrapped pan in a freezer bag or storage container. Place them in the freezer and store them for up to 3 weeks. I wouldn’t keep them longer than that, as they might start to develop frost and freezer burn.
To thaw the dinner rolls, remove the rolls from the freezer the night before you want to serve them. Remove the foil-wrapped rolls out of the freezer bag or storage container and let them thaw at room temperature overnight. You can serve them like this, but I prefer to reheat them in the oven for about 10 minutes at 300°F.

Other Homemade Dinner Rolls To Try
- Soft Buttermilk Dinner Rolls
- Hawaiian Rolls
- Texas Roadhouse Rolls
- Crescent Rolls
- Homemade Slider Buns
- Honey Rolls
Before You Begin! If you make this, please leave a review and rating letting us know how you liked this recipe! This helps our business thrive & continue providing free recipes.
Classic Dinner Rolls
Video
Ingredients
- 2½ teaspoon active dry yeast ((1 package) or instant yeast)
- 1 tablespoon sugar
- 1 cup milk (warm to the touch, between 100 and 110 F degrees)
- 8 tablespoons butter (unsalted, melted)
- ⅓ cup sugar
- 3 egg yolks
- 1 teaspoon salt
- 4 cups all-purpose flour
- 1 egg white (lightly beaten for brushing rolls)
- 2 tablespoons poppy seeds (optional)
- 2 tablespoons sesame seeds (optional)
Before You Begin! If you make this, please leave a review and rating letting us know how you liked this recipe! This helps our business thrive & continue providing free recipes.
Instructions
- Activate yeast: To the bowl of your mixer add the yeast, the 1 tbsp of sugar and the warm milk. Gently whisk it all together and allow it to rest for 10 to 15 minutes. After this time, if the yeast is good, it will froth.

- Make dough: Add the butter, sugar, egg yolks, salt, and flour to the yeast mixture. Mix with the dough hook on low speed, until it's all incorporated. Increase to medium high speed and knead for another 5 minutes. The dough should be slightly sticky but still soft to the touch.
- First rise: Place the dough in a lightly greased bowl, or the bowl from your mixer and cover it with plastic wrap. Let it rise until it doubles in size, about 45 minutes to an hour. See notes for rising.
- Prepare baking dish: I normally use a 9×13 inch baking dish for these, so lightly grease your baking dish with cooking spray or butter.
- Form rolls: Dust your work surface with a little flour, place the dough then press it down so that it deflates. Shape it into a ball. No need for additional kneading. Divide the dough in 16 equal pieces. To shape each piece into a roll, take a piece and flatten it with your palm or fingers. Fold it up into a ball by pinching the sides together, turn it over and roll it briefly. See video. Place the roll with the smooth side up onto the prepared baking sheet. Repeat with remaining dough pieces.
- Second rise: Cover the pan with plastic wrap or a clean kitchen towel and let the dough rise again until it's doubled in size, another 30 minutes or so.

- Prepare oven: Preheat the oven to 375°F.
- Brush rolls with eggs: Remove the plastic wrap or kitchen towel and brush the rolls with the egg white, so that they end up nice and shiny. Sprinkle with poppy seeds or sesame seeds, if preferred.

- Bake: Bake the rolls for 30 minutes or until golden brown.


Notes
- RISING: Preheat your oven to 200 F degrees, turn off the oven, then place the bowl with the dough in the oven until it doubles in size. Because this is a draft free environment and warm, the dough will rise faster, should take about 30 minutes.
- INSTANT YEAST: If using instant yeast, no proofing is required. Simply add the yeast along with the rest of the ingredients.
- Always check the expiration date on your yeast and make sure it hasn’t expired. All your yeast products whether it’s in a jar or a package should be stamped with a “Best if Used by” date. Always make sure you check this date, even when you purchase the yeast, who knows it could have been on the shelf past its expiry date.
- To keep your yeast fresh and longer lasting, unopened yeast packages or jars should be stored in a cool or dry place such as your cupboard. However, you can also store your yeast in the fridge or freezer. If you do store it in the freezer and need to use yeast for your baking, make sure you take out the amount you need and let it sit at room temperature for at least half hour before using.
- Once your yeast package or jar has been opened, you must refrigerate the yeast or freeze it in an airtight container.
- One thing to remember about your yeast, is that it is a living organism and over time it will lose activity, even if you’ve never opened the jar or package. So if you don’t bake often, buy the smaller yeast packages rather than a big jar of yeast.
Nutrition Information
Notice: Nutrition is auto-calculated for your convenience. Where relevant, we recommend using your own nutrition calculations.

Can I do the second rise overnight in the refrigerator?
Yes, you can do the second rise of the dinner rolls in the refrigerator overnight. This slow rise can actually enhance the flavor. Just let them come to room temperature before baking.
I want to use Rapid Rise yeast. How do I adjust the directions?
With Rapid Rise yeast, you can skip the first proofing step. Simply mix the yeast directly with your dry ingredients, then add the warm liquids, knead, shape the rolls, and let them rise once before baking.
I’ve just made these bread buns to go with our Christmas dinner!
Beautiful! This recipe will be my standard from now on! Thank you for the recipe, and Merry Christmas!
OMG this is the best! The search is over, I found what I’ve been looking for in a dinner roll. The bread is so soft, fluffy and delicious on its own, I tried many of your bread recipes and they never disappoint…thank you so much Jo. Regards from your avid fan in the Philippines. Be safe!
Thanks, Ellen! So glad you love this recipe!
I made these rolls yesterday to go with braised beef shanks I was serving for dinner. I did not have any poppy seeds so sprinkled some “Everything Bagel” seasoning on them When I took them out of the oven I brushed them with a wee bit of melted butter. They were a perfect match with the shanks. My first time ever making rolls. My husband and guests were very pleased with the results. I will be making them again ! Thanks for a great recipe !!
My pleasure, so glad you liked them!
Could I use Fleischmann’s active dry yeast packet, even though it’s 2 1/4 tsp?
Yes!
These were absolutely delicious!! So fluffy, soft, and sweet. I did end up taking them out about 7 minutes early because we have a convection oven that bakes things faster. But so delicious!
That’s great! So happy they turned out so good for you!
The whole family loved these rolls. I liked letting the stand mixer do all the hard work and still getting gorgeous, fluffy, rich rolls. I doubled the recipe and cooked the rolls on greased parchment on a cookie sheet. The only took about 20 minutes and looked just like the picture.
could u use whole wheat flour instead of all purpose?
Yeah, but I would mix half whole wheat and half white.
is it okay to sub the butter for margarine
You can but I always prefer butter!
You dinner rolls are so beautiful
Thanks!
Hi chef,
these fluffy rolls do look amazing and irresistible!!
can I use this recipe for cinnamon rolls??also why don’t you use whole eggs because I want to know the difference between whole eggs and egg yolks in dough making??I’ve found 2 recipes for cinnamon rolls and both use almost the same ingredients but the 1st recipe use 3 egg yolks and the 2nd one use 2 whole eggs so please tell me which one do you recommend and why?
These dinner rolls use egg yolks because it results in a richer and denser dinner roll. The egg yolks not only give the rolls a gorgeous color but they also add fat, richness and flavor to the bread. I suppose you could use this to make cinnamon rolls, if you look at my cinnamon roll recipe (https://www.jocooks.com/recipes/cinnabons-cinnamon-rolls/) you’ll find the recipe is quite similar, but it does use whole eggs and more sugar. The egg whites provide additional protein. The high level of protein in the egg whites helps sweet doughs bake to a relatively light texture. Hope this helps.
Excellent !!! Fast and delicious. A rare combination. Made this for dinner tonight. Will be making many time more. Thanks.
Followed directions as given and voila! Perfect! My husband loves them as do l! Only had to bake them for 20 minutes. I’m going to try the Parker house rolls now. By the way, this is my favorite cooking website. Thanks Jo.
You are going to love the rolls! They were so soft and delicious. We’re so happy to hear that you love the recipes, thank you for such a lovely comment 😊
Brilliant recipe!
Tried this last night and was delighted with results- looked just like the pictures.
Thought it was too sticky but as instructed resisted the urge to add more flour .Did not have a baking tin the correct size so put the dough in an old lasagna dish with fingers crossed.
Need not have worried this recipe is very forgiving
Have not made bread for decades but will be trying the others on the site now
Thanks
I’m so happy they turned out for you, Chryl!