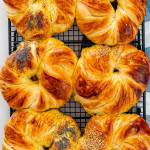
Brioche Buns
These Brioche Buns are incredibly flaky, buttery, fragrant and melt in your mouth delicious! With this simple recipe, you'll be surprised how easy it is to make these right at home!
Servings: 8
Calories: 485kcal
Equipment
Ingredients
- 1 cup water lukewarm
- 2 tablespoon sugar granulated
- 1 tablespoon active dry yeast
- 1 cup milk lukewarm
- ½ cup vegetable oil
- 2 large eggs separated, at room temperature
- 1 teaspoon salt
- 4-6 cups all-purpose flour
- 6 tablespoon butter unsalted, softened
Optional
- 1 teaspoon vanilla paste
- 1 tablespoon sesame seeds
- 1 tablespoon poppy seeds
Instructions
Make Dough
- Activate yeast: In the bowl of your mixer add the warm water, a tbsp of the sugar and the active dry yeast. Stir and let it rest for 5 to 10 minutes until frothy.
- Add the rest of the wet ingredients: Add the rest of the sugar, milk, oil, salt, egg whites and roughly whisk everything together.
- Make the dough: Add 2 cups of the flour to the bowl and start mixing on low for a couple minutes. Add more flour, a cup at a time, until the dough comes together but is still a bit sticky and soft. I used 4 cups of flour, but you might need a bit more flour than I did. The dough should be a bit sticky, elastic and should spring back when poked with your finger. Using an oiled plastic bench scraper scrape the dough from the bowl and place it in a well oiled bowl. Cover the bowl with plastic wrap and let it rise in a warm, draft free environment until doubled in size, 1 to 2 hours.
Form The Buns
- Prep the oven and baking sheets: Preheat the oven to 375°F. Line 2 baking sheets with parchment paper.
- Roll out the dough: Punch down dough to release the air. Oil your work surface well, with a couple tablespoons of oil. Transfer the dough to the work surface and using your fingers spread the dough into a big rectangle, that's about 20 x 16 inches. The dough should be soft enough that you can easily spread it. Alternatively you can use a rolling pin.
- Create flaky layers: Spread about 3 tbsp of the butter over the surface of the dough. Fold in thirds, then use your fingers again to spread the dough a bit more. Spread another 2 tbsp of the butter over the new surface of the dough and fold it in thirds again, just like folding a letter. Spread the dough again a bit then spread the remaining butter over the top. Fold it in thirds one last time. Spread the dough so that it's about 12 inches by 8 inches. Basically we just created layers of dough with butter in between, similar to making croissants.
- Form buns: Using a pizza cutter cut the dough into 8 long strips, each strip about 1 1/2 inches wide. Fold each rope in two and twist it, then bring the ends together and pinch them to connect the rope. If your hands stick to the dough, just make sure to oil a bit. Place the buns on the prepared baking sheet, only 6 will fit on a baking sheet, so you'll have to bake the other 2 separately.
Finish And Bake
- Brush with yolks: Whisk the egg yolks wth the vanilla paste (optional), then generously brush the buns with this yolk mixture. If you wish, you can sprinkle the buns with some poppy seeds or sesame seeds.
- Bake: Transfer the baking sheet to the oven and bake 20 to 25 minutes or until golden brown. Let them cool for 5 minutes on the baking sheet then transfer to a cooling rack to cool completely.
Notes
- Once your yeast package or jar has been opened, you must refrigerate the yeast or freeze it in an airtight container.
- Always check the expiration date on your yeast and make sure it hasn’t expired. All your yeast products whether it’s in a jar or a package should be stamped with a “Best if Used by” date.
- Dough thrives in a warm, draft-free environment. If your oven has a “proof” function, then use it. The “proof” function preheats the oven to 100 F degrees, causing a warm, but not hot environment for your dough to rise nicely. If your oven doesn’t have this “proof” function, I would still use the oven. What I usually do is preheat the oven to 200F degrees, or whatever the lowest setting is for it. Once it reaches that temperature, turn off the oven, then place the dough in there to rise. This will speed up the proofing process tremendously.
- The amount of flour you use in these buns totally depends on your environment. It could vary greatly, 4 to 6 cups. I live in a very dry environment, so for me I always have to use less flour than a recipe specifies. If you live in a humid environment, more flour is required.
- Note that the dough is so soft, you don't even have to roll it with a rolling pin, you can just use your fingers to spread out the dough.
- Brioche buns truly are best enjoyed the day you make them, but if you do have some leftover buns, they will last up to 3 days at room temperature. I usually just place them in a ziploc bag.
- These brioche buns can actually be frozen and will last in the freezer for up to 3 months. Just make sure they are completely cooled to room temperature. Once cooled wrap them in plastic wrap individually then place them in a ziploc bag and freeze.
Nutrition
Serving: 1bun | Calories: 485kcal | Carbohydrates: 53g | Protein: 10g | Fat: 26g | Saturated Fat: 18g | Trans Fat: 1g | Cholesterol: 72mg | Sodium: 326mg | Potassium: 145mg | Fiber: 2g | Sugar: 5g | Vitamin A: 379IU | Vitamin C: 1mg | Calcium: 82mg | Iron: 3mg