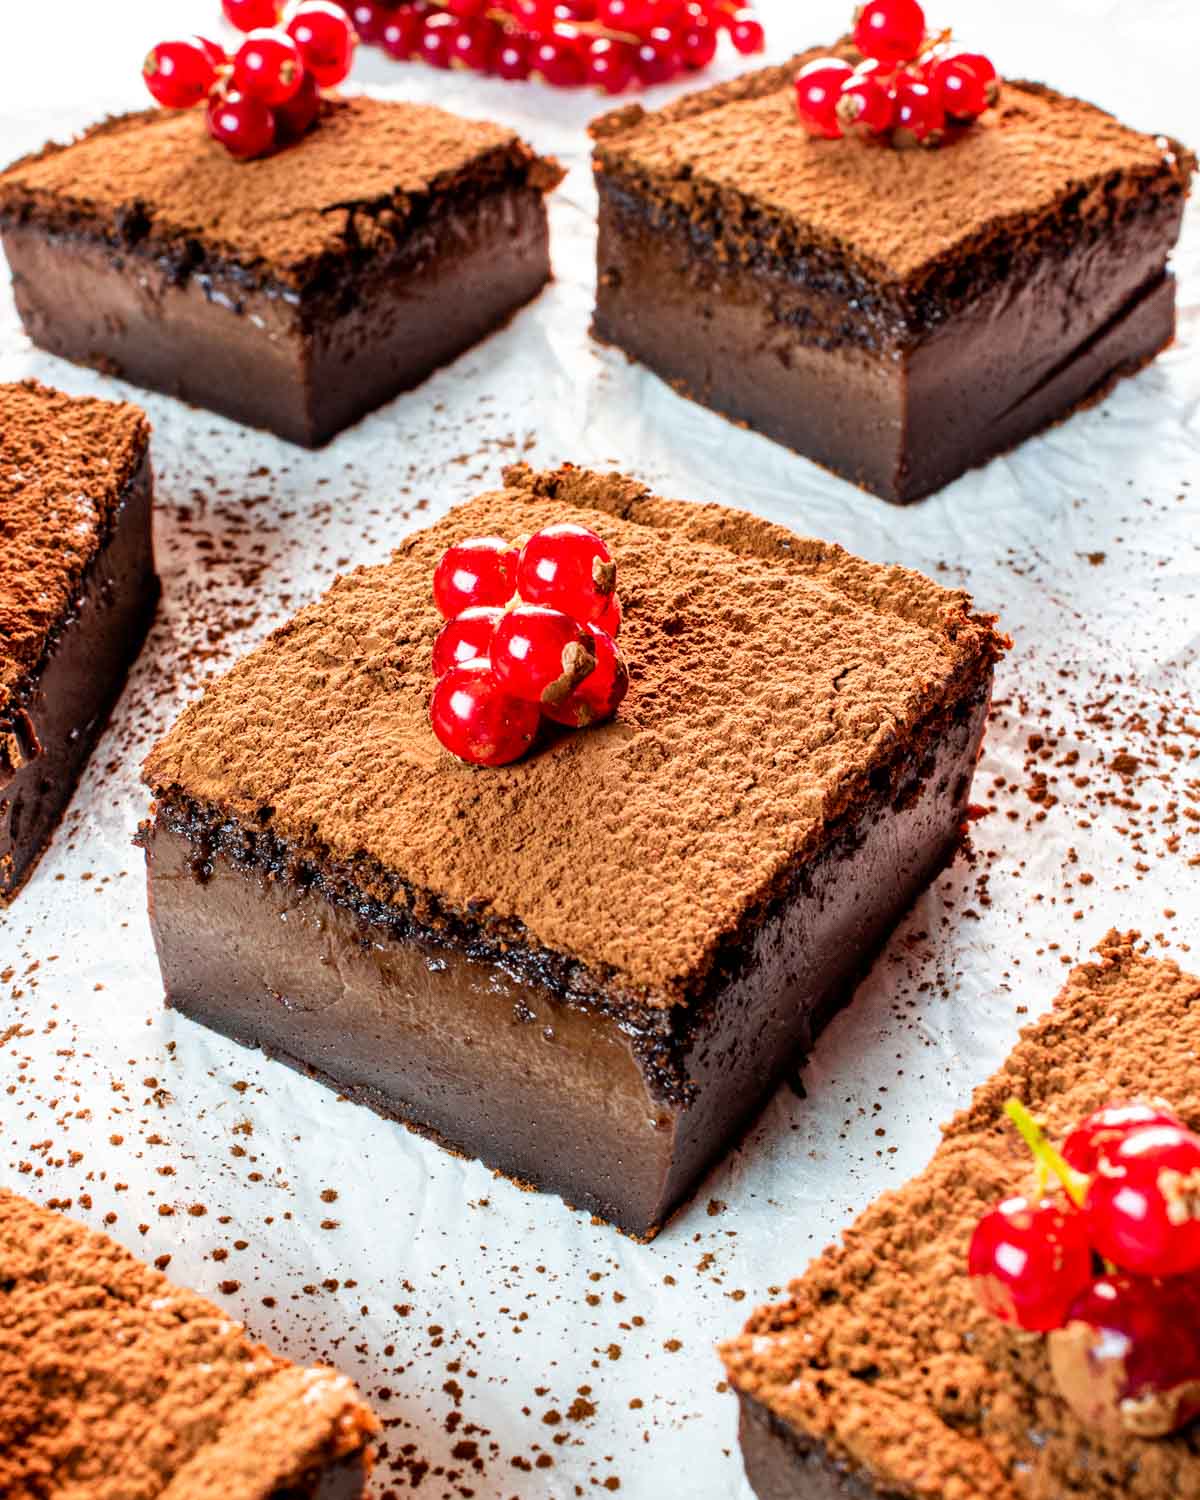
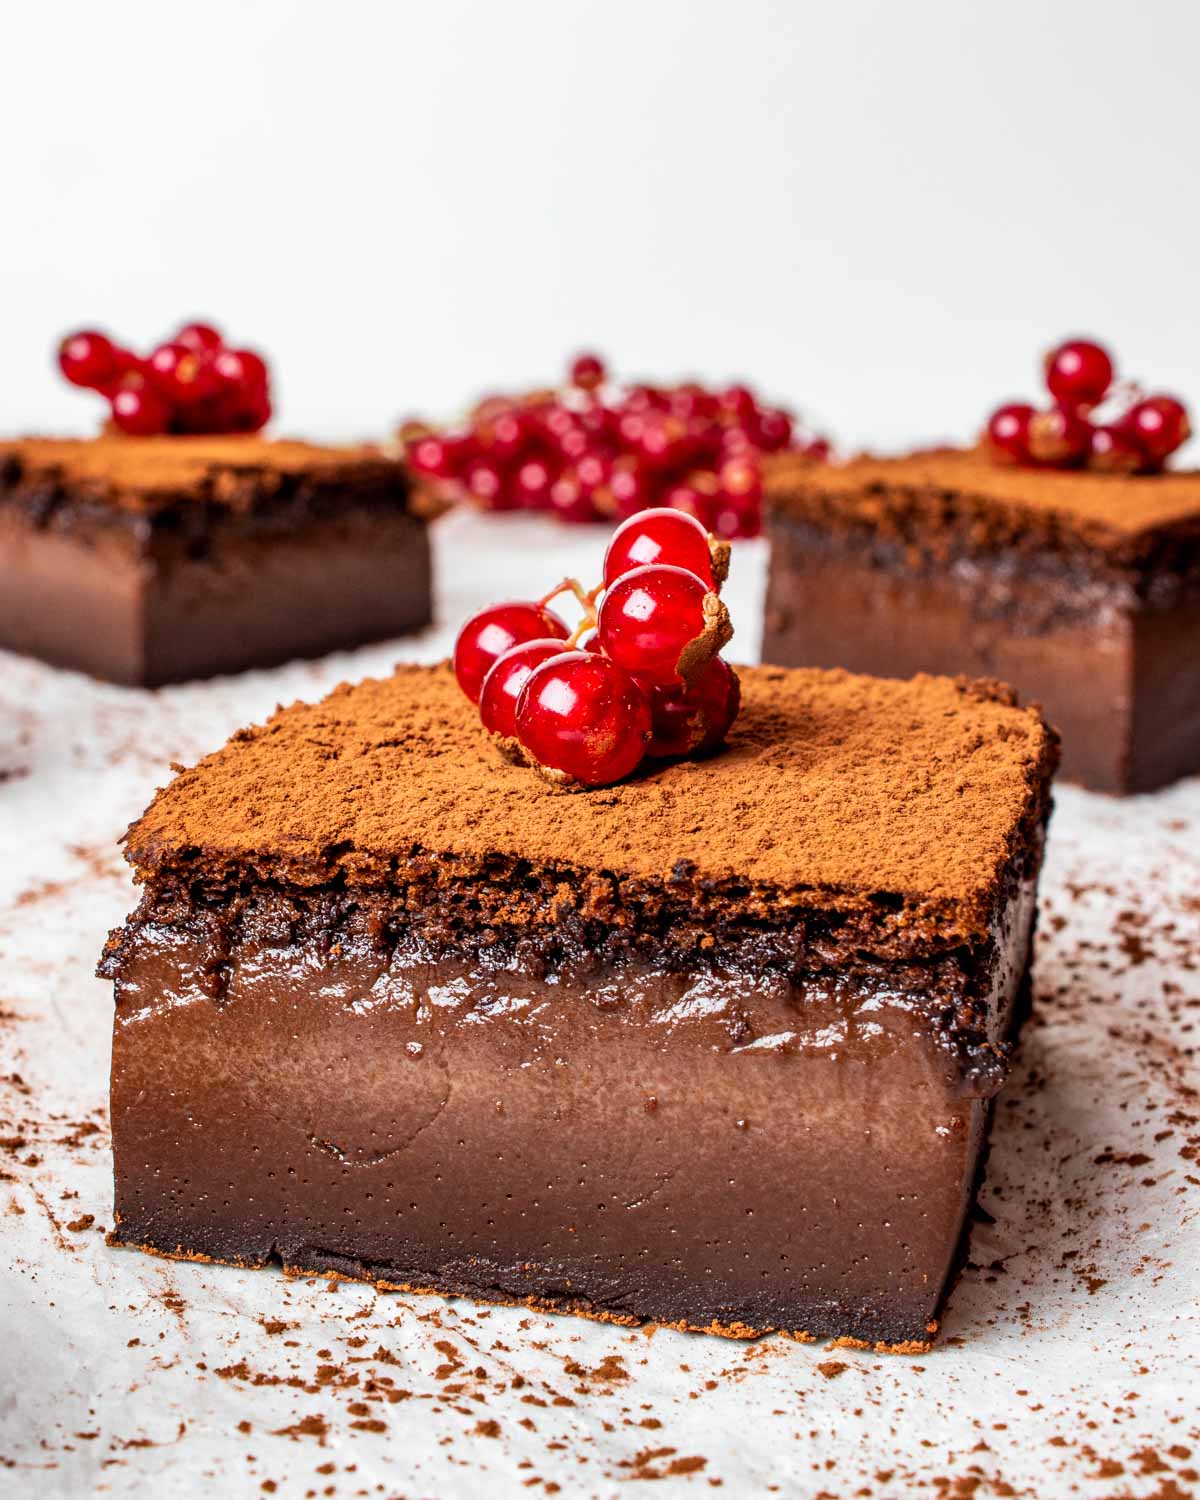
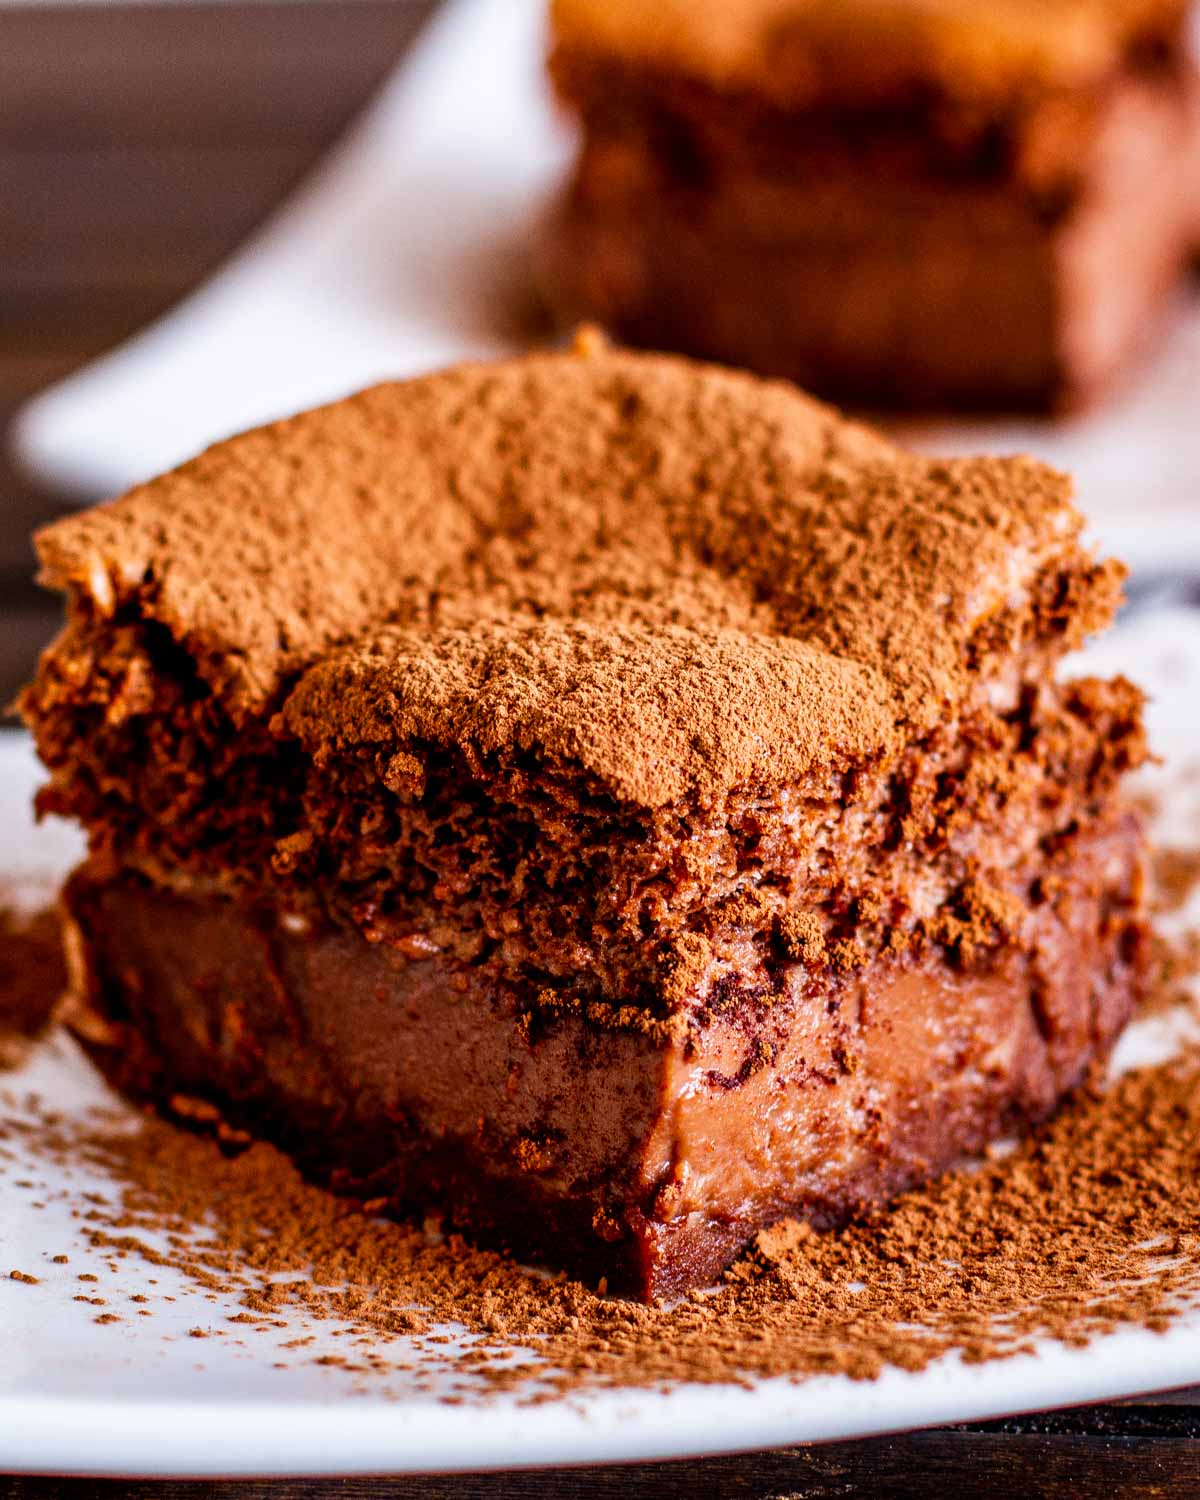
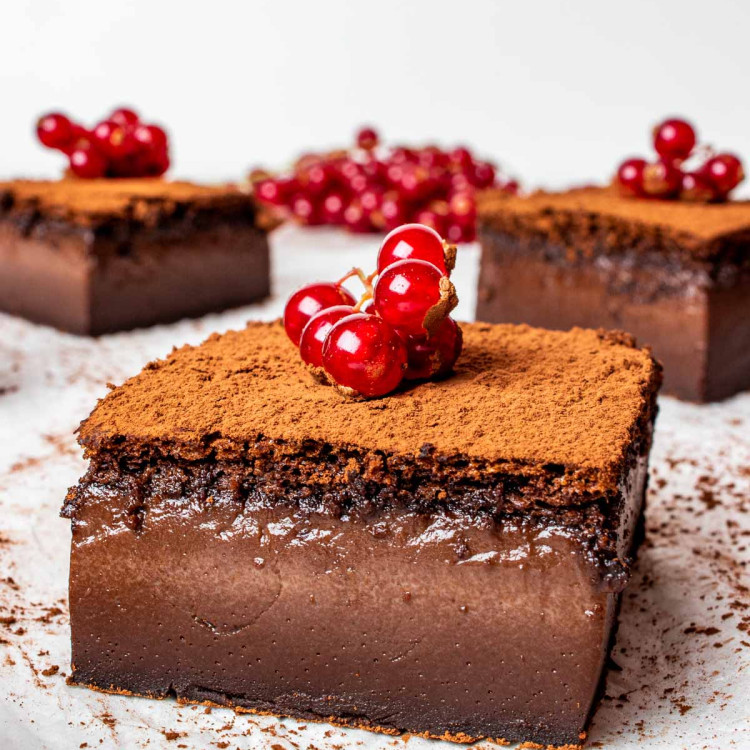
Chocolate Magic Cake
This post may contain affiliate links. Please read my disclosure policy.

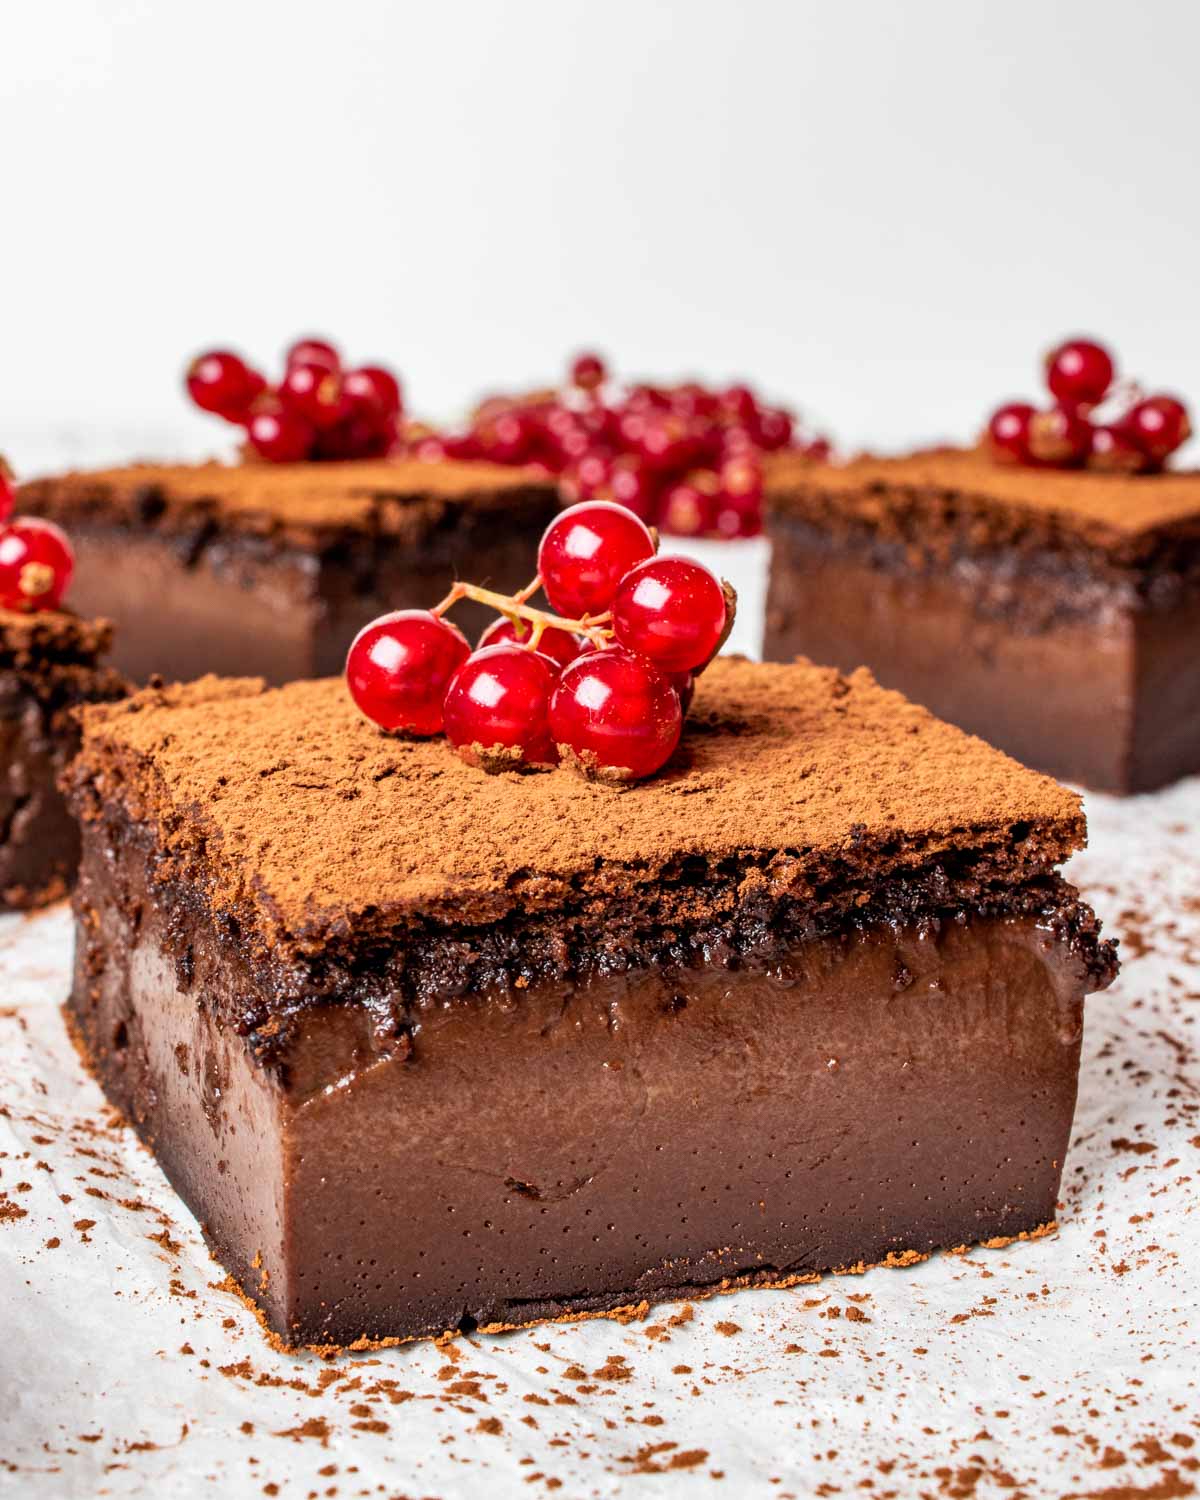
This Chocolate Magic Cake is an incredible easy cake to make. One simple thin batter, bake it and you end up with a 3 layer chocolate magic cake.
Chocolate Magic Cake
A few years ago my Magic Cake recipe took over the internet. Ever since then I’ve made many different versions, including this chocolate magic cake version. If I were to pick a favorite, I’d say it’s a tie between this and Nutella magic cake!
If you’re wondering about the origin of magic cakes, it’s a little unclear where they’re from, however, I’ve actually found information that this cake is from my home country, Romania. Whether that’s true or not, is up for debate, but I’m sticking with Romania.
Because this cake only requires one batter, this is quite an easy cake to make. It also only requires staple ingredients you already likely have in your kitchen.
Ingredient Notes
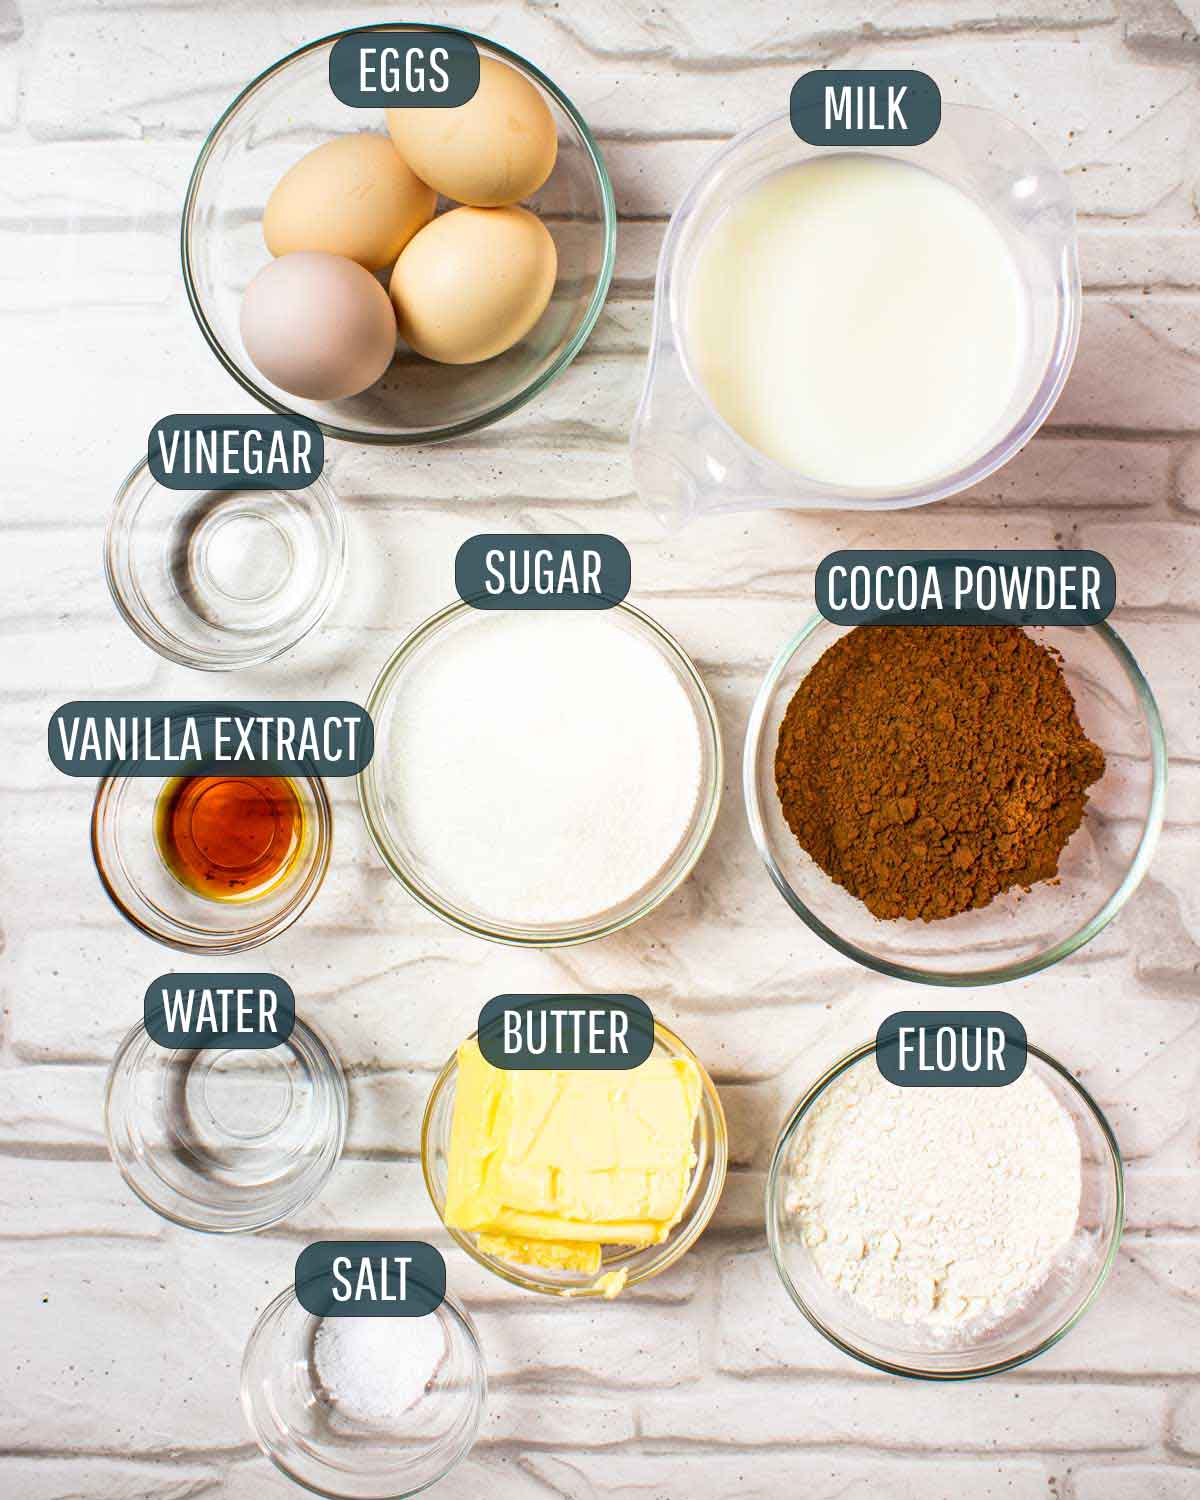
- Eggs – You’ll need 4 eggs at room temperature, separated.
- Milk – I like to warm up the milk a bit so the butter doesn’t cool in the batter, just to about 95F. I’ve made this cake with lactose free milk as well as 2% milk.
- Vinegar – We need a bit of white vinegar when whisking the egg whites, to prevent over-beating. A small amount helps to stabilize the egg whites and allows them to reach full volume and stiffness.
- Flour – All purpose flour is what works best for this cake. Other readers have used gluten free flour, some with great success, some without.
- Cocoa Powder – This is what makes our magic cake chocolatey.
- Butter – I like to use unsalted butter, but if you only have salted butter, use that and you can omit the salt.
- Salt – Without salt, your cake would be bland.
- Sugar – Add a bit of sweetness to your cake. Granulated sugar is fine.
- Vanilla Extract – As with salt, vanilla extract brings all the flavors together in this cake.
How To Make Chocolate Magic Cake
- Prep: Preheat oven to 325°F. Line a 8×8 inch baking dish with parchment paper.
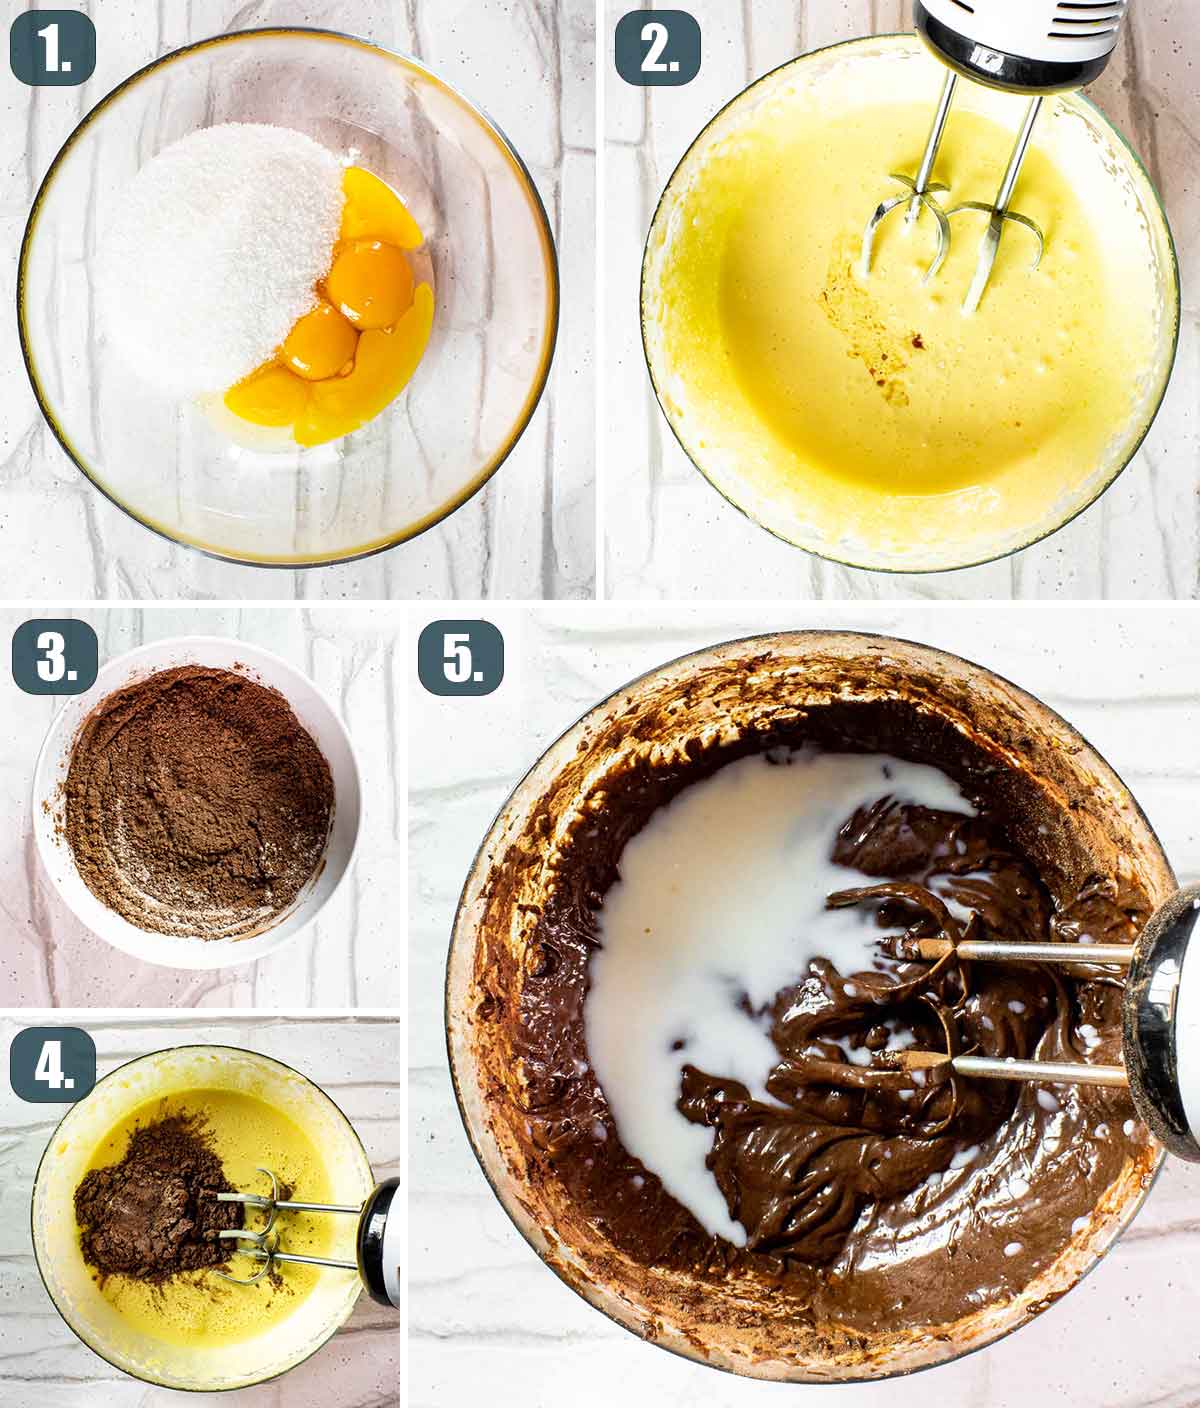
- Mix the yolks with water and sugar: Separate the eggs and add the egg yolks to the bowl of a mixer. Add a tbsp of water and the sugar. Beat this at high speed until are eggs are light and pale in color.
- Drizzle in melted butter, vanilla and add salt: Add melted butter, vanilla extract and salt to the yolk mixture and continue beating until butter is fully incorporated and the mixture is light.
- Stir in the dry ingredients: Add the flour and cocoa powder to the bowl and mix thoroughly, scraping down the side and bottom of the bowl as needed.
- Add milk: Add the milk a bit at a time and mix. The milk should be warm so not to cool the butter. Make sure the milk has been mixed in thoroughly. The mixture should be pretty wet, so don’t get scared.
- Whisk the egg whites: If using a handheld mixer, clean the beaters and pour the egg whites in a large clean bowl. If using a stand mixer, wash the mixing bowl and whisk attachment and make sure you dry them out. Add egg whites to mixing bowl and the vinegar and mix until egg whites are stiff.
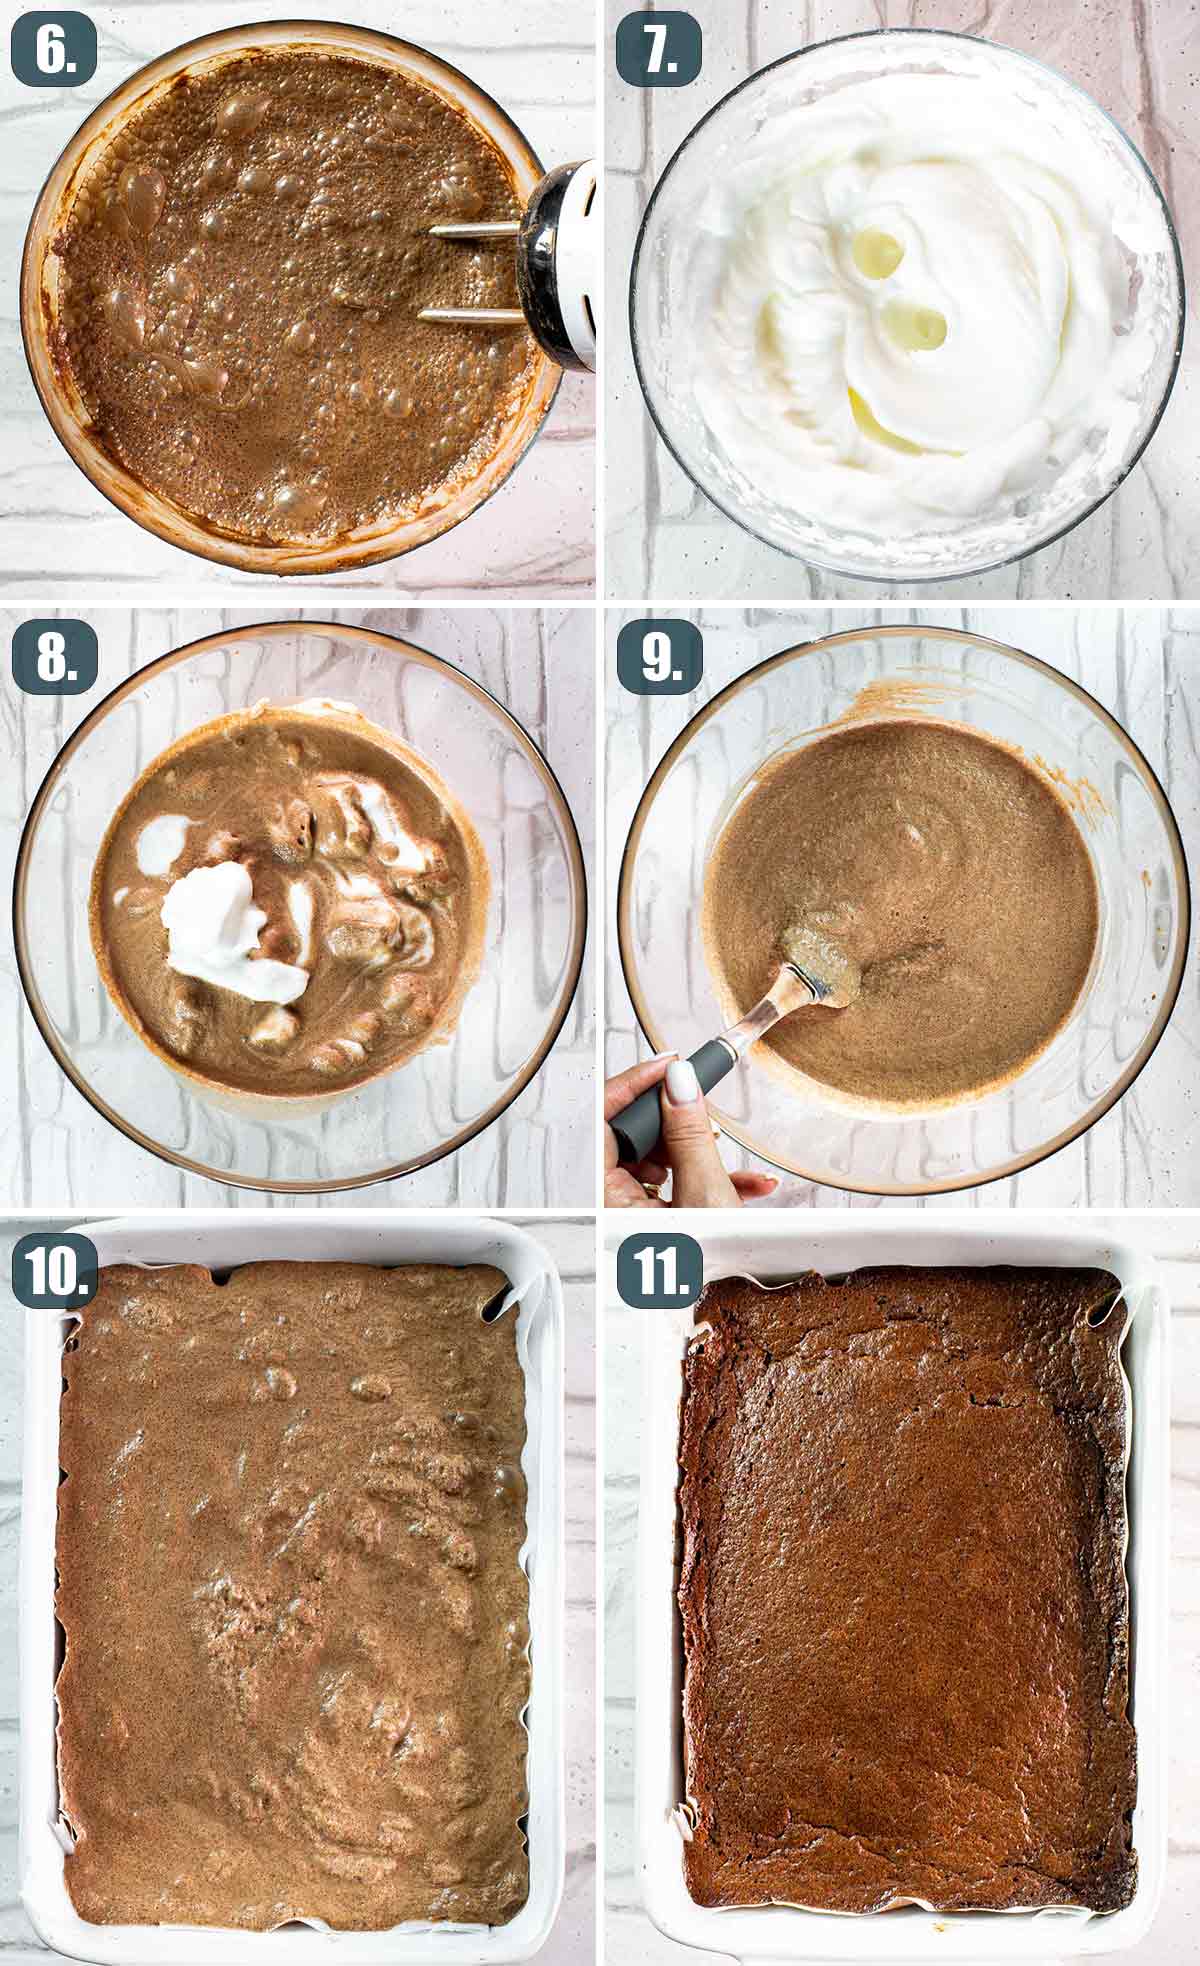
- Add the egg whites to cake batter: Add a bit of the egg whites to the chocolate mixture and gently mix using a whisk. Next you’re going to reverse and add a bit of the chocolate mixture to the egg whites. This way it will be easier to mix everything together. Repeat until everything is mixed together and the mixture should be quite thin. Make sure to leave a distinct layer of fluffy egg white lumps at the top of the batter, so do not overmix.
- Bake, chill and serve: Pour the batter in the prepared baking dish and bake for roughly 60 minutes or until done. The cake will still jiggle in the middle when you take it out, so that’s normal. Let it cool completely, chill for about 4 hours letting the cake set, then cut into squares and serve.
Frequently Asked Questions
What Is Magic Cake?
Magic cake is a cake that forms three layers from one single batter as it bakes. The bottom layer is a fudge-like layer, middle layer is a custard-like layer and the top layer is a cake layer.
Can I Make Other Versions Of Magic Cake?
Yes, absolutely. I have many recipes for magic cake, including the original vanilla magic cake, butterscotch magic cake, Nutella magic cake and the ever popular lemon magic cake.
Why Didn’t My Magic Cake Have 3 Layers?
My trick to make sure you do get the 3 layers is to make sure you don’t fold in the egg whites completely, you want to make sure you still have some of the white bits in it.
How Do I know when My Magic Cake Is Done Baking?
It’s hard to tell when magic cake is done, so look for signs. You want to make sure the sides are set, the center still jiggles a bit and the top is brown. You cannot use a toothpick as with a traditional cake to test fo doneness.
Expert Tips
- Use the right size pan. In my pictures above you’ll notice I used a long pan, but it’s 9×6-inches, or most commonly used for this cake is an 8×8-inch pan that is at least 2 inches in height. A 9×13-inch pan won’t work, there simply won’t be enough batter for it, and it won’t form into 3 layers.
- Stir the egg whites into the batter, don’t fold or mix them in. Stir them gently but not until they’re fully mixed into the batter. You want to make sure there are still some white bits floating around, this is what’s going to create that top cake layer.
- It’s hard to tell when magic cake is done, so look for signs. I’ve baked it in 3 different ovens, and the time differed on all 3. You want to make sure the sides are set, the center still jiggles a bit and the top is brown. You cannot use a toothpick as with a traditional cake to test fo doneness.
- Don’t slice into it right away. Allow the chocolate magic cake to come to room temperature, cover it with plastic wrap, then refrigerate for 4 hours before actually cutting into it, especially if you want to get nice slices. I have cut into it without refrigerating it, it’s still as delicious, it just won’t look as pretty.
Storing Leftover Magic Cake
This chocolate magic cake is best stored in an airtight container in the fridge for up to 3 days.
Freezing
This is one of those cakes that’s better served fresh, after it’s been chilled, however if you must freeze it, you can store it in an airtight container in the freezer for up to 1 month.
More Great Recipes To Try
Before You Begin! If you make this, please leave a review and rating letting us know how you liked this recipe! This helps our business thrive & continue providing free recipes.
Chocolate Magic Cake
Video
Ingredients
- 4 large eggs (at room temperature and separated)
- 1 tablespoon water
- ¾ cup sugar
- 8 tablespoons butter (unsalted and melted, 1 stick)
- 1 teaspoon vanilla extract
- ⅛ teaspoon salt
- 6½ tablespoons all-purpose flour
- 6 tablespoons cocoa powder
- 2 cups milk (warmed up to about 95°F)
- 1 teaspoon vinegar (regular white vinegar)
Before You Begin! If you make this, please leave a review and rating letting us know how you liked this recipe! This helps our business thrive & continue providing free recipes.
Instructions
- Prep: Preheat oven to 325°F. Line a 8×8 inch baking dish with parchment paper.
- Mix the yolks with water and sugar: Separate the eggs and add the egg yolks to the bowl of a mixer. Add a tbsp of water and the sugar. Beat this at high speed until are eggs are light and pale in color.
- Drizzle in melted butter, vanilla and add salt: Add melted butter, vanilla extract and salt to the yolk mixture and continue beating until butter is fully incorporated and the mixture is light.
- Stir in the dry ingredients: Add the flour and cocoa powder to the bowl and mix thoroughly, scraping down the side and bottom of the bowl as needed.
- Add milk: Add the milk a bit at a time and mix. The milk should be warm so not to cool the butter. Make sure the milk has been mixed in thoroughly. The mixture should be pretty wet, so don't get scared.
- Whisk the egg whites: If using a handheld mixer, clean the beaters and pour the egg whites in a large clean bowl. If using a stand mixer, wash the mixing bowl and whisk attachment and make sure you dry them out. Add egg whites to mixing bowl and the vinegar and mix until egg whites are stiff.
- Add the egg whites to cake batter: Add a bit of the egg whites to the chocolate mixture and gently mix using a whisk. Next you're going to reverse and add a bit of the chocolate mixture to the egg whites. This way it will be easier to mix everything together. Repeat until everything is mixed together and the mixture should be quite thin. Make sure to leave a distinct layer of fluffy egg white lumps at the top of the batter, so do not overmix.
- Bake, chill and serve: Pour the batter in the prepared baking dish and bake for roughly 60 minutes or until done. The cake will still jiggle in the middle when you take it out, so that's normal. Let it cool completely, chill for about 4 hours letting the cake set, then cut into squares and serve.
Equipment
Notes
- Please note video above is for magic cake.
- Use the right size pan. In my pictures above you’ll notice I used a long pan, but it’s 9×6-inches, or most commonly used for this cake is an 8×8-inch pan that is at least 2 inches in height. A 9×13-inch pan won’t work, there simply won’t be enough batter for it, and it won’t form into 3 layers.
- Stir the egg whites into the batter, don’t fold or mix them in. Stir them gently but not until they’re fully mixed into the batter. You want to make sure there are still some white bits floating around, this is what’s going to create that top cake layer.
- It’s hard to tell when magic cake is done, so look for signs. I’ve baked it in 3 different ovens, and the time differed on all 3. You want to make sure the sides are set, the center still jiggles a bit and the top is brown. You cannot use a toothpick as with a traditional cake to test fo doneness.
- Don’t slice into it right away. Allow the chocolate magic cake to come to room temperature, cover it with plastic wrap, then refrigerate for 4 hours before actually cutting into it, especially if you want to get nice slices. I have cut into it without refrigerating it, it’s still as delicious, it just won’t look as pretty.
- This cake is best stored in an airtight container in the fridge for up to 3 days.
- This is one of those cakes that’s better served fresh, after it’s been chilled, however if you must freeze it, you can store it in an airtight container in the freezer for up to 1 month.
Nutrition Information
Notice: Nutrition is auto-calculated for your convenience. Where relevant, we recommend using your own nutrition calculations.
Originally published April, 2013. Updated with new photos, step by step pictures and more information.
