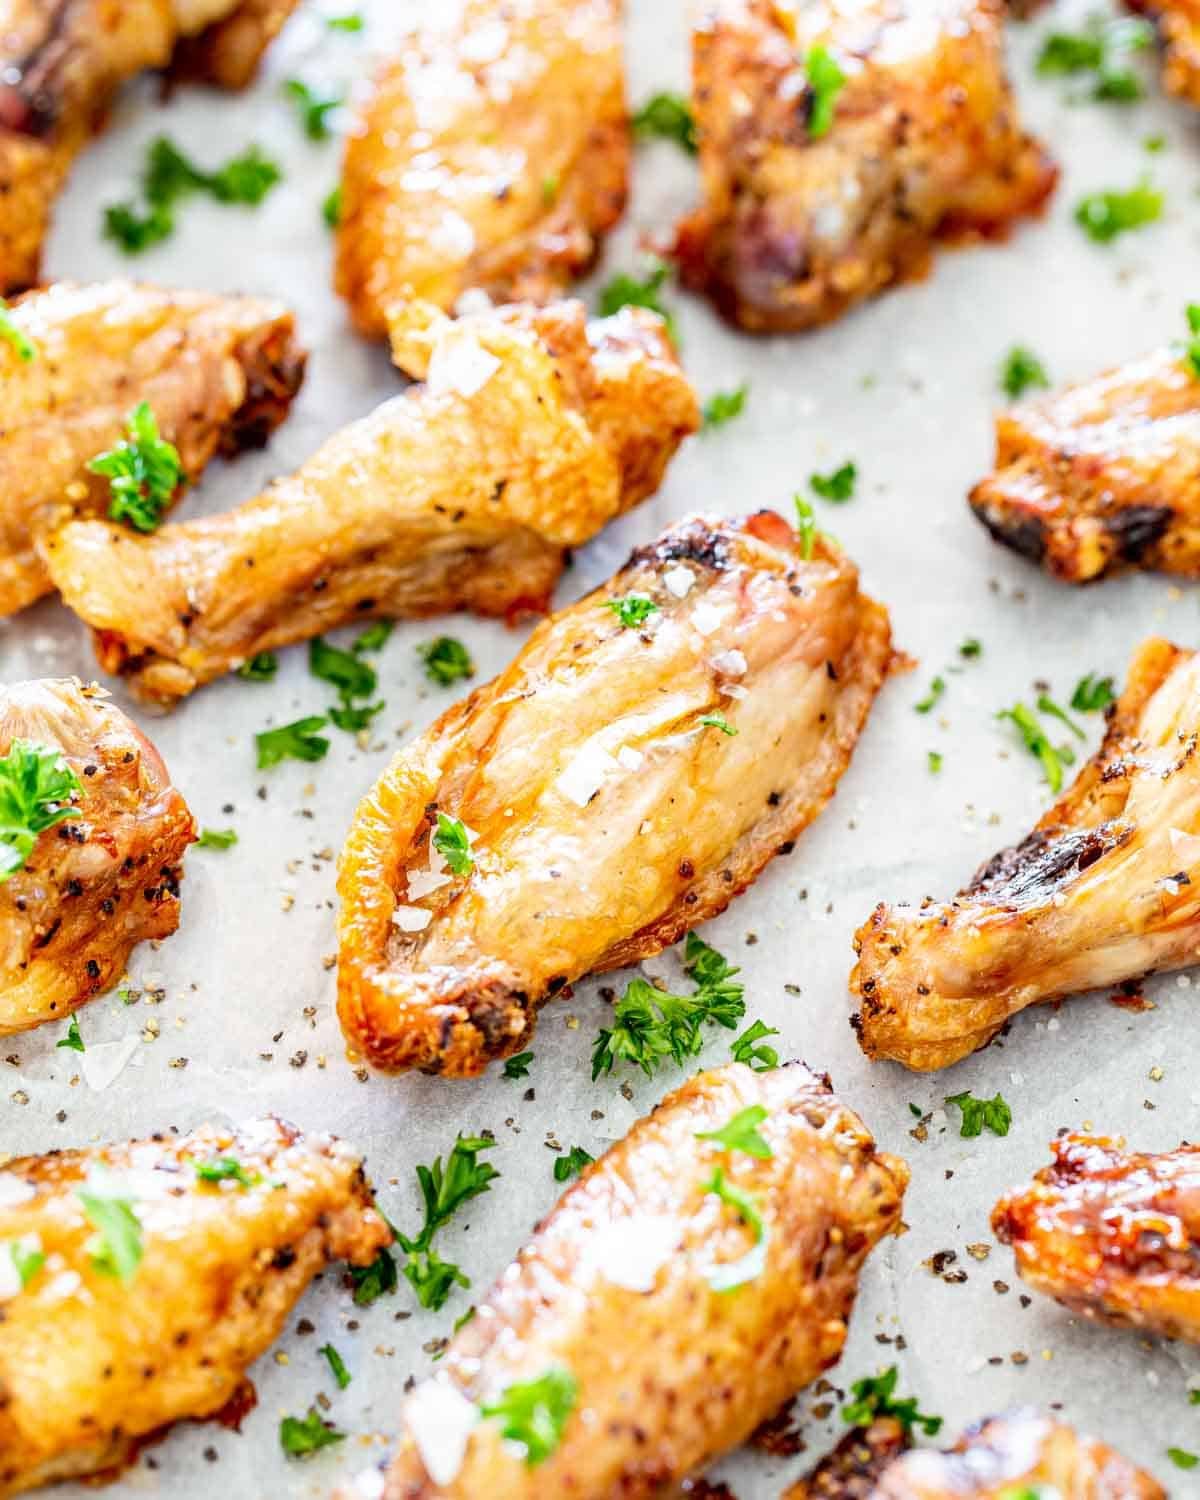
Crispy Baked Salt and Pepper Chicken Wings
This post may contain affiliate links. Please read my disclosure policy.

Generously seasoned with simple salt and pepper and then baked to crisp perfection, this Crispy Baked Salt and Pepper Chicken Wings recipe is going to rock your world! It’s an easy crowd pleaser that’s perfect for your next potluck or Sunday football feast!

Easy Crispy Salt And Pepper Chicken Wings Recipe
The thing with me and chicken wings is that I can’t ever seem to make enough. Everyone in my family loves them, so I’m always coming up with new ways to make them like my Honey Garlic Chicken Wings, Crispy Baked Parmesan Chicken Wings, and Sticky Chinese Chicken Wings.
But salt and pepper wings have always been a favorite in our house, so I realized it was time to share my simple crispy baked salt and pepper chicken wings recipe with you guys! They are so easy it’s crazy. Just wings, salt, pepper, and olive oil! That’s it, but oh so good!
And these delicious salty peppery wings are gobbled up and gone in no time! But for good reason. Mine are the best! No seriously, they are because I bake all my wings. So not only are they lower in calories and fat making them more healthy, but baked wings come out so crispy every time without all the added grease.
Why You’ll Love These Crispy Salt And Pepper Wings
- Super Simple! This easy chicken wing recipe only requires 5-ingredients and no deep fryer is needed! You just toss the wings in some oil, season with salt and pepper, and bake them right in the oven.
- Salty Peppery Perfection! So basic, but so darn good. These wings are juicy on the inside and crispy on the outside coated in salty goodness and spicy pepper.
- Healthy Finger Food! Because they are baked and not fried my baked salt and pepper wings recipe has less fat and calories, which makes it not all that bad for you.
- Party Favorite! These yummy crispy baked salt and pepper chicken wings are a crowd pleaser and are perfect for any party, potluck, or movie night. Your family and friends will love them.
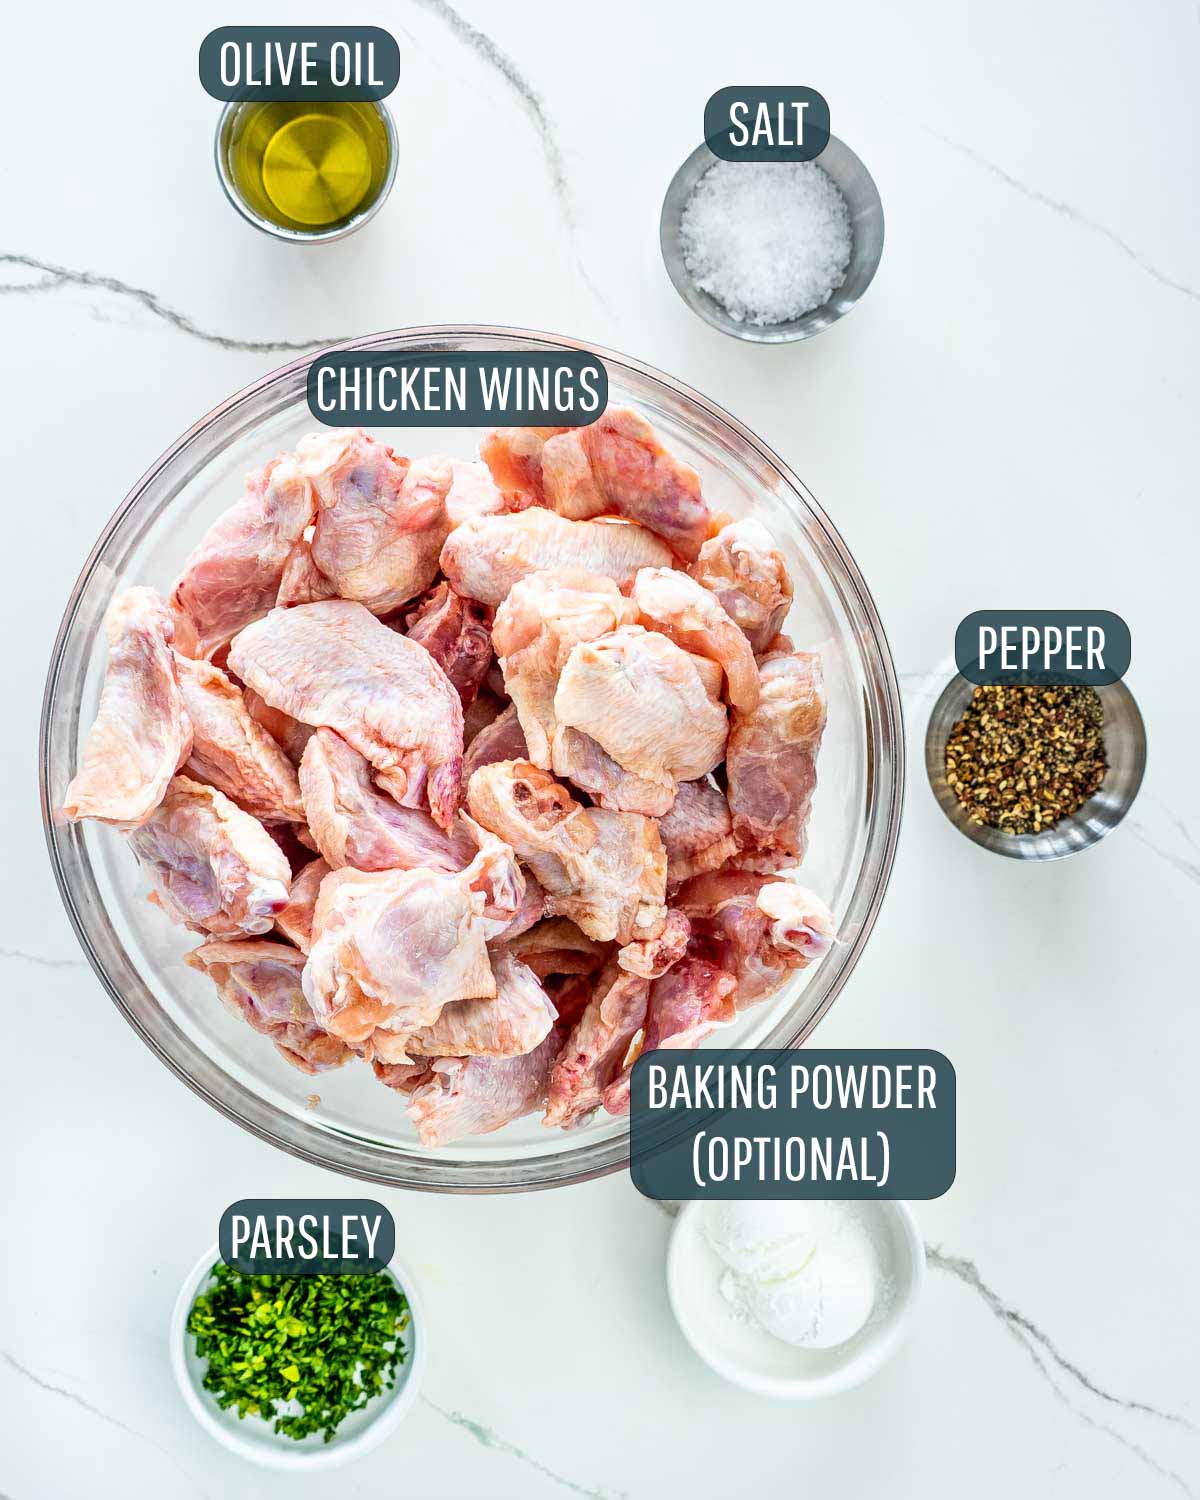
- Chicken Wings – I used wings that were already pre-cut into wingettes and drumettes. But you can buy whole wings if you like. Just remove the wing tip and then cut them vertically through the joint. Then you can discard the wing tip.
- Olive Oil – I use olive oil for this recipe, but any type of vegetable oil will work.
- Black Pepper – Regular ground black pepper is perfect. You can also mix it with some Sichuan pepper, or even some white pepper.
- Sea Salt – For this recipe I always use sea salt to season the wings.
- Baking Powder – This is a special ingredient, it will help the outside of the chicken wings get brown and crispy.
- Parsley – Fresh chopped parsley is used for garnish, but it also adds a touch of fresh herb flavor. You can also garnish with some freshly chopped green onions.
This recipe is ridiculously easy! Because you aren’t using a deep fryer there isn’t much involved. Once your chicken is prepped you’re nearly done!
Preheat The Oven And Prep The Pan
Before you even start seasoning the wings, you need to preheat your oven to 425°F (218°C). Then line a baking sheet with parchment paper or a silicone baking mat. And don’t skip on lining the baking sheet or the wings will likely stick to the pan, which will result in more cleanup and some loss of crispy skin.
Season The Wings
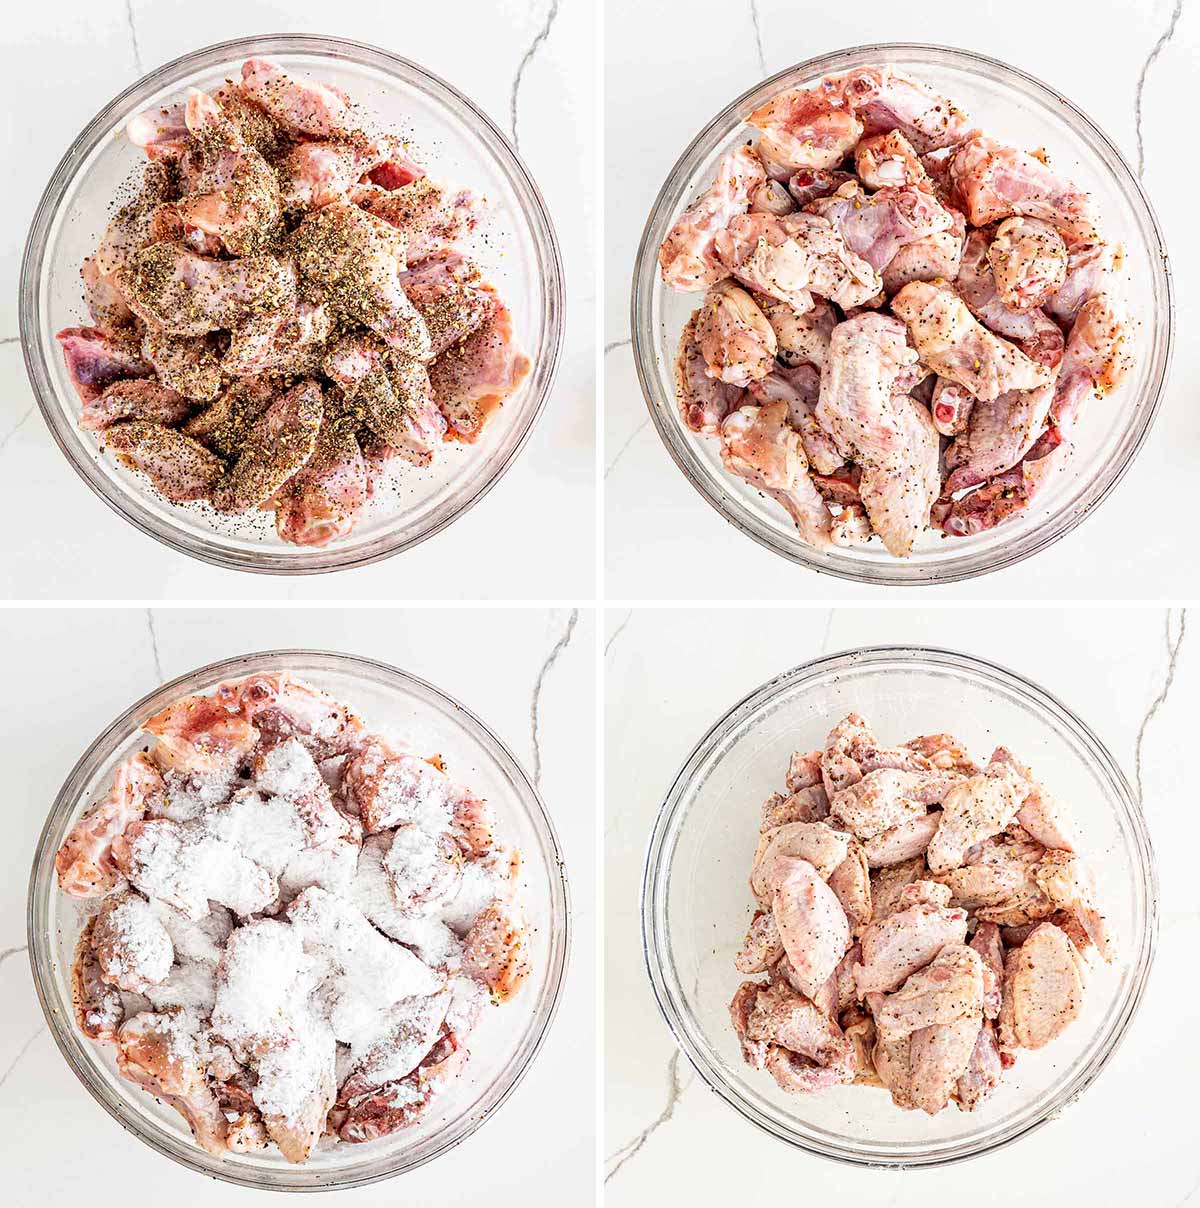
Pat chicken wings dry with paper towels then place them into a large bowl. Then drizzle them with the olive oil and toss well to coat. Every single one needs to be fully coated in the oil before moving on. Next, generously sprinkle the wings with salt and pepper and then toss the mixture well once again. If you’re using baking powder, now is the time to sprinkle it all over the wings and toss them again. Now, your wings are seasoned and ready to go!
Bake The Chicken Wings
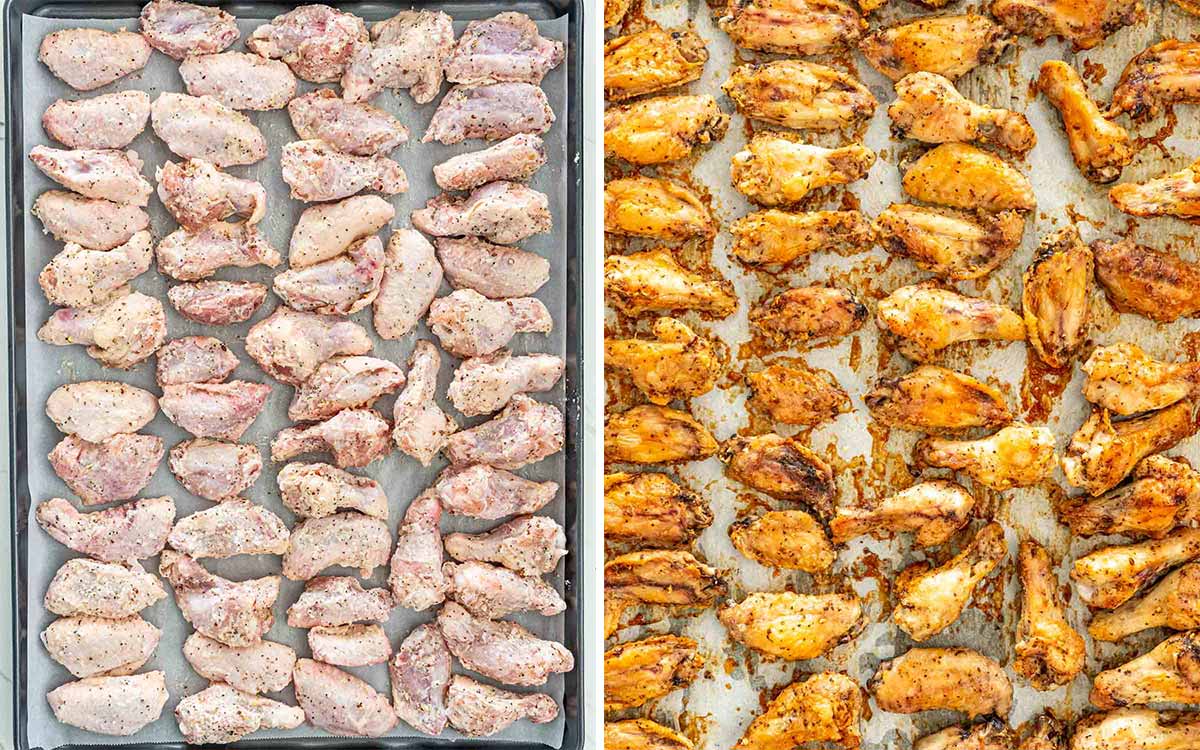
To cook, lay the seasoned wings in a single layer on the prepared baking sheet making sure that they are spaced apart to ensure even cooking. Then put the wings into the oven to bake for about 40 to 45 minutes or until they are golden in color and crispy.
Also, to be considered fully cooked and safe to eat, the wings must have reached an internal temperature of at least 165°F (74°C) when checked with a digital cooking thermometer. So if the chicken wings have not reached 165°F after 45 minutes of baking just put them back in the oven for a few more minutes and then test the temperature again.
Garnish And Serve
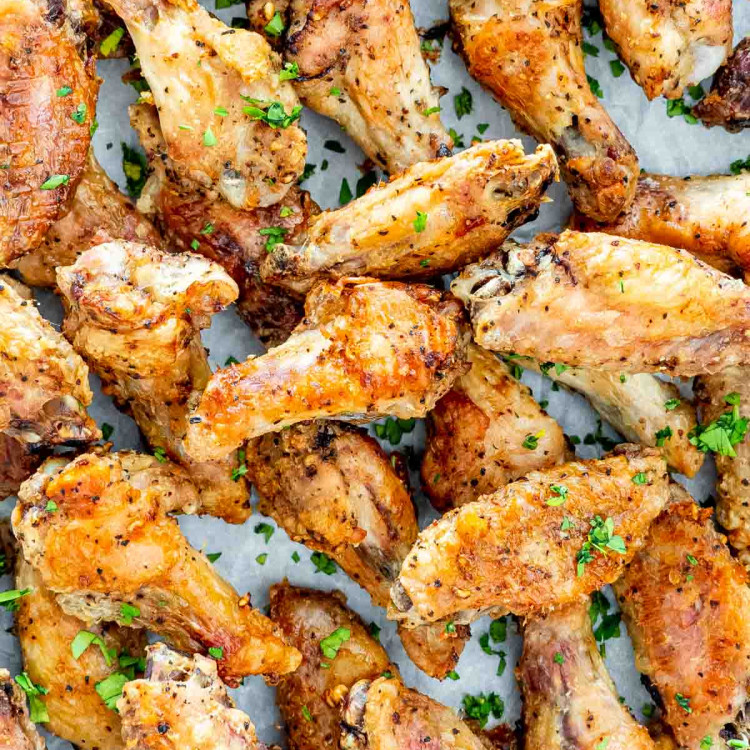
When the wings are done, transfer them to a large plate. Then sprinkle them with more salt and pepper if you like and garnish with some fresh chopped parsley. Now, enjoy yourself with some warm and delicious crispy baked salt and pepper chicken wings!
Can I Omit The Baking Powder?
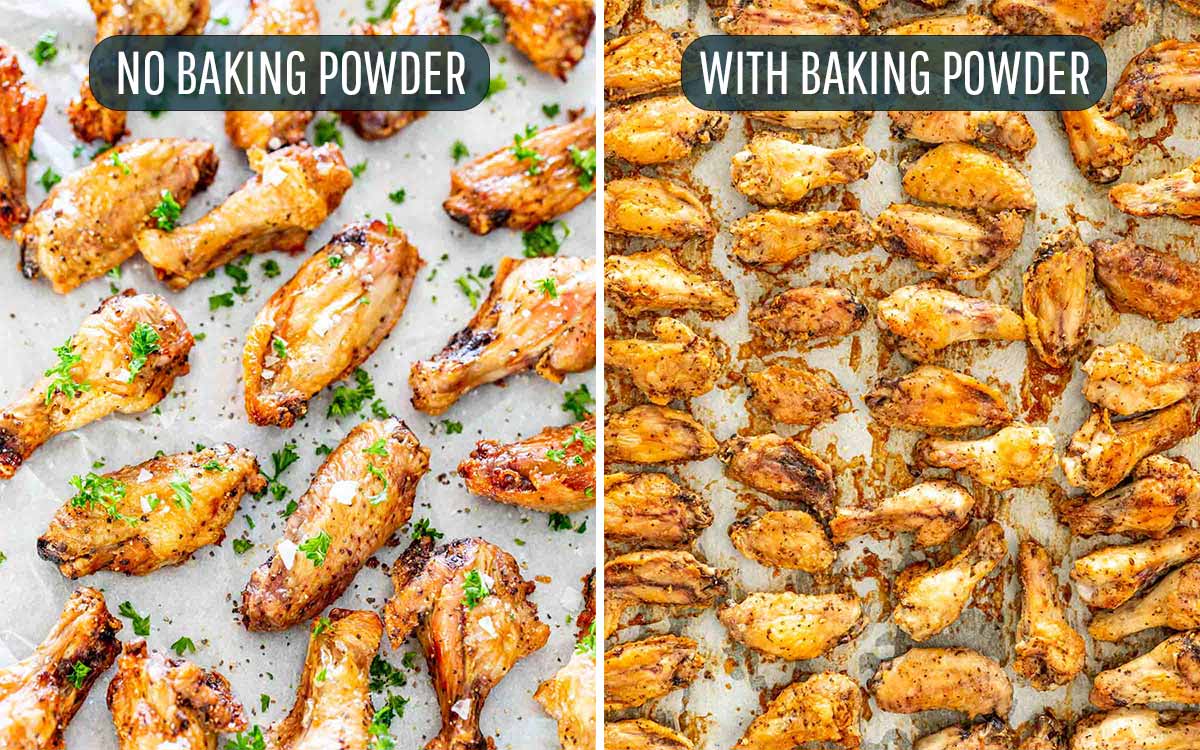
Yes, you can. I have made these both ways. There is a difference in the final product as you can see above. If you’re using baking powder, the chicken wings will have the texture of a fried chicken wing. Without the baking powder they will still get nice and crispy but with it, they will be more brown in color and taste more like a fried chicken wing.
Can I Add Other Spices?
Yes! You can customize these crispy baked chicken wings any way you like! For example, a pinch of garlic powder, ground ginger, red pepper flakes, or any herb will add more flavor.
How Long Do Chicken Wings Take To Bake?
Every oven is different, so this can vary. However, crispy baked salt and pepper chicken wings typically take about 40 minutes at 425°F (218°C) to be both crispy and fully cooked.
Expert Tips
- Fully oil the wings. Make sure that you oil each and every single wing before seasoning. The oil not only makes the wings crispy but also helps the salt and pepper to adhere to the skin.
- Use sea salt. For the most refined taste, use sea salt. Table salt will work, but it won’t add the same depth in flavor.
- Line the baking sheet. Do not forget to line your baking sheet. The skin of the chicken wings will stick to the pan.
- Temp the chicken wings. To make sure your wings are fully cooked you will want to use an instant-read digital meat thermometer to ensure they have reached at least 165°F (74°C) for food safety.
Leftovers
These crispy baked salt and pepper chicken wings will keep in the fridge for up to 4 days or in the freezer for up to 4 months in an airtight container or sealed bag. To reheat, simply put them in the microwave for a few minutes on medium heat or in the oven at 375°F (190°C) for about 10 minutes. If they are frozen, it’s best to reheat them in the oven for about 30 minutes.

Other Incredible Chicken Wings Recipes To Try
- Red Chimichurri Chicken Wings
- Lemon Pepper Wings
- Air Fryer Thai Chicken Wings
- Honey Garlic Chicken Wings
- Coca Cola Chicken Wings
- Dry Rub Wings
Before You Begin! If you make this, please leave a review and rating letting us know how you liked this recipe! This helps our business thrive & continue providing free recipes.
Crispy Baked Salt and Pepper Chicken Wings
Video
Ingredients
- 2 pounds chicken wings
- 2 tablespoons olive oil
- 1 teaspoon black pepper (freshly ground )
- 2 teaspoon sea salt
- 1 tablespoon baking powder (optional)
- 1 tablespoon parsley (fresh, chopped for garnish)
Before You Begin! If you make this, please leave a review and rating letting us know how you liked this recipe! This helps our business thrive & continue providing free recipes.
Instructions
- Preheat oven to 425 F degrees. Line a baking sheet with parchment paper.
- Pat chicken wings dry with paper towels the place them in a large bowl. Drizzle the wings with the olive oil and toss well, making sure each wing is coated with a bit of olive oil.
- Sprinkle the chicken wings with the pepper and salt, and toss well. If using baking powder, sprinkle it all over the wings then toss well.
- Arrange the wings in a single layer on the prepared baking pan. Bake for about 40 to 45 minutes or until they're golden crisp.
- Sprinkle with more salt and pepper if preferred and garnish with some chopped parsley.
Equipment
Notes
- My wings already came pre-cut into wingettes and drumettes, but if they are not, remove the wing tip then cut them vertically through the joint. Discard the wing tip.
- If your wings aren’t golden and crispy after 45 minutes, turn the broiler on and broil them for about 3 more minutes, watching them carefully as they could burn quickly.
- Use sea salt. For the most refined taste, use sea salt. Table salt will work, but it won’t add the same depth in flavor.
- Line the baking sheet. Do not forget to line your baking sheet. The skin of the chicken wings will stick to the pan.
Nutrition Information
Notice: Nutrition is auto-calculated for your convenience. Where relevant, we recommend using your own nutrition calculations.
