Pasca – Romanian Easter Bread
This post may contain affiliate links. Please read my disclosure policy.
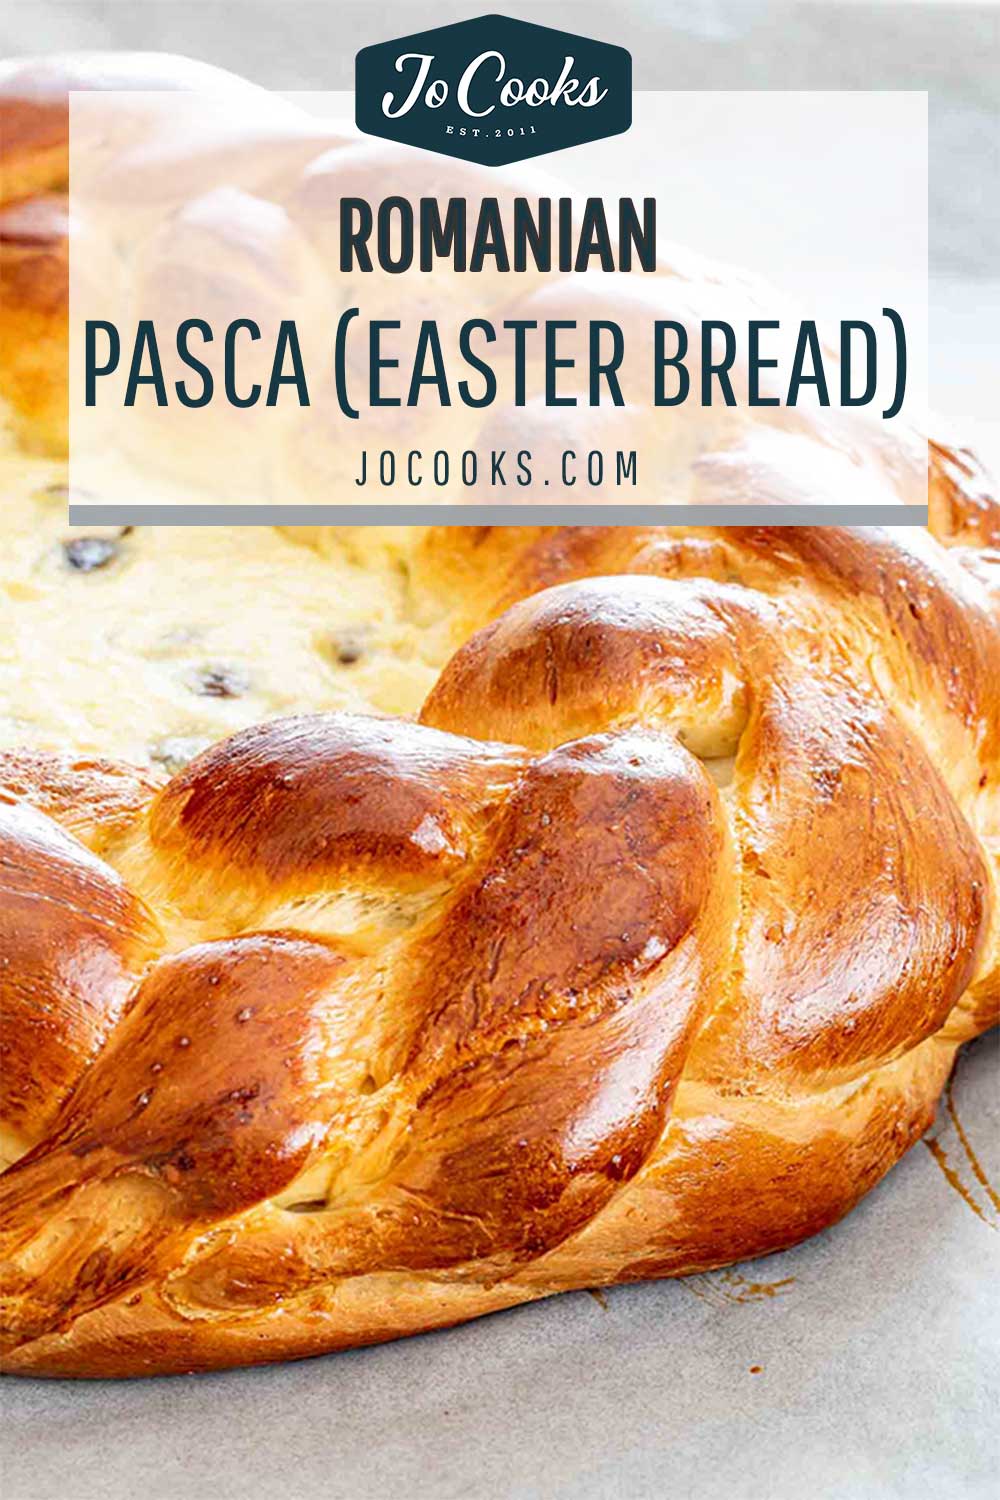
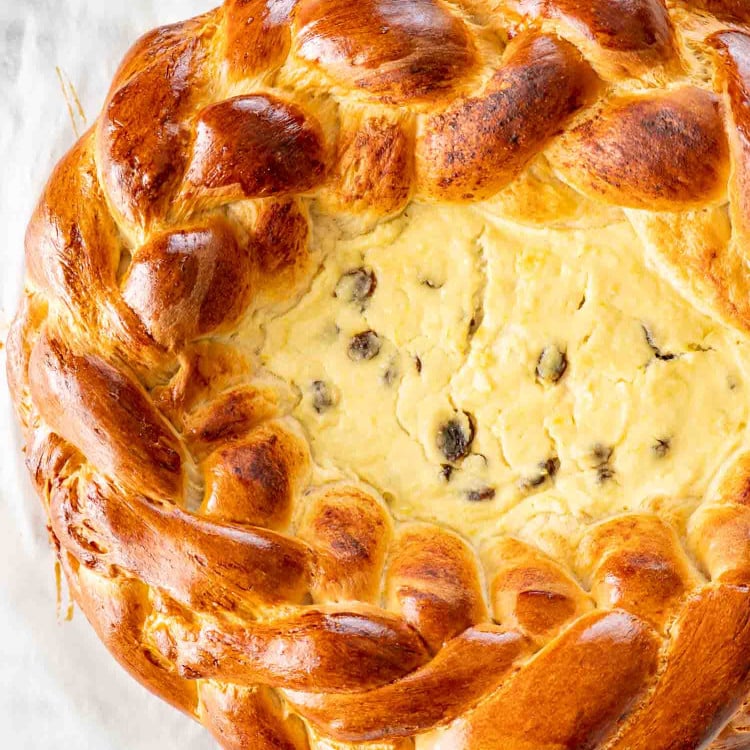
My recipe for Pasca, a traditional Romanian Easter Bread, has a touch of sweetness with fresh lemon zest. You’re in for a treat with a sweet filling of ricotta, lemon, and raisins. Learn how to make this gorgeous sweet bread with an easy 6-strand braided edge!

Pasca – Romanian Easter Bread
I’ve had so many requests for this amazing Romanian Easter Bread, and here I am with, what I think is, the best version! Using a similar dough that my Cozonac recipe is made with, this sweet bread is sure to be a hit at your Easter brunch this year.
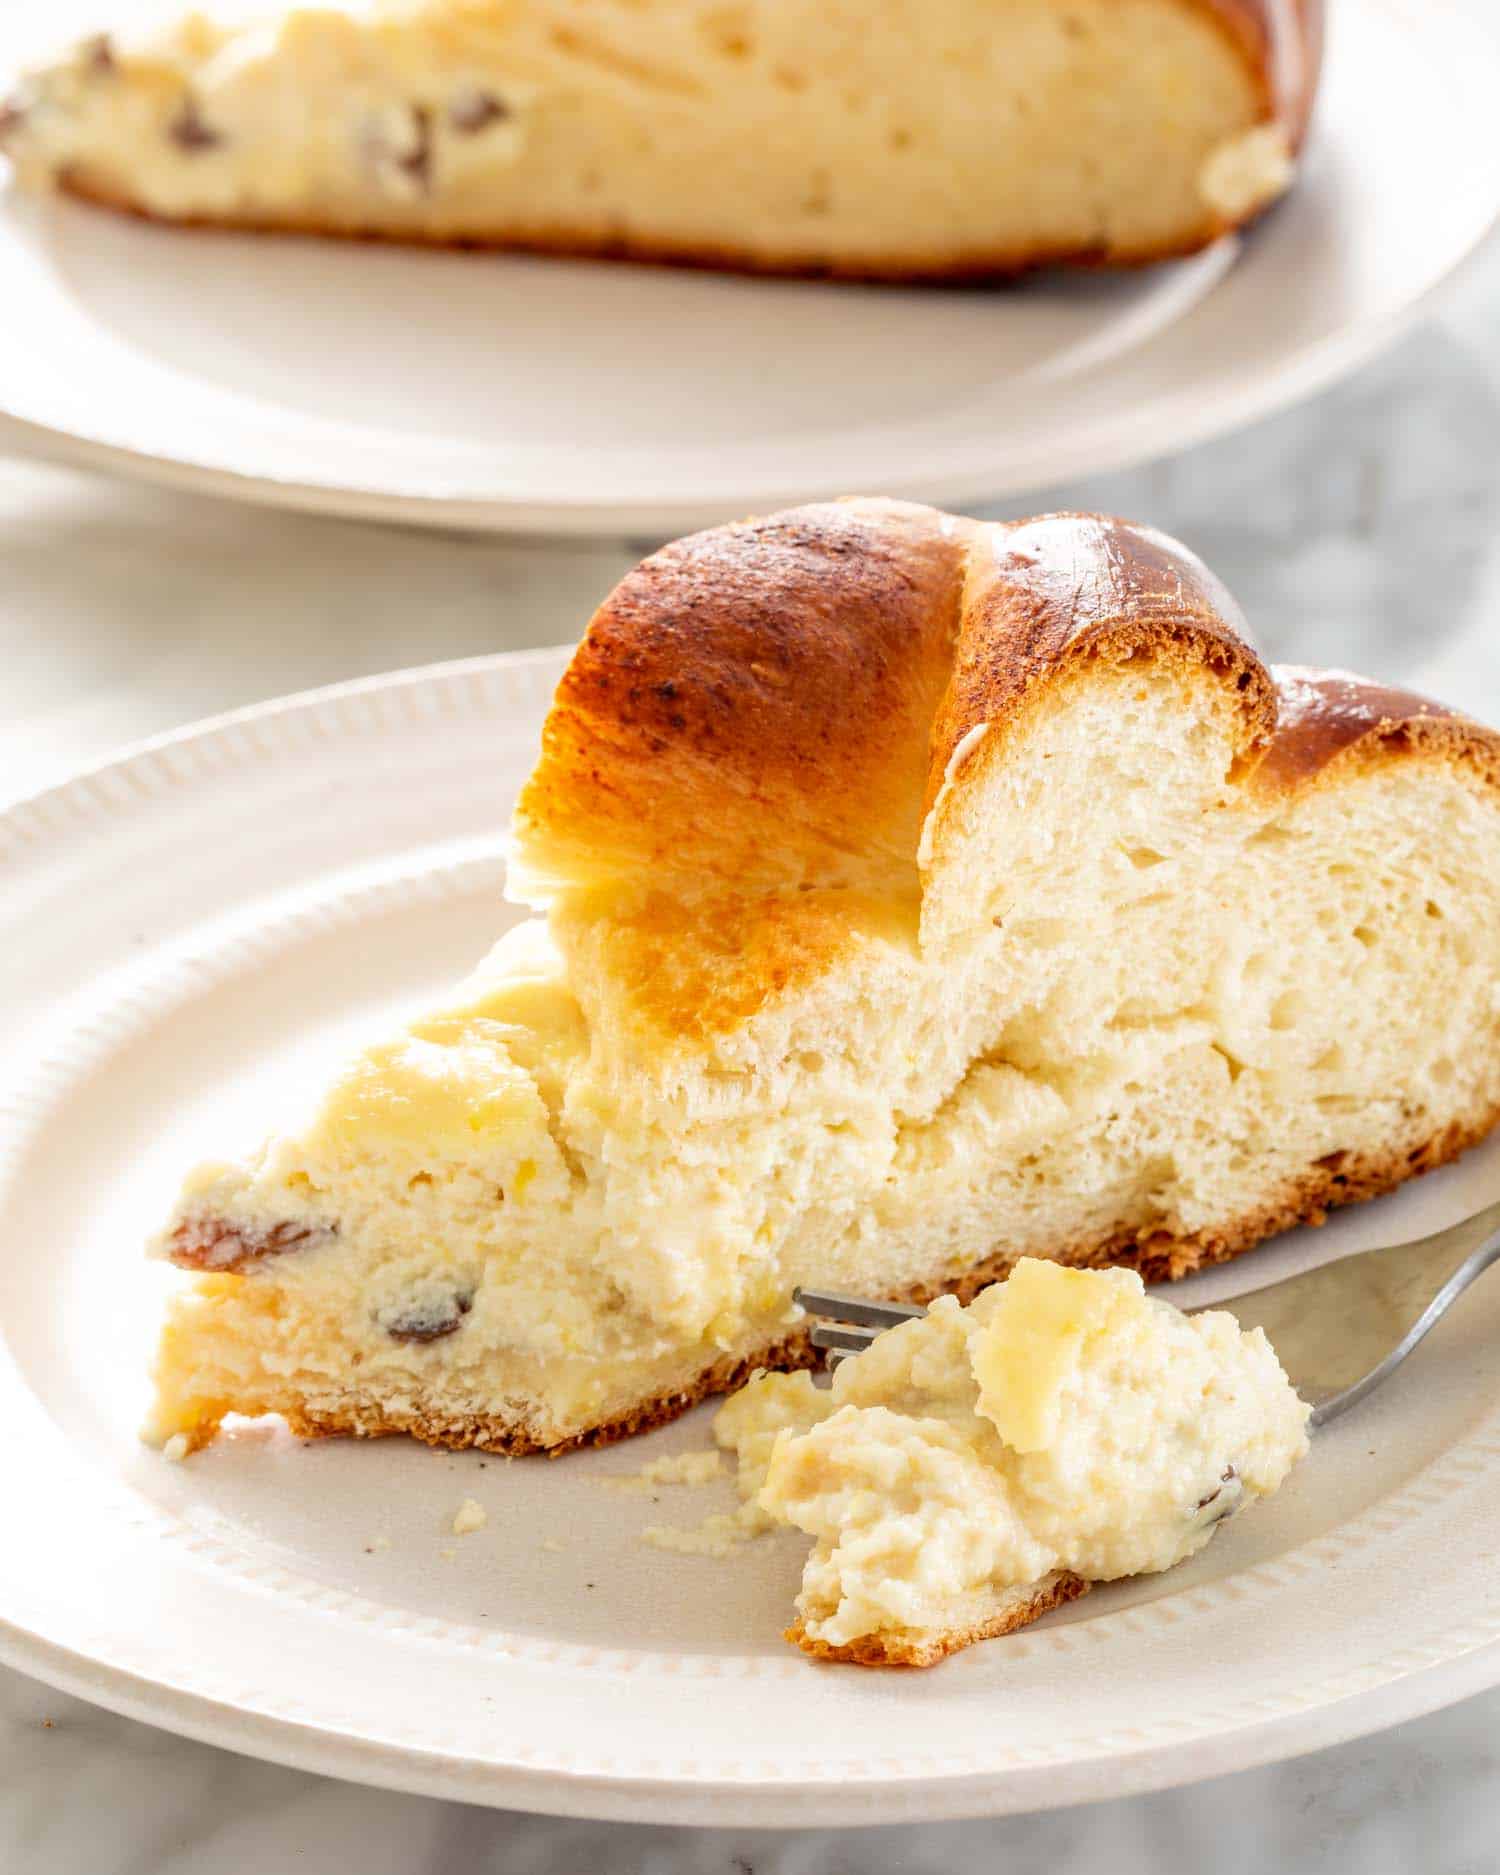
What makes this pasca recipe so special is that ricotta filling in the center. Seriously, once you try a bite you’re going to want to grab a a spoon and eat all that filling right up! Both the dough and the filling are hit with a healthy amount of fresh lemon zest which just takes this recipe over the top. I’ve also included instructions on how to make the gorgeous 6-strand braid that you see around the edge of the pasca. Are you ready? I sure am!
Why You’ll Love This Pasca
- It’s a traditional Easter dessert: Pasca is a beloved Easter dessert in Romania and making it can be a fun way to learn about and honor Romanian culture and traditions.
- It’s delicious: Pasca is a sweet and creamy dessert with a soft and fluffy texture. The combination of sweetened cheese, raisins, and vanilla make for a rich and satisfying flavor that’s perfect for satisfying a sweet tooth.
- A unique baking challenge: Making Pasca can be a challenging and rewarding baking experience. The process of making the dough and shaping it into a beautiful braided ring or loaf can be a fun and satisfying challenge for those who enjoy baking.
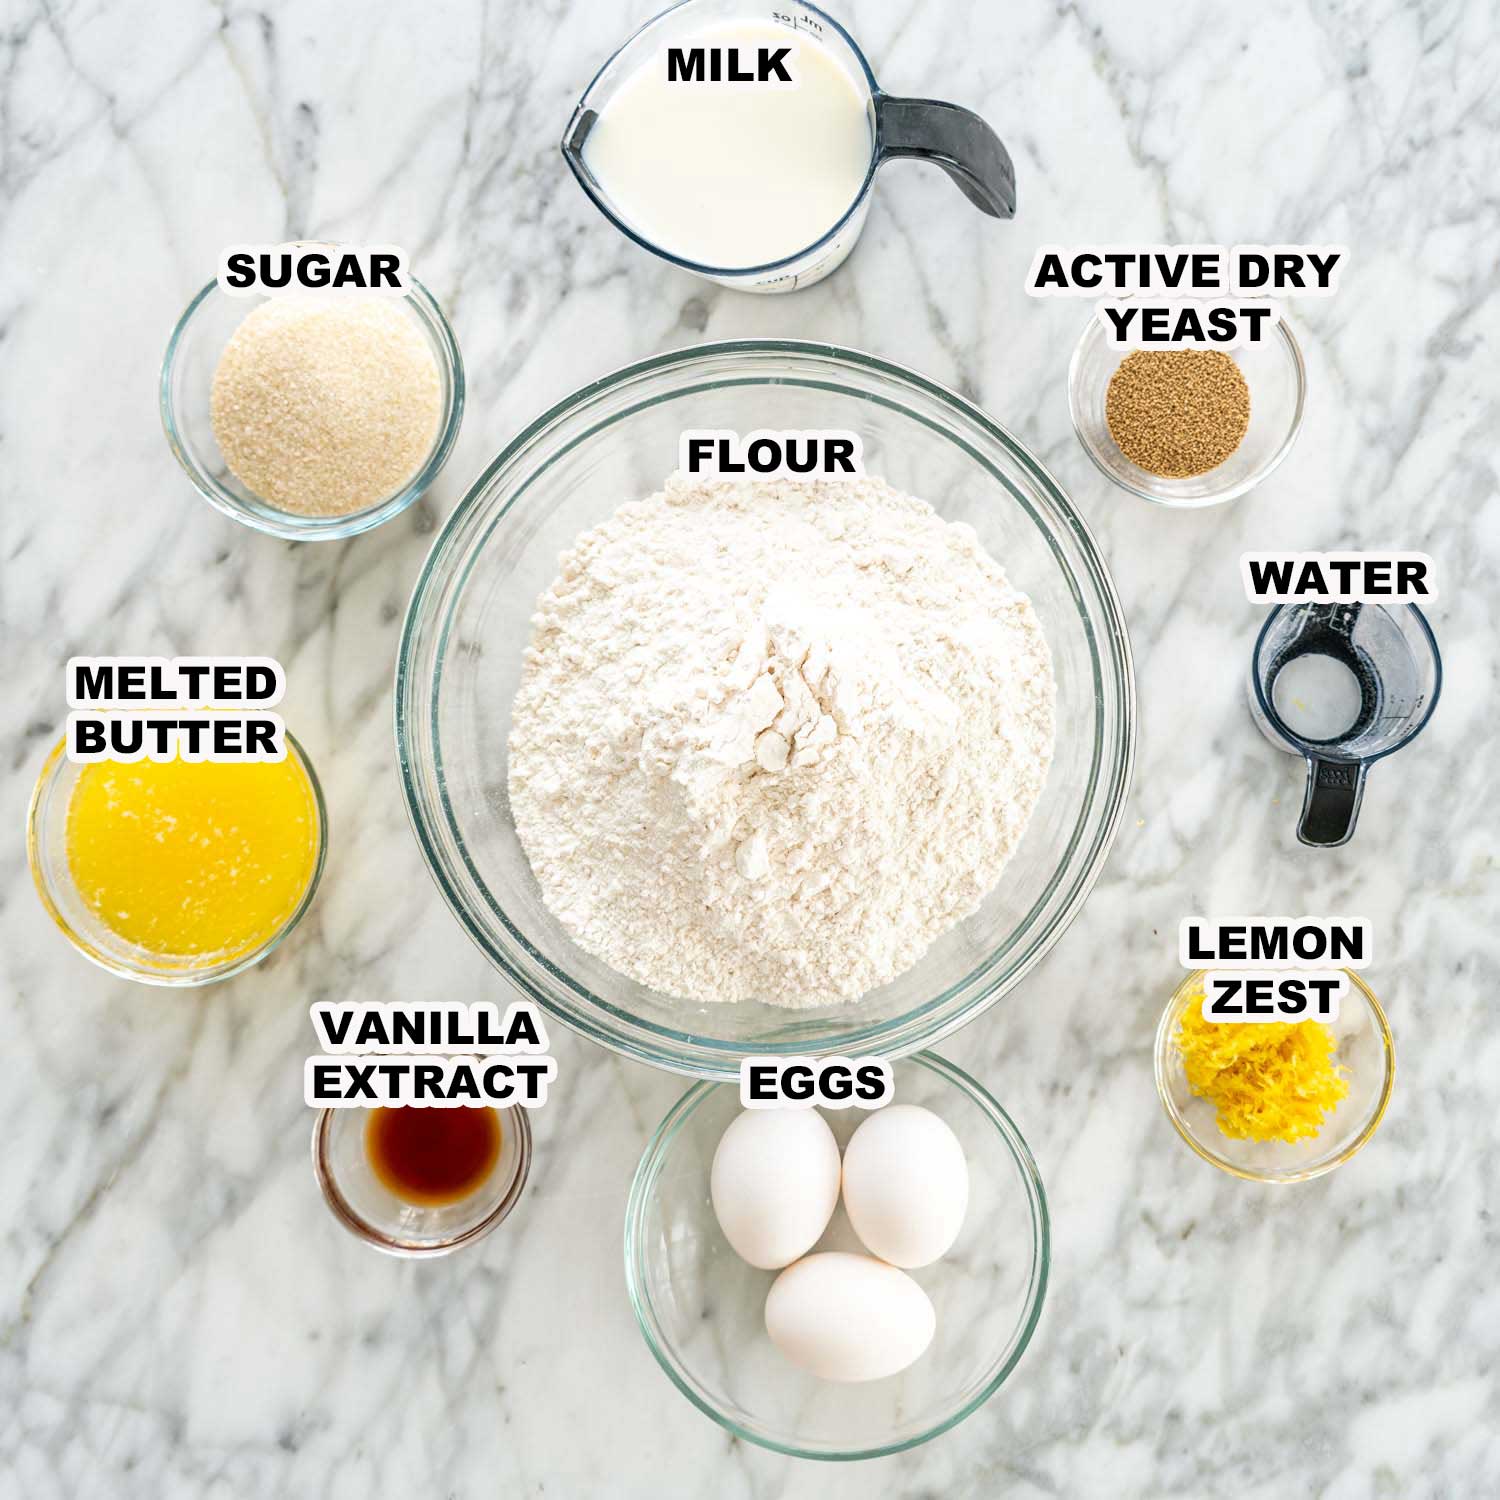
- Active dry yeast – You can use instant yeast if that’s what you have. If you use instant, you won’t need to bloom it first, but it’s a good idea to test if it’s still alive. If your yeast doesn’t foam up your yeast is dead and the bread won’t turn out.
- Water – The water is used to bloom our yeast. Make sure it’s lukewarm – you can test with your finger. It needs to be warm to the touch, not hot. If it’s too hot it will kill the yeast.
- Milk – I used whole milk (3.25%) but you can use whatever is in your fridge.
- Butter – I only use unsalted butter. This way I have full control over the sodium in my recipes.
- Lemon zest – I know 2 tablespoons seems like a lot, but this recipe makes a pretty large pasca. The lemon is what really makes this bread taste so incredible! You can, of course, add less or more depending on your tastes.
- Sugar – This bread is meant to have a touch of sweetness. You can add a little more or less if you’d like.
- All-purpose flour – You can use bread flour for this recipe if you’d like. The difference is that you’ll get a bit more gluten formation. If you use gluten-free flour, make sure to get a protein such as xanthan gum to replace the gluten.
- Eggs – Use large eggs for this recipe.
- Vanilla – The way the vanilla warms up the lemon zest is just irresistible!
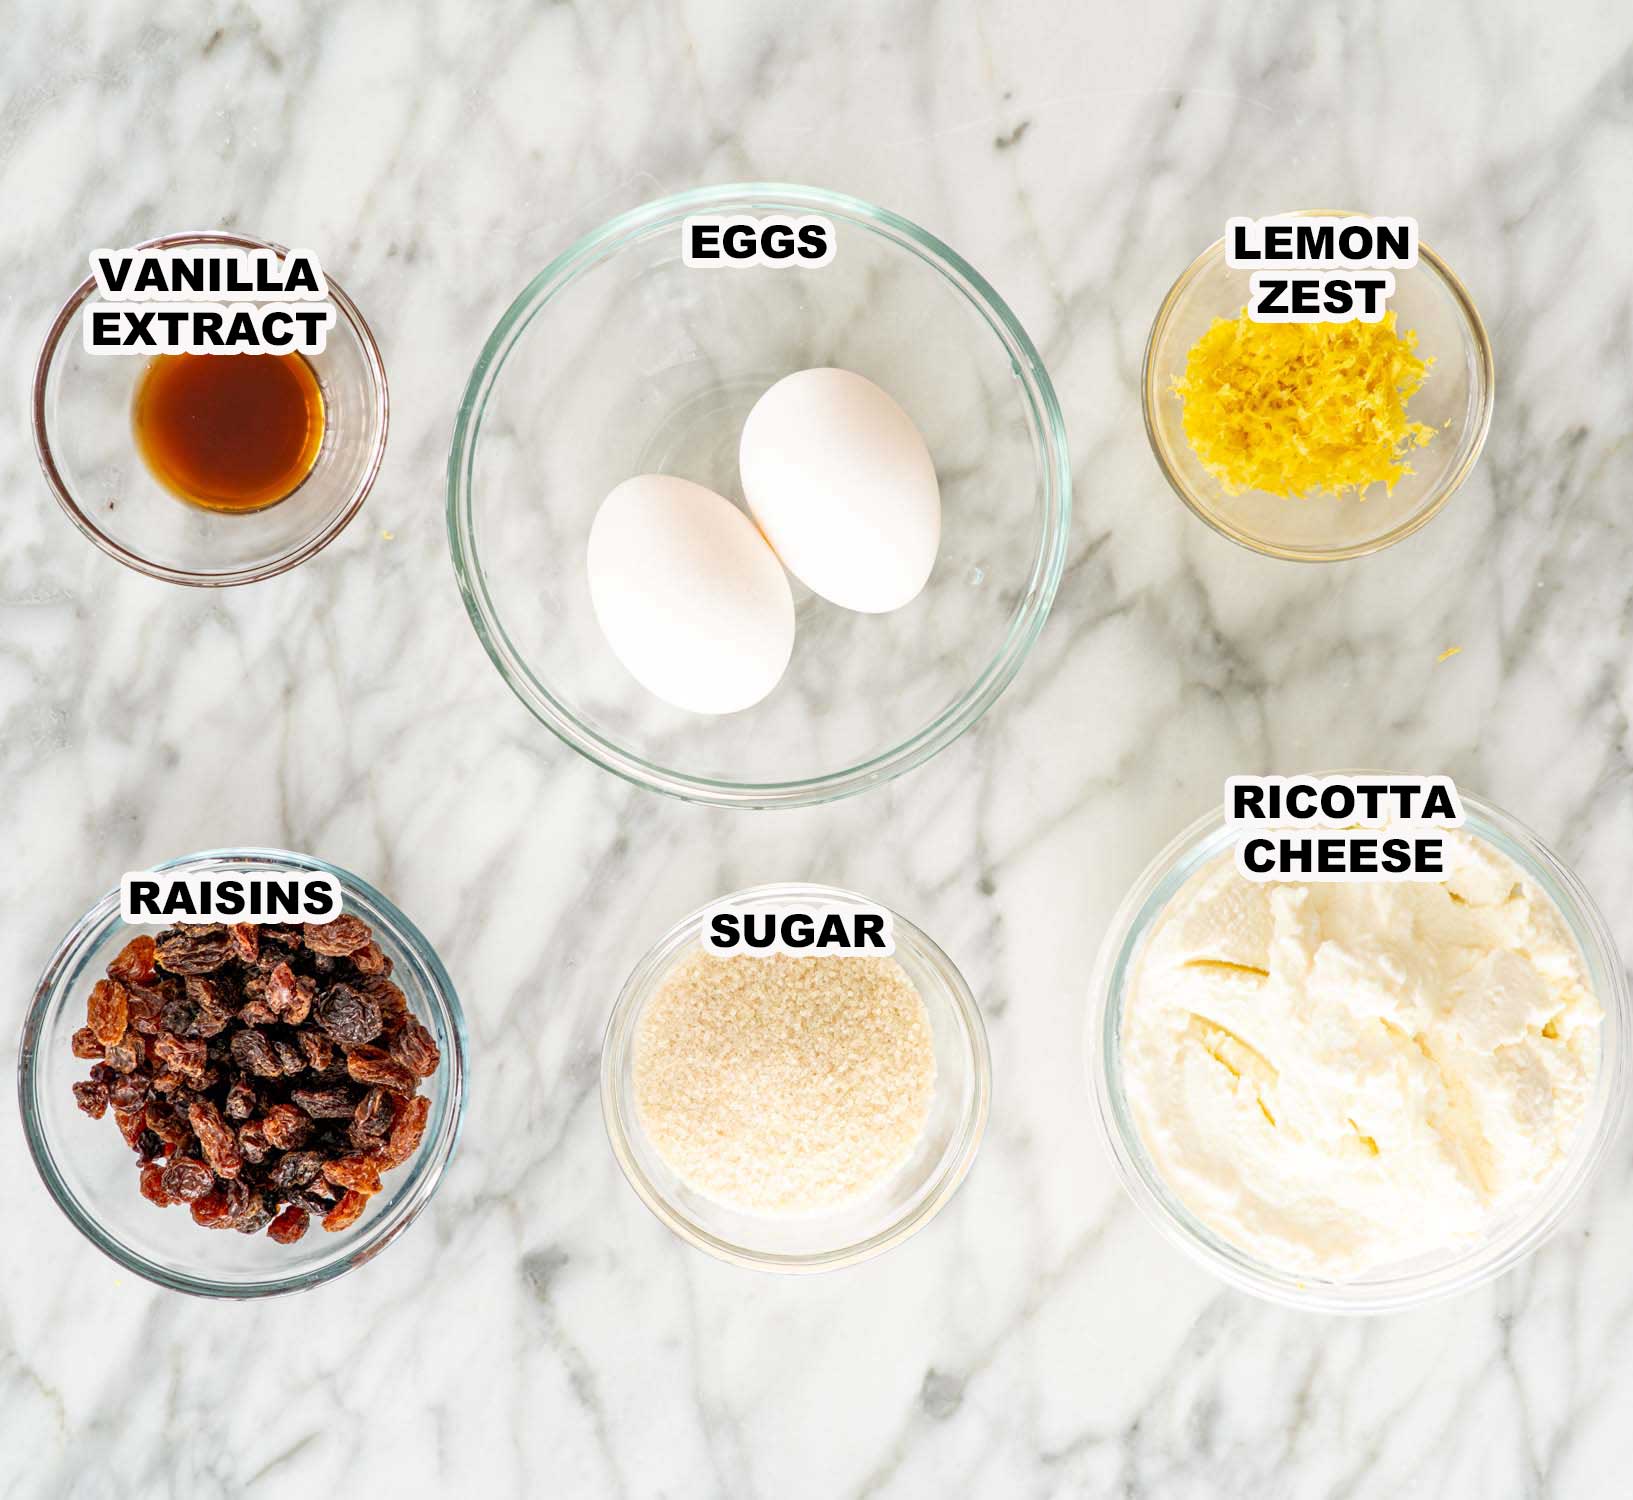
- Ricotta cheese – You can use a low-fat ricotta if you’d like. Since this is the star of the show for your filling, getting a good quality ricotta will taste so amazing.
- Sugar – You can adjust the amount of sugar in the filling to suit how sweet you’d like it to be.
- Eggs – The eggs are used to bind the filling and keep everything together without spilling out when you slice the pasca.
- Lemon zest – The lemon makes the flavor of this filling really pop! You can add more or less zest if you’d like.
- Vanilla – Just like in the dough, the vanilla tastes incredible paired with the lemon zest in your filling.
As I mentioned, making a Pasca can be a challenging and rewarding baking experience, but even though it may seem complicated, there are only two big steps to making this; making the dough and the filling.
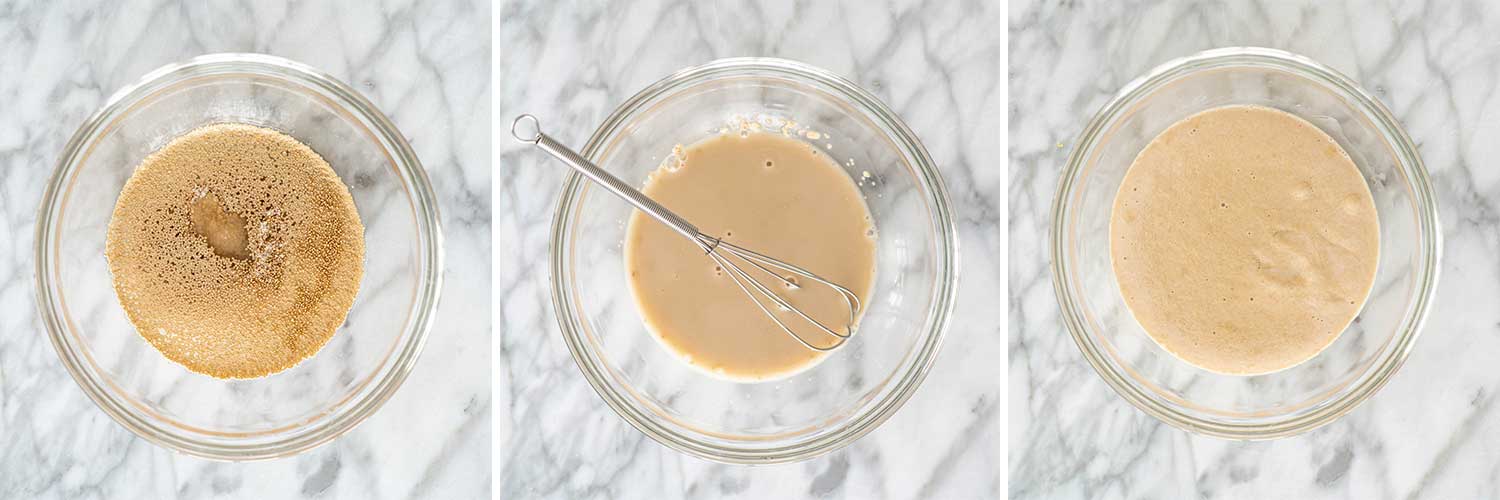
First step is to dissolve the yeast in the warm water. You can add a tablespoon of sugar from the sugar needed for the dough to help activate the yeast. Let it sit for 10 minutes until it has foamed up nicely. If your yeast doesn’t get foamy, don’t move forward. Buy a new jar and store it in the freezer so it lasts longer.
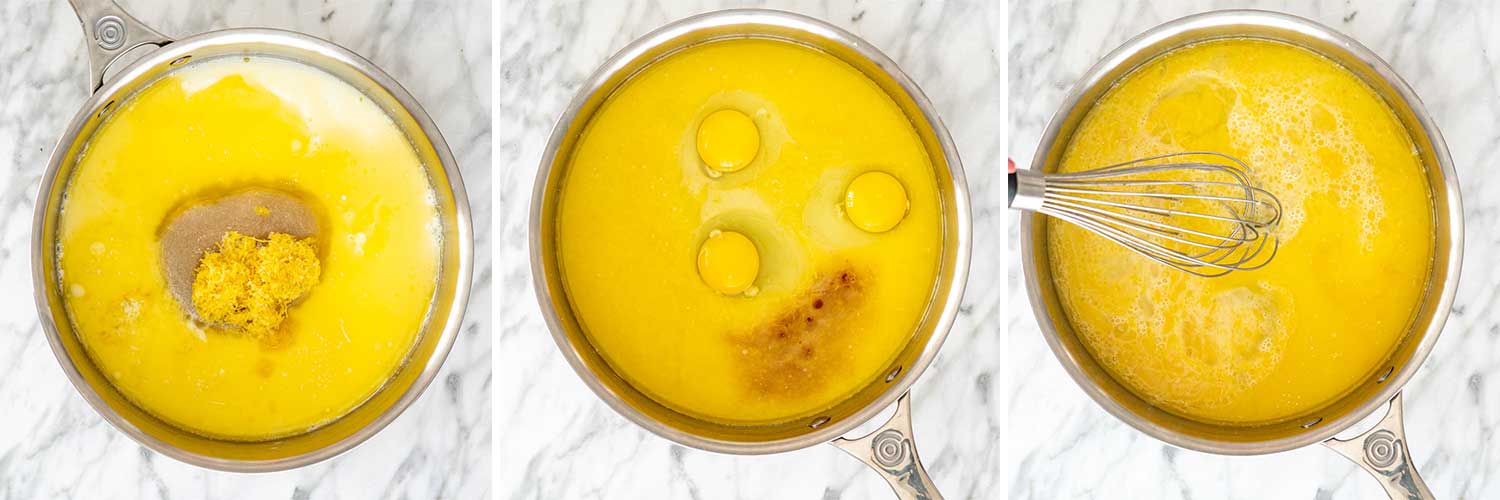
In a saucepan, add the milk, butter, lemon zest, sugar, and vanilla. Stir over medium heat just until the sugar dissolves a bit. We don’t want the mixture to boil or get too hot. It should just be warm to the touch. Remove from heat and whisk in the eggs.
Add the flour, yeast mixture, and milk mixture to the bowl of your mixer. Knead it with the dough hook for about 5 minutes until it’s soft and elastic. Remove the dough, spritz the bowl with cooking oil, place the dough back in, cover with a clean kitchen towel, and let the dough rise until doubled in size.
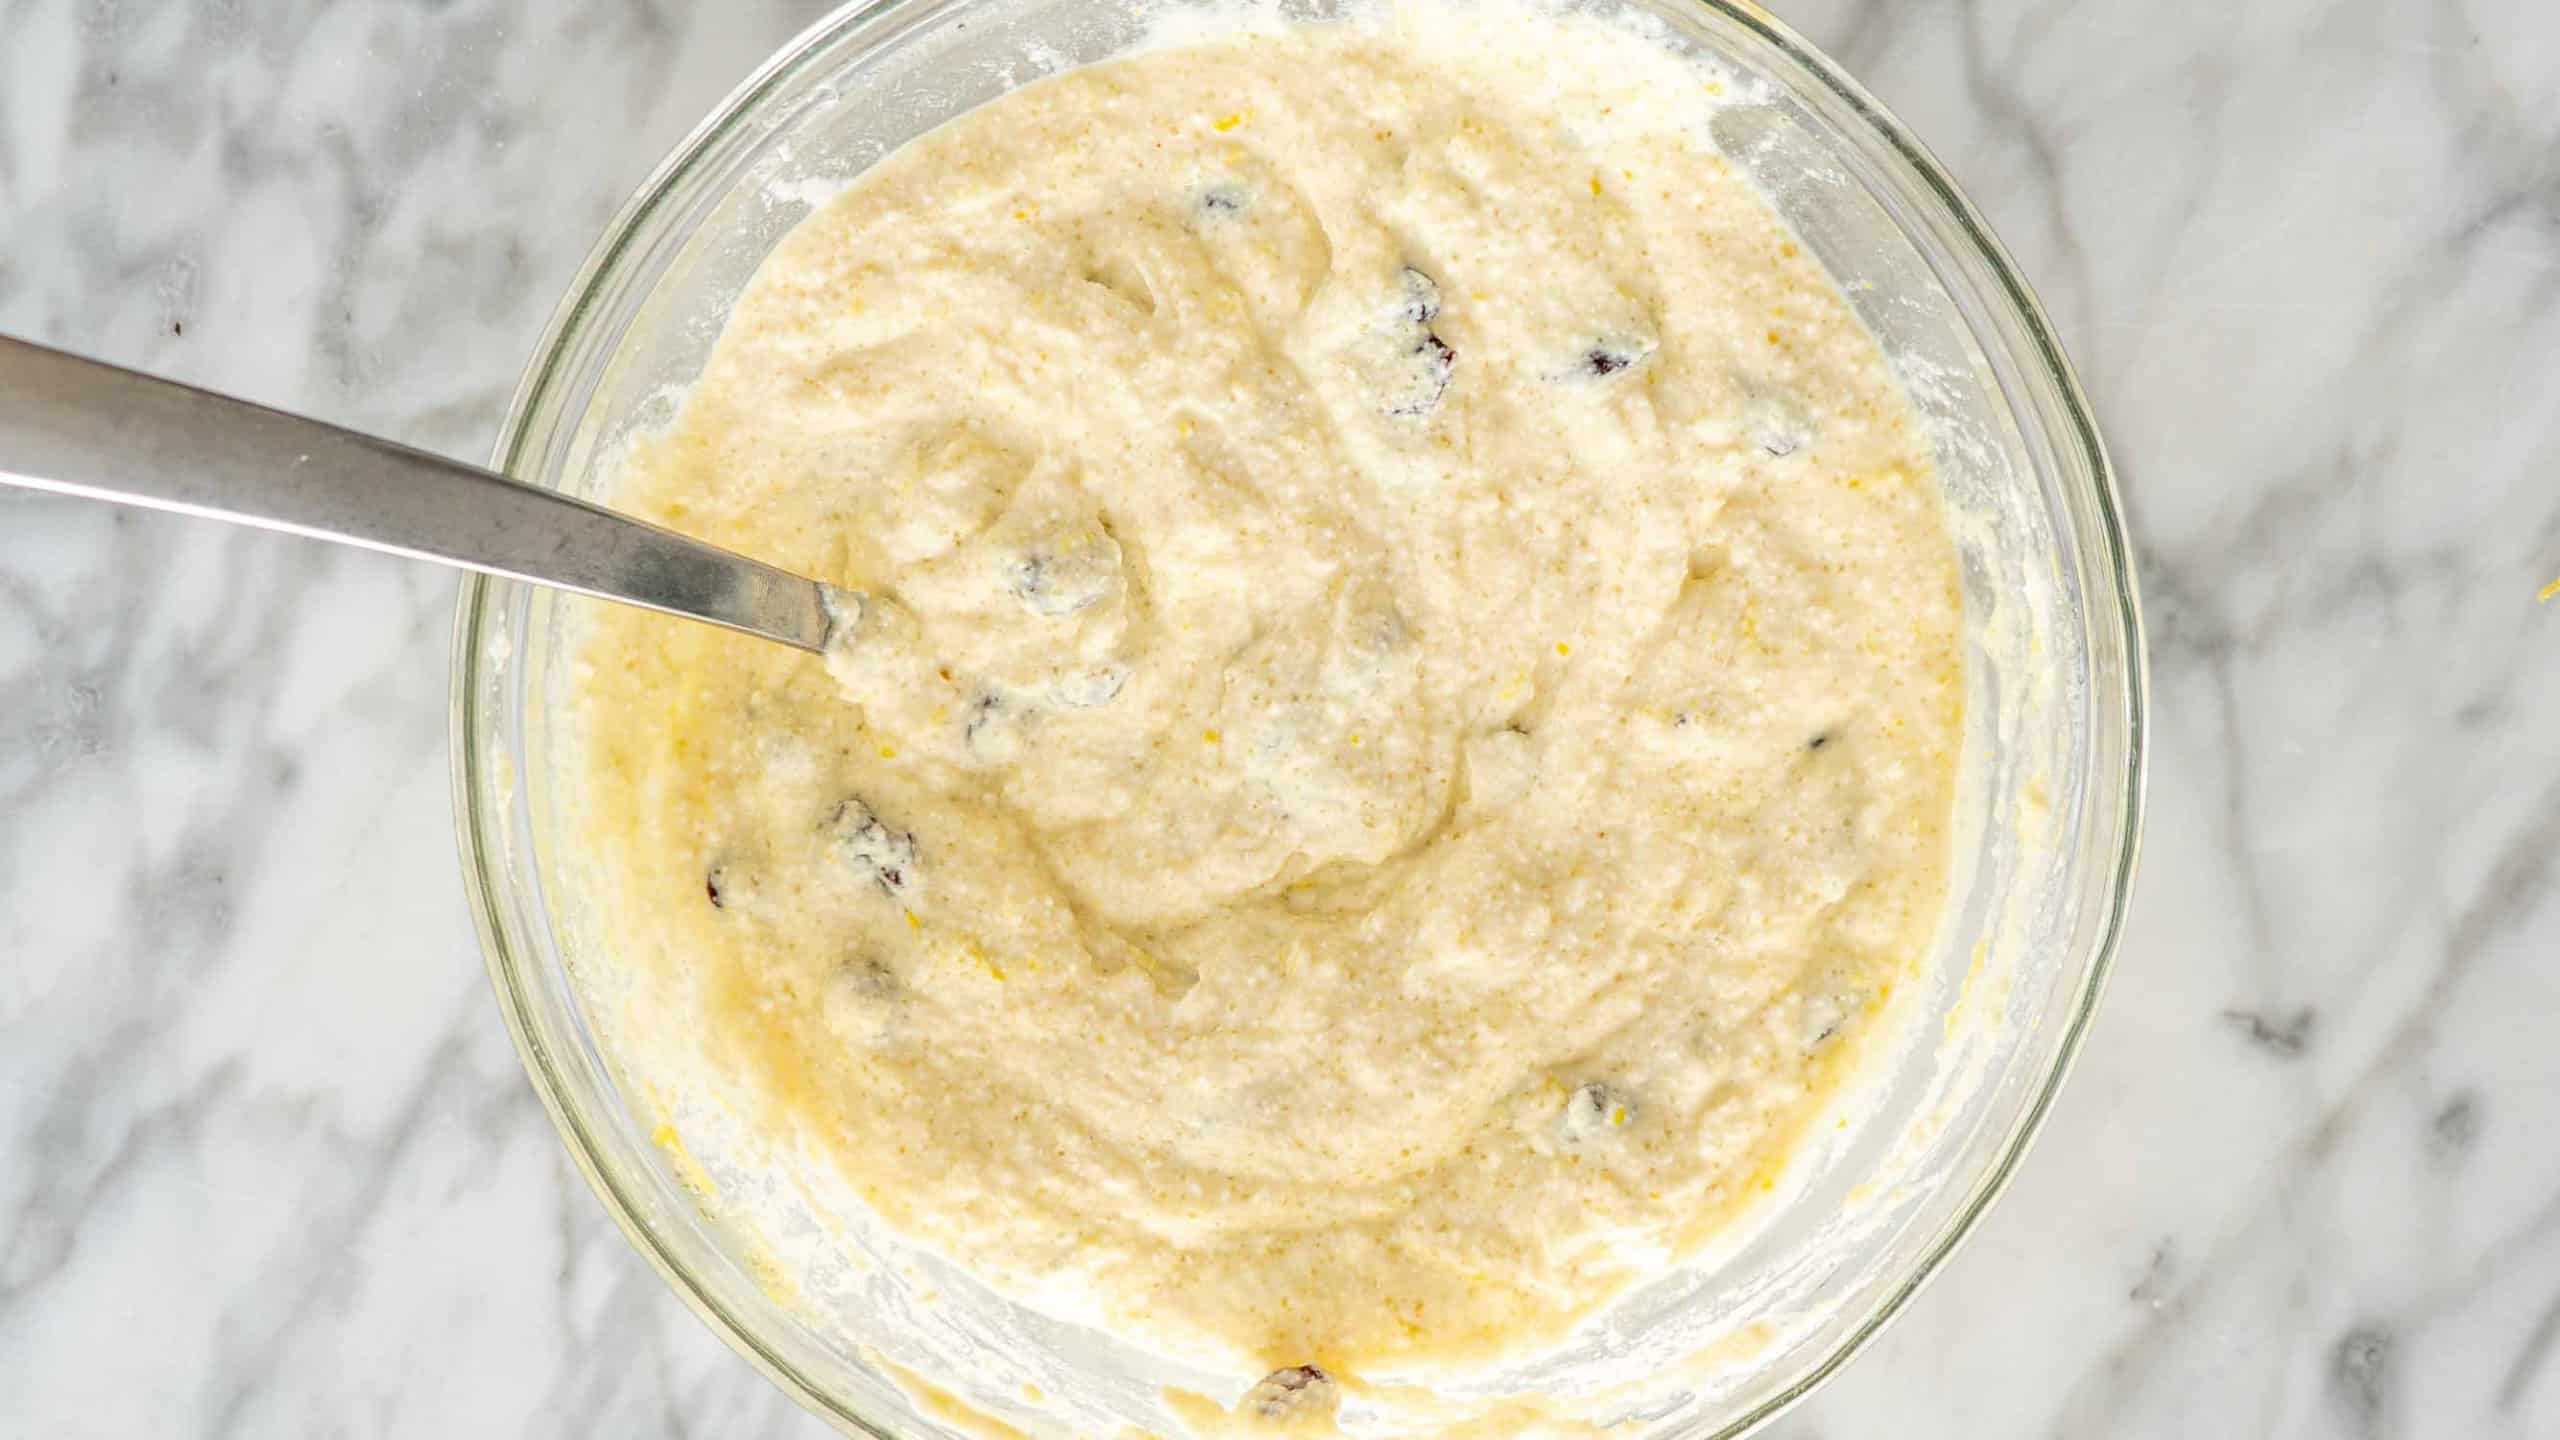
To make the filling is quite easy. Basically, whisk all the filling ingredients together, cover with plastic wrap, and store in the fridge until you’re ready to use it.
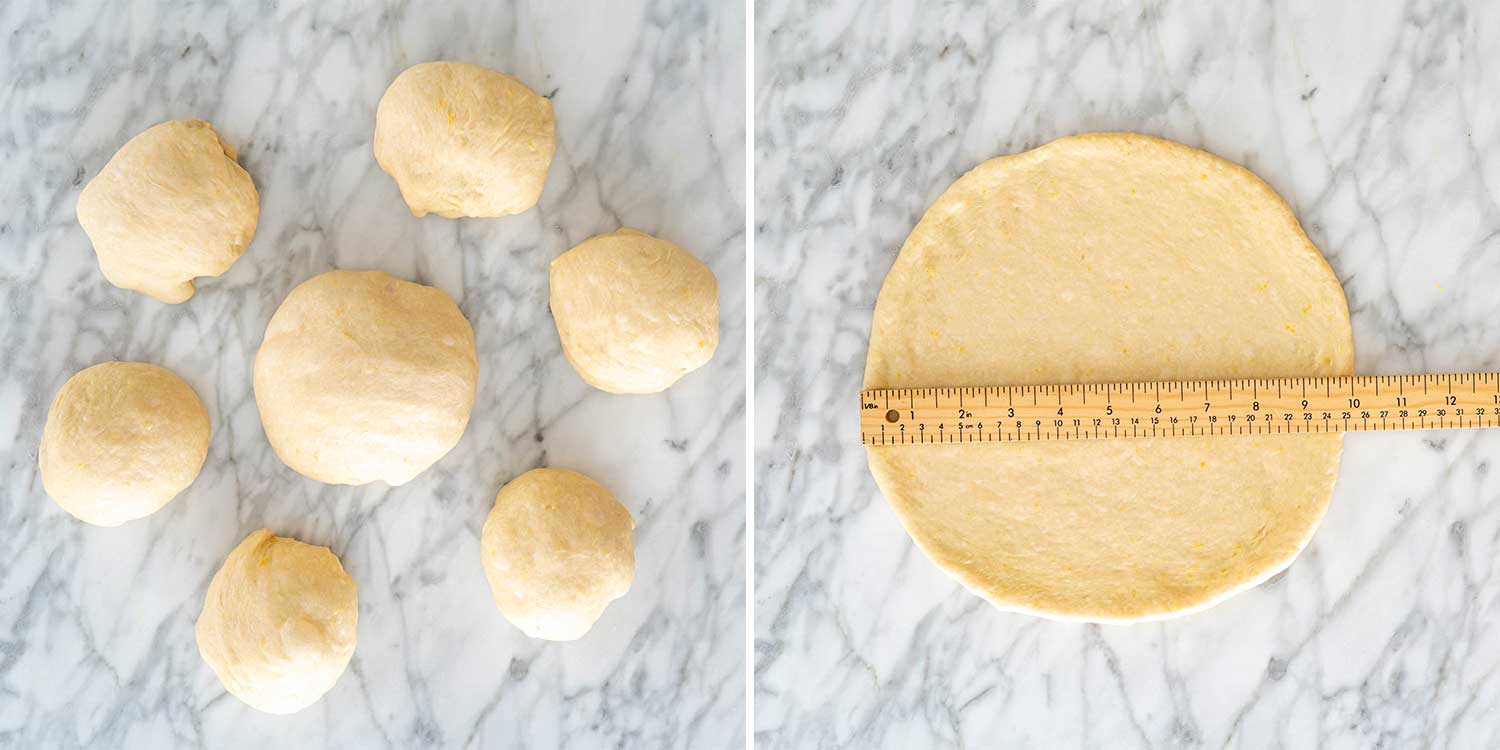
First, you’ll need to split the dough into 4 equal-sized pieces. Spritz them with some cooking spray so they don’t dry out. Take 3 of the pieces and cut them in half, so you should end up with 6 smaller pieces and 1 larger one. Roll out the large piece until it’s about 10″ in diameter. Place this onto a baking sheet lined with parchment paper.

Roll the remaining balls of dough into 6 long ropes, about 3 feet long. Place the ropes side-by-side on a lightly floured surface, then pinch the top ends together. Take the rope on the far right and bring it over two ropes to the left, then tuck it under the third rope. Take the rope on the far left and bring it over two ropes to the right, then tuck it under the third rope. Continue braiding the ropes, alternating between the left and right ropes, until you reach the end. Finally, pinch the bottom ends of the ropes together, then tuck them under the braid to create a neat finish.
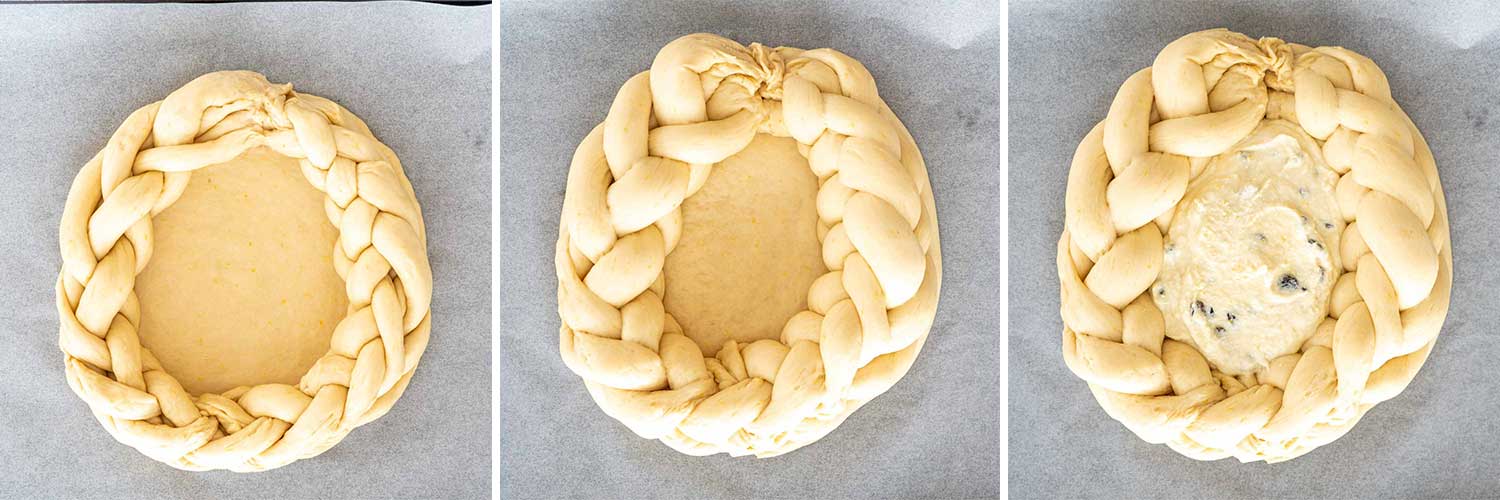
Form a circle with the braid and place it on top of the rolled out dough on the baking sheet. Cover the Pasca with a clean kitchen towel and let it rise in a warm, draft-free place for another 30-45 minutes. Pour the filling into the center of the pasca and brush it with the beaten egg.
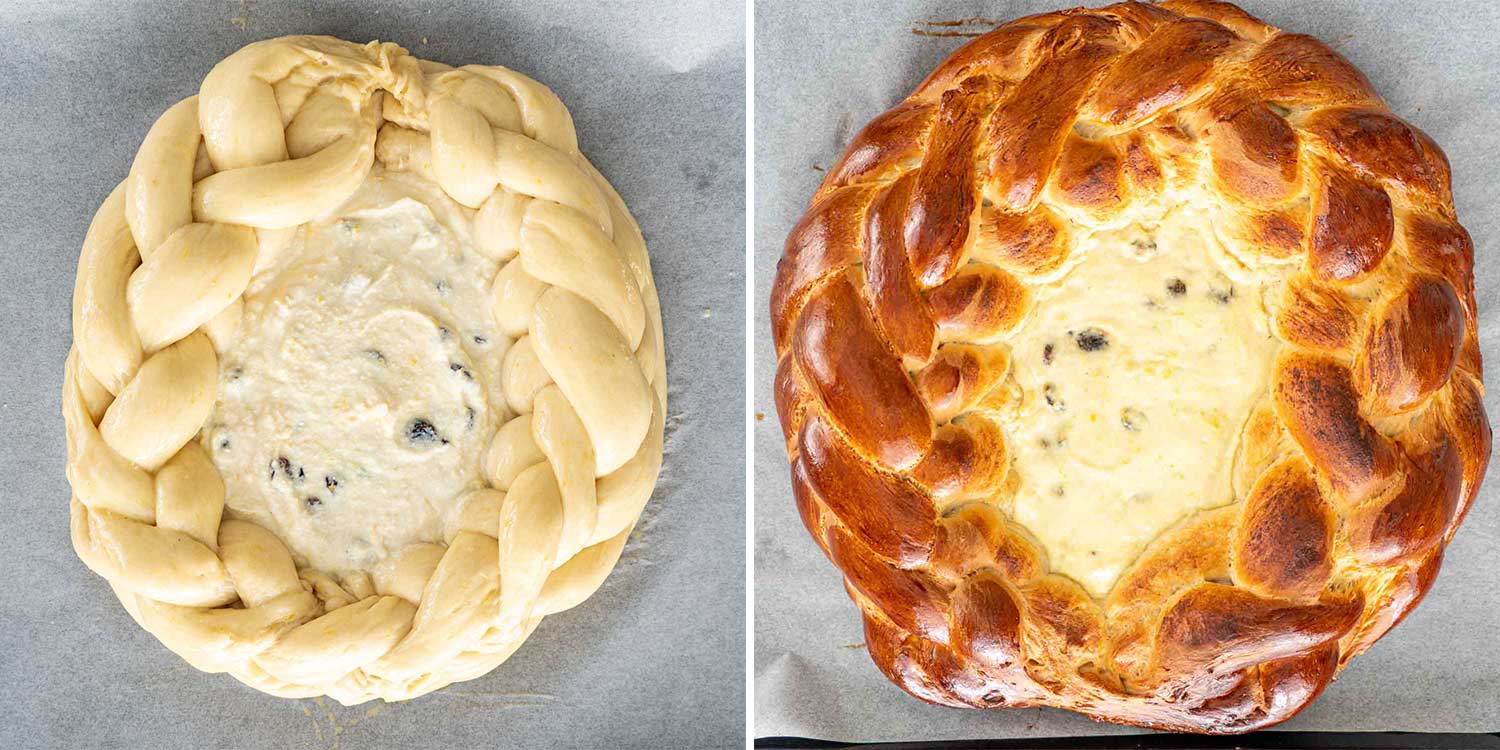
While you wait for your bread to rise, preheat the oven to 350°F (180°C). Transfer the baking sheet to the oven and bake the pasca for 45 minutes or until nicely browned. The centre will still be a bit jiggly when you take it out but should settle while it cools.
What Is Pasca?
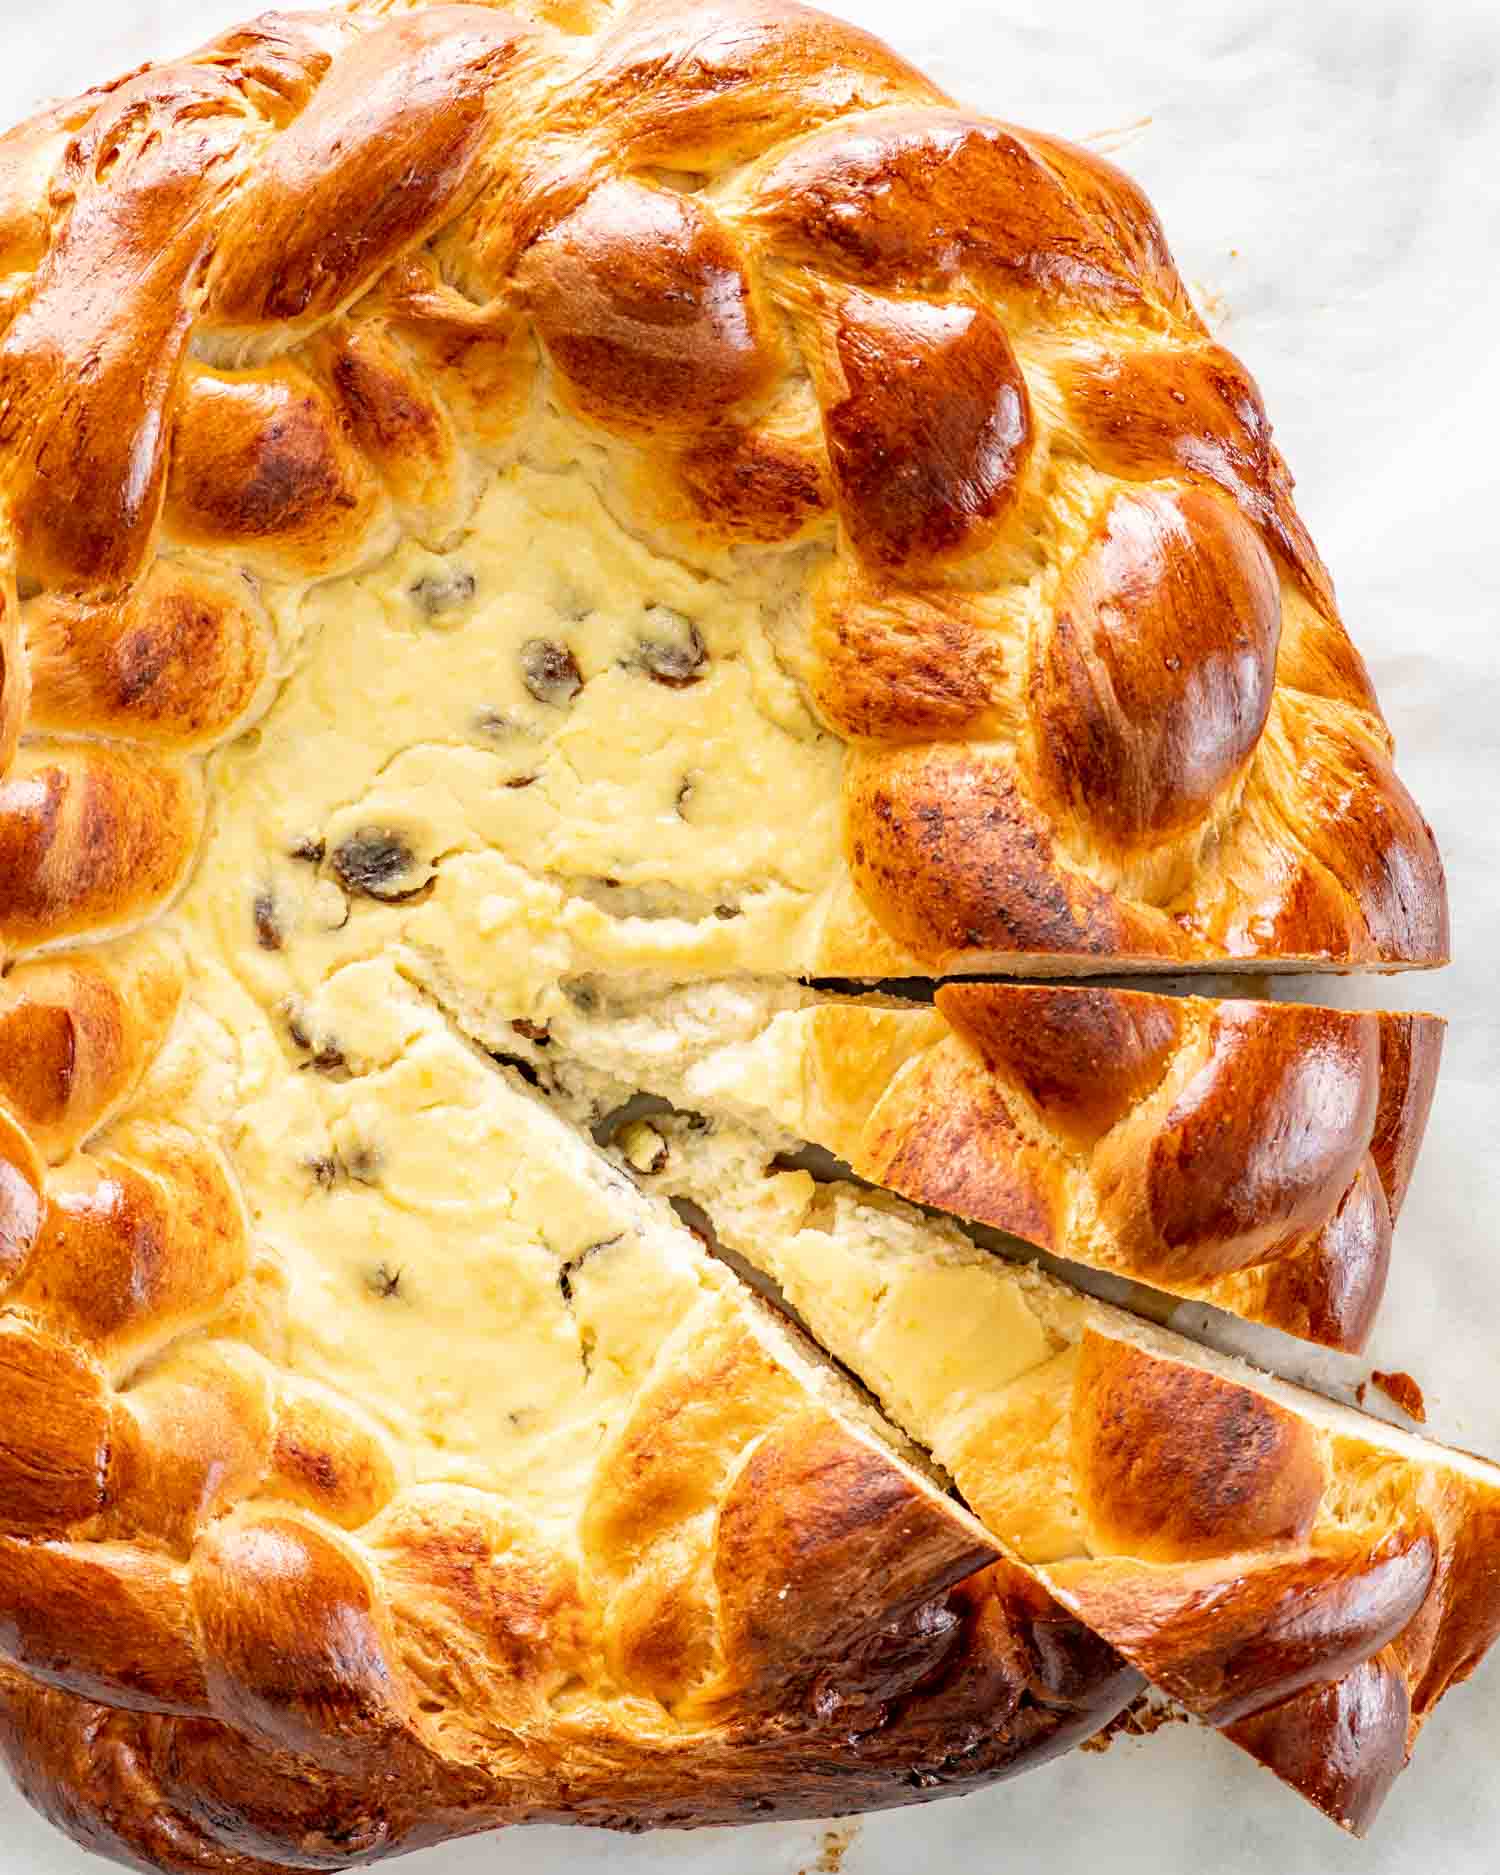
This is a sweet bread or cake that everyone has on their tables for Easter in Romania. It’s as popular as hot cross buns are here in North America – it’s serious business. What I really love about this particular sweet bread is that with the ricotta filling, you can slice it up and serve on its own for a light meal. It’s like an Italian panettone meets cheesecake!
Can I Make Pasca Without Cheese?
hile cheese is an essential ingredient in Pasca, you can experiment with other fillings such as fruit, nuts, or chocolate chips. However, keep in mind that the texture and flavor of the Pasca will be different without the cheese.
Can I Make Pasca Gluten-Free?
Yes, you can make Pasca gluten-free by using a gluten-free flour blend and a suitable thickener for the cheese filling such as cornstarch or arrowroot powder. Keep in mind that the texture and flavor may be different from traditional Pasca.
Expert Tips
- Use good quality cheese: Pasca requires a type of fresh cheese called “branza de vaci” which can be difficult to find outside of Romania. However, you can substitute it with ricotta cheese or a combination of ricotta and cream cheese. Make sure you use a good quality cheese that’s not too dry, as the moistness of the cheese is important to achieve the right texture for the Pasca.
- Knead the dough well: The dough for Pasca needs to be kneaded well to develop the gluten and create a strong structure that can support the weight of the filling. Knead the dough until it becomes smooth and elastic, but don’t overdo it as this can make the dough tough.
- Let the dough rise properly: Allow enough time for the dough to rise properly before shaping it into the Pasca. The first rise should take around 1-2 hours, depending on the temperature of your kitchen.
- Add raisins and vanilla: Pasca traditionally contains raisins and vanilla, which add flavor and sweetness to the filling. You can soak the raisins in hot water or rum for a few minutes before adding them to the cheese mixture, as this will plump them up and prevent them from burning during baking.
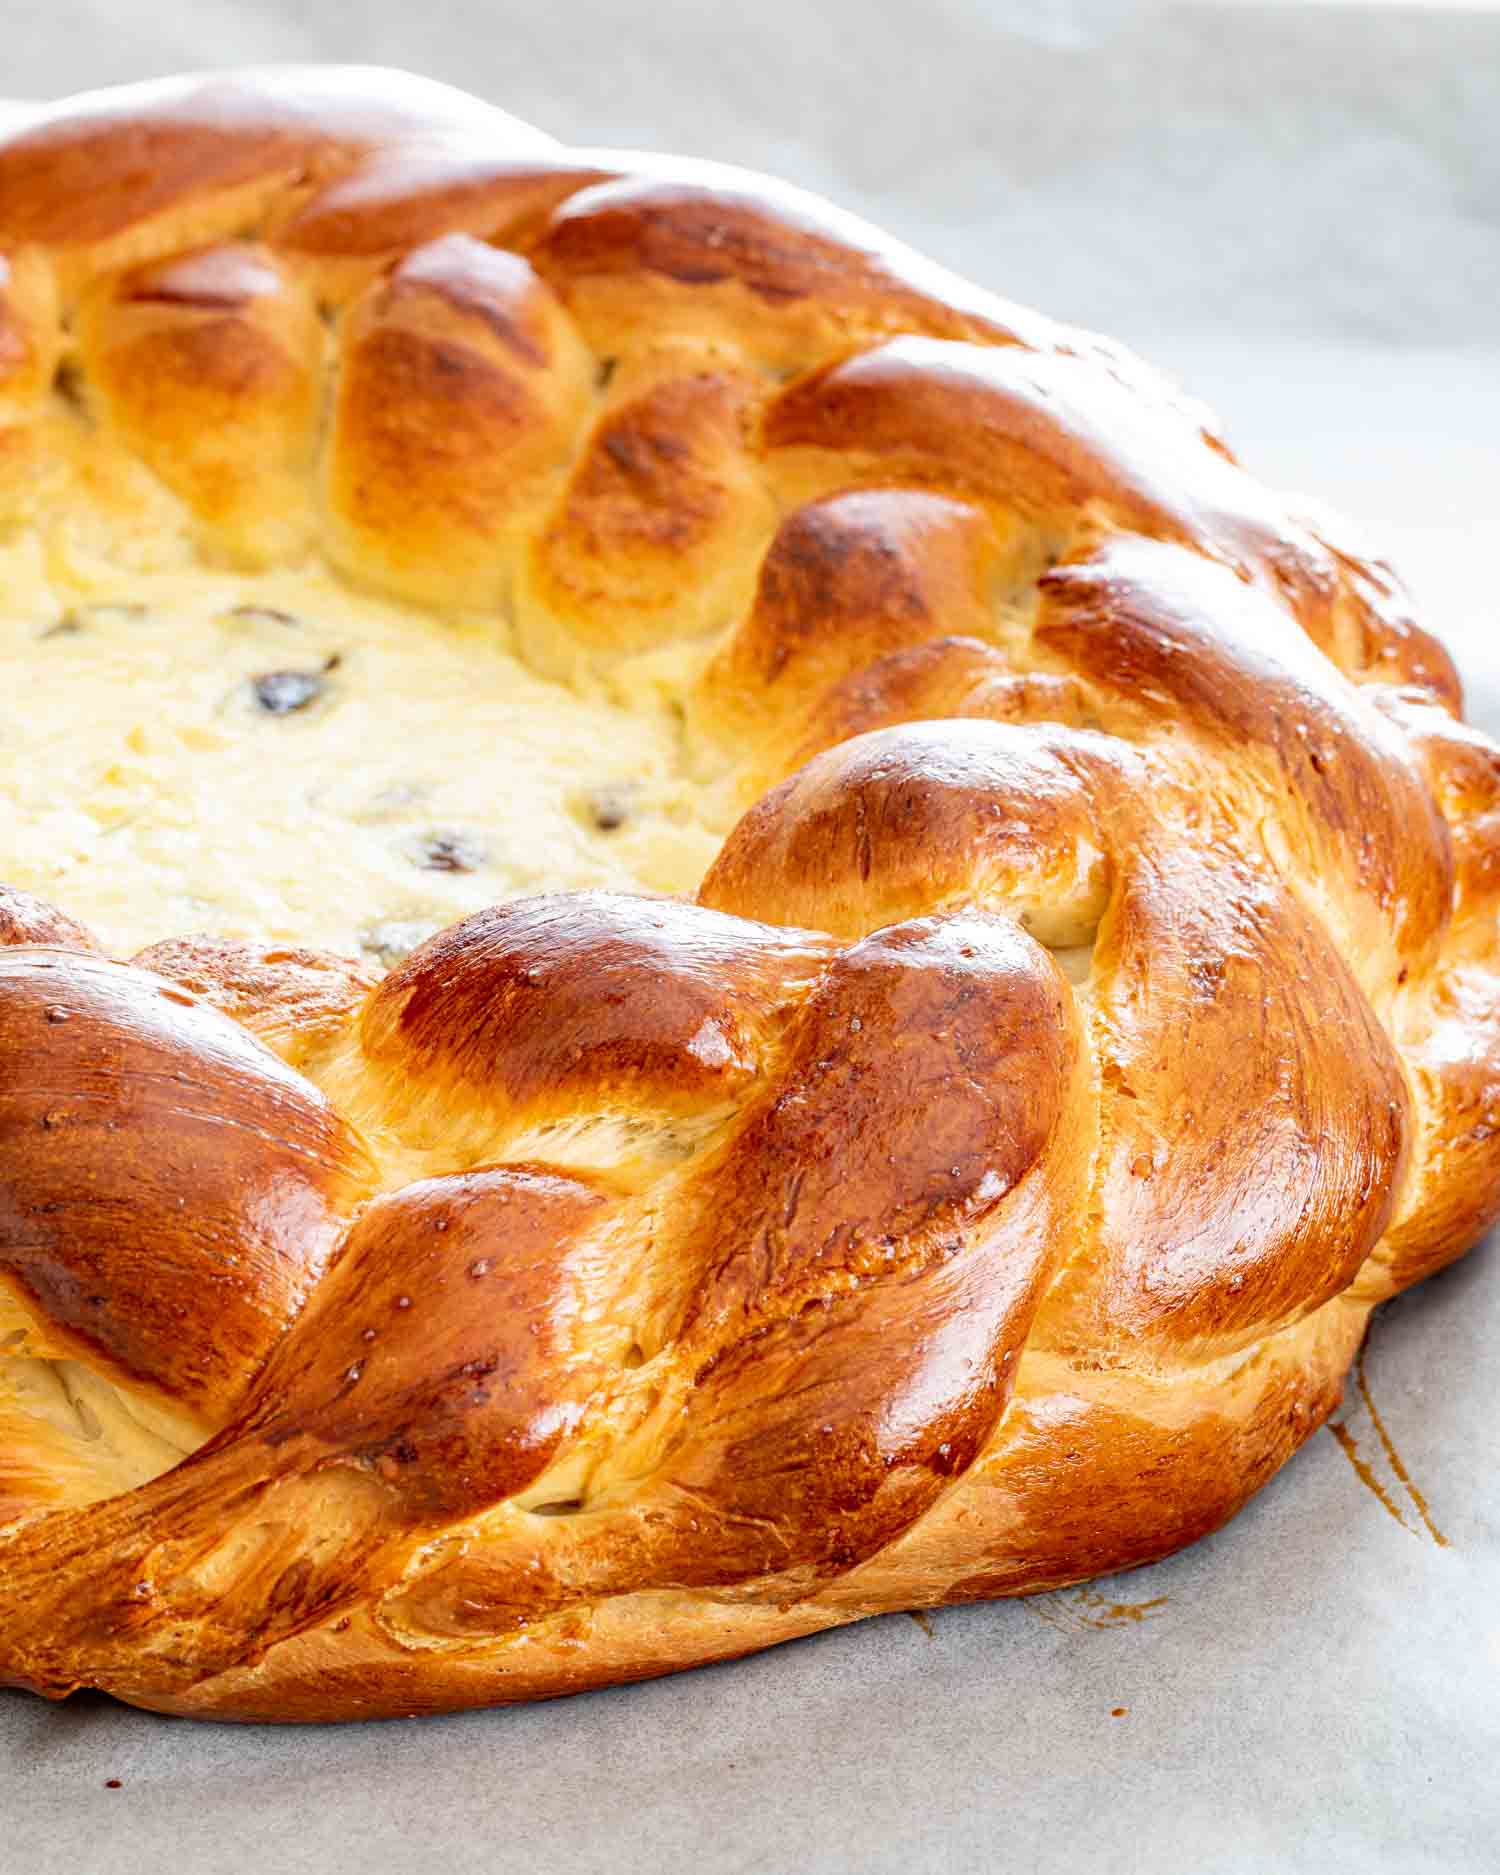
- Brush with egg wash: Brushing the Pasca with egg wash before baking will give it a beautiful golden-brown color and a shiny surface. You can also sprinkle some sugar on top of the egg wash to add extra sweetness and crunch.
- Cool before slicing: Allow the Pasca to cool completely before slicing, as this will make it easier to handle and prevent it from falling apart. Serve it at room temperature or slightly warm, with a dollop of sour cream or jam on top if desired.
Storage
Pasca can be stored at room temperature for up to 3 days or in the refrigerator for up to 1 week. Make sure you wrap it tightly in plastic wrap or foil to prevent it from drying out.
You can also freeze Pasca for up to 2 months. Wrap it tightly in plastic wrap and foil before freezing. To thaw, let it sit at room temperature for a few hours or overnight in the refrigerator.

Other Delicious Romanian Recipes To Try
- Romanian Meatball Soup (Ciorba de Perisoare)
- Walnut Roll (Cozonac cu Nuca)
- Romanian Stuffed Peppers (Ardei Umpluti)
- Beef Salad (Salata de Boeuf)
- Romanian Cabbage Rolls (Sarmale)
- White Bean Dip
Before You Begin! If you make this, please leave a review and rating letting us know how you liked this recipe! This helps our business thrive & continue providing free recipes.
Pasca – Romanian Easter Bread
Video
Ingredients
Pasca Dough
- 1 tablespoon active dry yeast
- ¼ cup warm water
- 1 cup milk
- ½ cup butter (unsalted, melted)
- 2 tablespoon lemon zest
- ½ cup sugar
- 4⅔ cups all-purpose flour
- 3 large eggs
- 1 teaspoon vanilla extract
Cheese Filling
- 1 pound ricotta cheese
- 2 large eggs
- 1 teaspoon vanilla extract
- ¼ cup sugar
- ½ cup raisins
- 1 tablespoon lemon zest
- 1 egg (beaten, for egg wash)
Before You Begin! If you make this, please leave a review and rating letting us know how you liked this recipe! This helps our business thrive & continue providing free recipes.
Instructions
- In a bowl add the yeast and warm water, stir it a bit and let it sit for 10 to 15 minutes to activate. You can also add 1 tbsp of sugar from the 1/2 cup of sugar needed for the dough, to help activate the yeast. The yeast should bubble up. If you don't see it bubble up, then the yeast is old. Do not proceed because your bread will not rise.
- In a sauce pan add the milk, butter, lemon zest and sugar. Heat it over medium-low heat just until the butter melts and the sugar is dissolved. Do not boil it, it just needs to be warm to the touch. If it gets too hot it can kill the yeast. Remove from heat. Whisk in the eggs.
- To the bowl of your mixer add the flour, the milk mixture, and the yeast mixture. Using the dough hook mix everything for about 5 minutes until everything is well blended together and the dough should come off the sides of the bowl. The dough will be a softer dough and somewhat sticky to your hands. The more you mix the dough the fluffier it will be.
- Take a large bowl and oil it with about 1 tbsp of the vegetable oil. Place the dough in the bowl and use the other tbsp of vegetable oil to rub over the dough. Cover the bowl with plastic wrap and place in a warm, draft free environment. Let the dough rise until it doubles in size, could take 1 to 2 hours. Alternatively you could let the dough rise in the mixer bowl.
- Preheat the oven to 350°F(180°C). Line a large baking sheet with parchment paper.
- Divide the dough into 4 equal pieces. Take one piece and roll it into a 10 inch circle. Place it on the prepared baking sheet. Divide the other 3 pieces in half so that you end up with 6 pieces.
- Roll each one into thin ropes about 3 feet long. Braid them and place them in the prepared pan in a circle around the edge of the 10 inch circle. Let this rise for a 2nd time until doubled in size.
- Make the cheese filling by mixing all the ingredients together. Pour this into the pasca (see pictures).
- Brush the dough with egg wash and bake for about 40 to 45 minutes or until the crust is deep brown but not burnt. Let the pasca cool before slicing and serving.
Notes
- Knead the dough well: The dough for Pasca needs to be kneaded well to develop the gluten and create a strong structure that can support the weight of the filling. Knead the dough until it becomes smooth and elastic, but don’t overdo it as this can make the dough tough.
- Let the dough rise properly: Allow enough time for the dough to rise properly before shaping it into the Pasca. The first rise should take around 1-2 hours, depending on the temperature of your kitchen.
- Add raisins and vanilla: Pasca traditionally contains raisins and vanilla, which add flavor and sweetness to the filling. You can soak the raisins in hot water or rum for a few minutes before adding them to the cheese mixture, as this will plump them up and prevent them from burning during baking.
- Brush with egg wash: Brushing the Pasca with egg wash before baking will give it a beautiful golden-brown color and a shiny surface. You can also sprinkle some sugar on top of the egg wash to add extra sweetness and crunch.
- Cool before slicing: Allow the Pasca to cool completely before slicing, as this will make it easier to handle and prevent it from falling apart. Serve it at room temperature or slightly warm, with a dollop of sour cream or jam on top if desired.
Nutrition Information
Notice: Nutrition is auto-calculated for your convenience. Where relevant, we recommend using your own nutrition calculations.
