Cheesy Breadsticks
This post may contain affiliate links. Please read my disclosure policy.

You can have super soft, rich buttery, totally delicious homemade Cheesy Breadsticks with this easy 7-ingredient recipe! It’s a simple dough that comes together very quickly that is then filled with cheddar cheese, twisted, topped with lots of yummy Parmesan cheese, and then baked to perfection in just a matter of minutes!

Easy Cheesy Breadsticks Recipe
Hello cheese lovers! Get ready for your new favorite extra cheesy carb overload! No joke! These cheesy breadsticks are pretty amazing! It’s such an easy recipe that even the most novice bread makers will have no problems at all. In fact, it’s a great recipe for a fun day in the kitchen with the kids.
They are so darn good! Soft on the inside and crispy on the outside with tasty browned cheese twisted into the dough. The recipe calls for both parmesan and cheddar cheese, which add to the cheesiness in different ways. The parmesan adds a nice salty touch and the cheddar melts so well. But this recipe is really versatile. So feel free to use any type of cheese you like. Spicy jack could be yummy if you want some added spice!
Once these cheesy breadsticks come out of the oven, they don’t last long in my house! So they never seem to stick around long enough! But they are also perfect for dipping into some Pizza Sauce for a snack or laid-back appetizer as well as a fantastic addition to almost any pasta dish like my Sausage Pepper Pasta. Trust me, your family will not be disappointed!

Why You’ll Love These Cheesy Breadsticks
- Quick and Easy! With just 7 basic ingredients you can have warm cheesy, ready to eat breadsticks totally homemade! This is the perfect recipe for beginners and kids.
- Soft Cheesy Breadsticks! With freshly grated parmesan and cheddar cheese twisted into a flavorful buttery dough, these soft breadsticks are incredibly tasty.
- Freezer Friendly! These breadsticks will keep in the freezer for months. So you can easily double this recipe and freeze half so that you can have homemade breadsticks at any time.
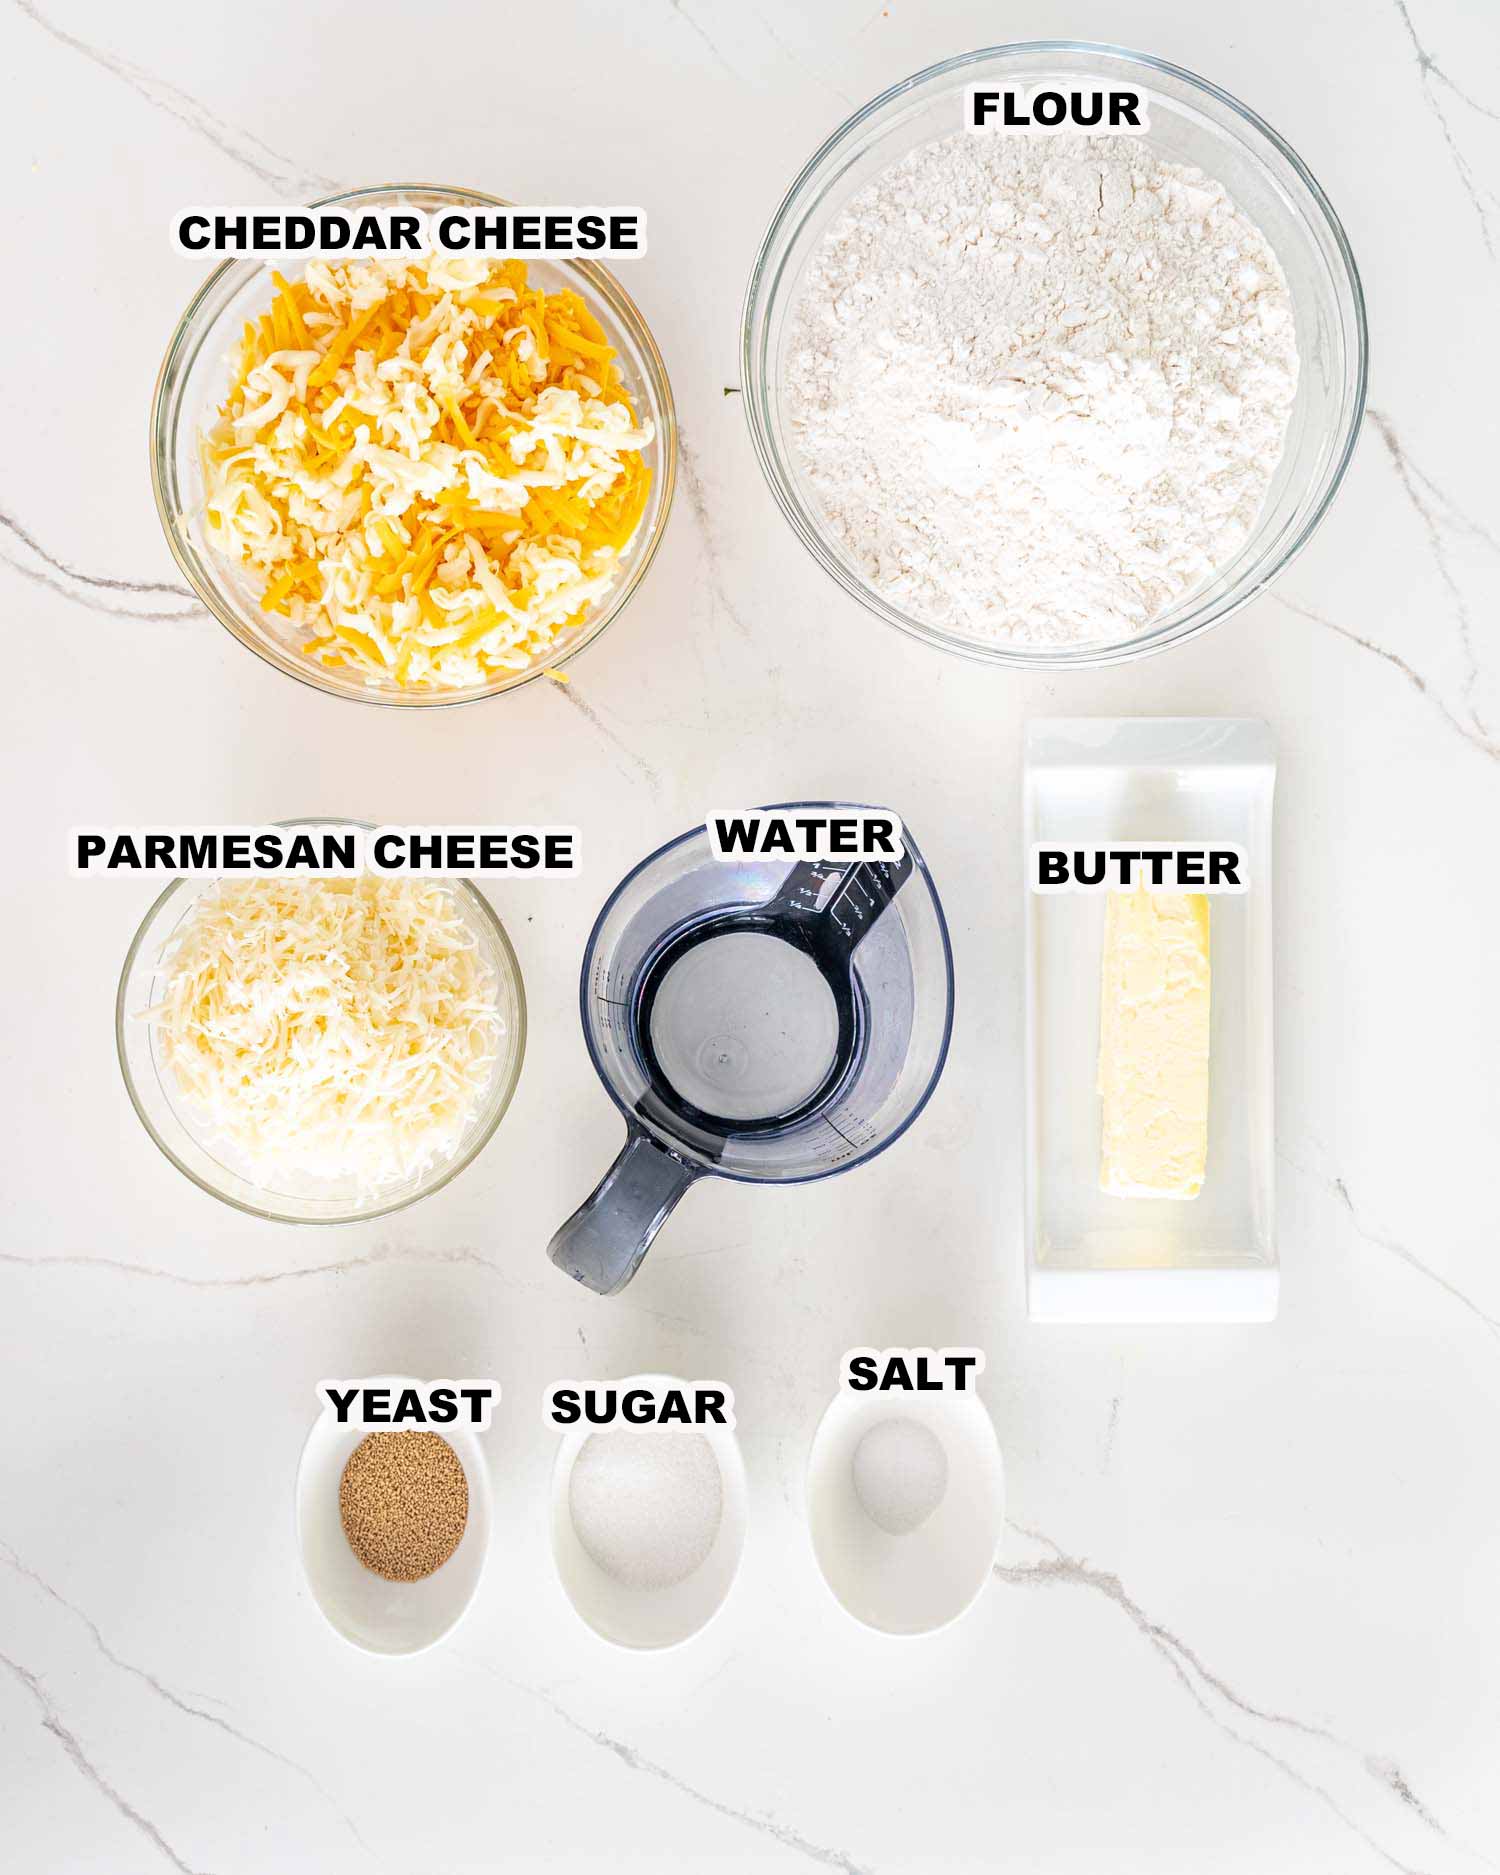
- Warm Water – You’ll need a bit of water to activate the yeast. And it must be warm or the yeast will not bloom properly. Make sure the water is between 98℉ and 105℉ (36.5°C to 40.5°C).
- Sugar – Helps to activate the yeast and adds a touch of sweetness.
- Active Dry Yeast – Used to make the dough rise. Make sure to check the expiration date on your yeast.
- Flour – Simple all-purpose flour is all you need. But bread flour will also work.
- Salt – A dash of salt enhances the flavor of the dough.
- Butter – Always use unsalted butter to control the amount of added salt.
- Parmesan Cheese – Sprinkled on the dough before baking to add some salty cheesiness.
- Cheddar Cheese – For extra cheesy flavor I used both white and yellow cheddar cheese. However, you can use any type of cheese you like as long as it melts well.
This recipe is one of the easiest ways to make breadsticks that come out perfect every time! I use a stand mixer to make the dough, but it can be done by hand too!
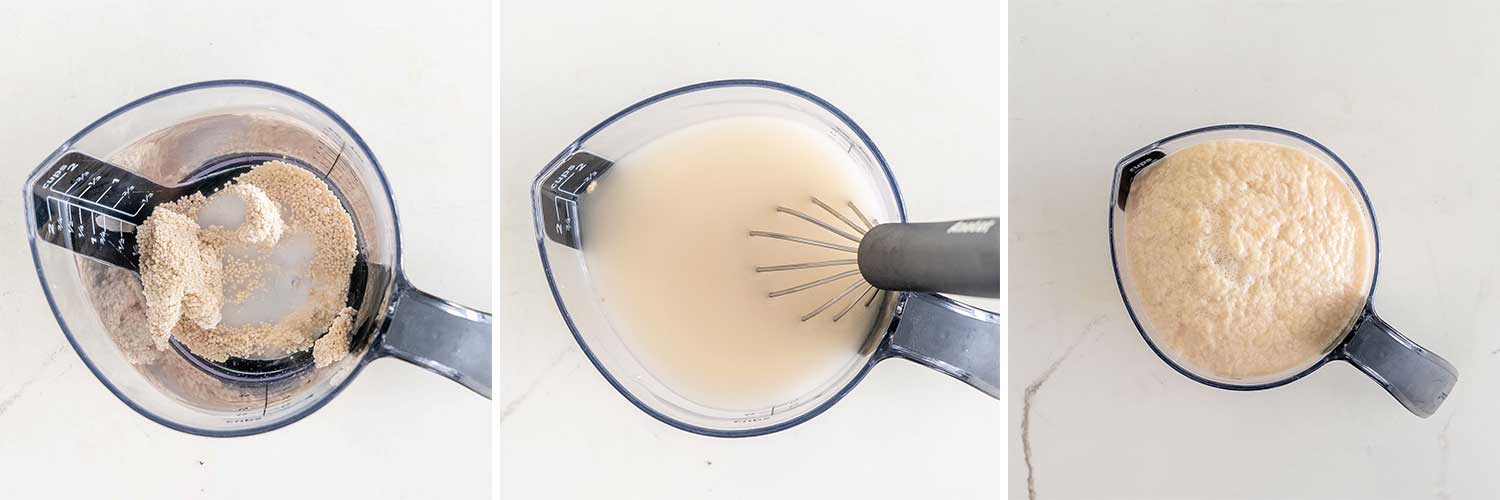
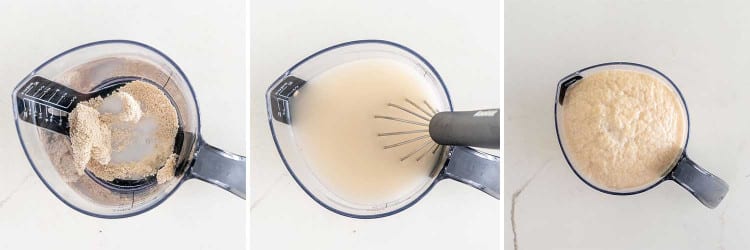
To begin, you need to bloom the yeast. This step is the most crucial and what makes the dough rise, yet it’s super easy to do. Just stir the warm water, yeast, and sugar together with a fork in a small bowl. Then let the mixture sit undisturbed for 10 minutes until the yeast bubbles and foams up. However, if your yeast doesn’t bubble or rise, don’t move forward with the recipe. Sadly this means that your yeast is dead.
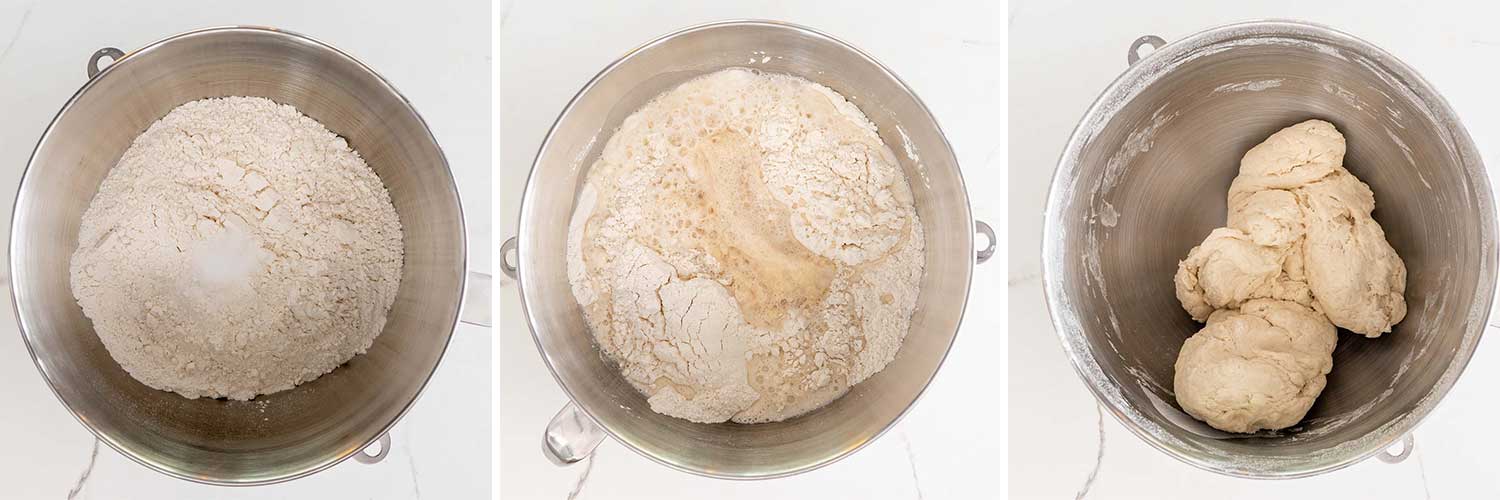
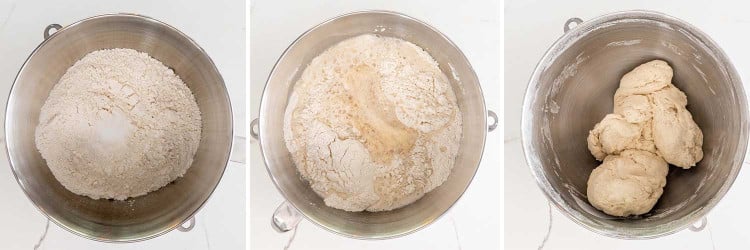
After the yeast has been activated, you can start making the dough. First, mix the flour and salt together in the large bowl of your stand mixer. Next, pour the yeast mixture into the bowl and mix everything together on low speed for a couple of minutes using the dough hook. You can stop mixing the dough once it becomes smooth and comes clean from the sides of the bowl.
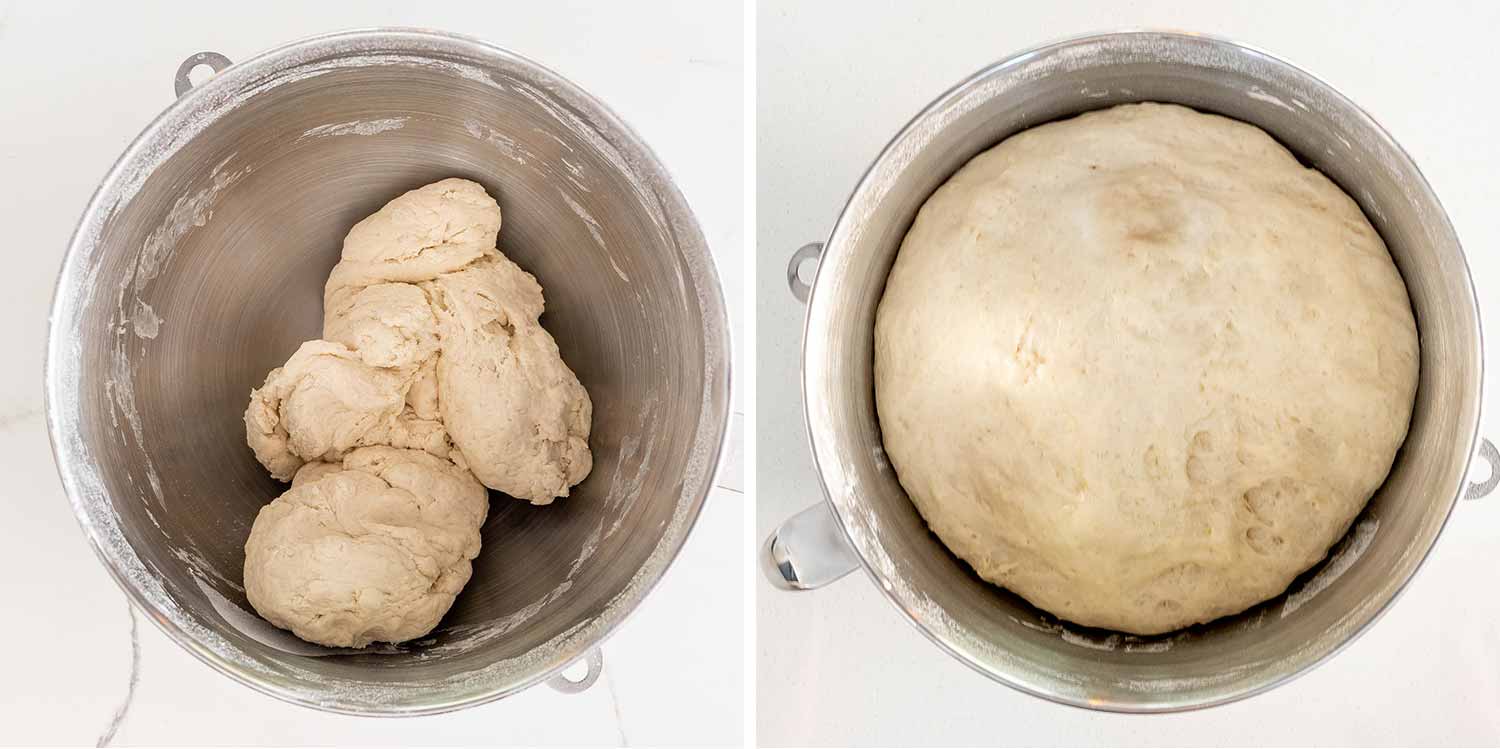
Next, the dough needs to rise so that the rolls are super soft. So transfer the dough to a well oiled bowl and cover it with plastic wrap, or just oil the dough in the mixer bowl and cover it up with plastic wrap. Then set it in a warm environment for about an hour or until it doubles in size.
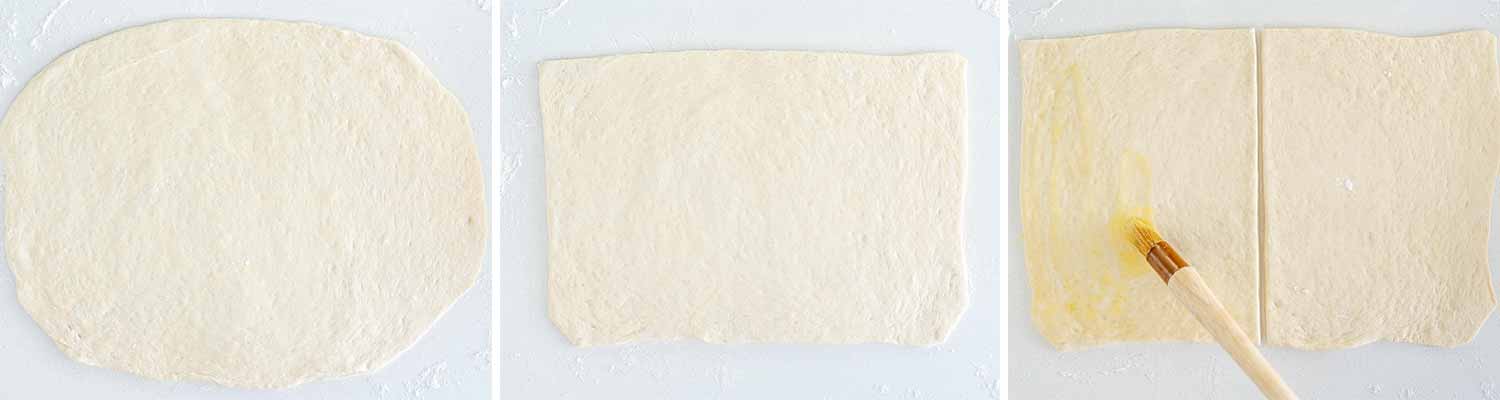
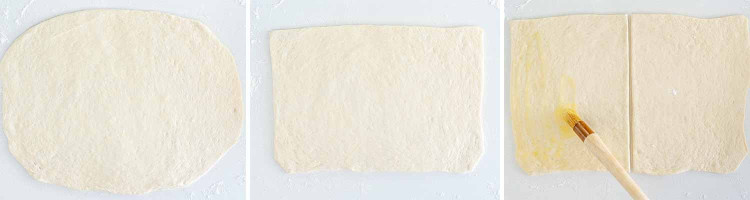
Once the dough has doubled in size, roll it out into a large rectangle that’s about ¼-inch in thickness on a clean floured surface. You can cut the edges off for a perfect rectangle. Cut this rectangle in half.

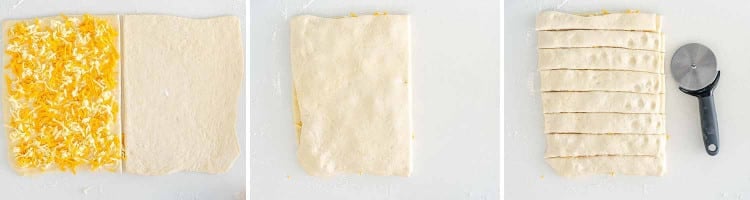
Then use a pastry brush to brush the top of the halves with melted butter. Next, sprinkle the dough with cheddar cheese. Place the other half of dough over the one with the cheese. Cut the dough into long strips that are about 1-inch in thickness.

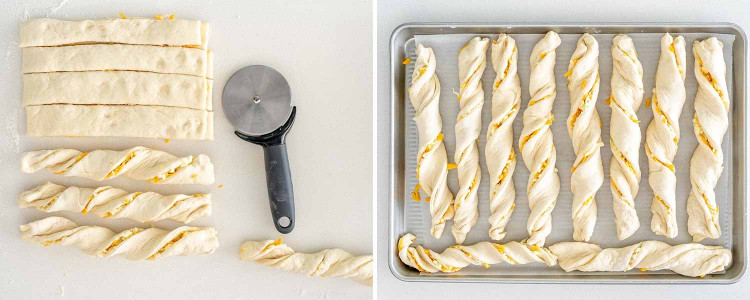
Now that you have the strips of dough cut, you can form them into breadsticks! All you have to do is take each strip of dough and then twist it. That’s it! Then place each twisted strip of dough onto an ungreased baking sheet.
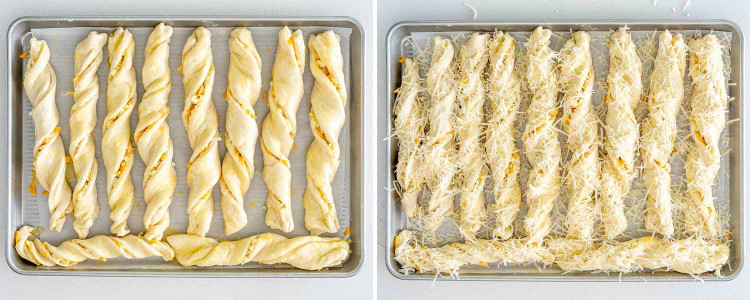
While the breadsticks are rising, preheat your oven temperature to 400°F (204°C) to get it ready for baking. You don’t want the breadsticks to sit for much longer than 15 minutes. So don’t forget to do this step right after they are formed.
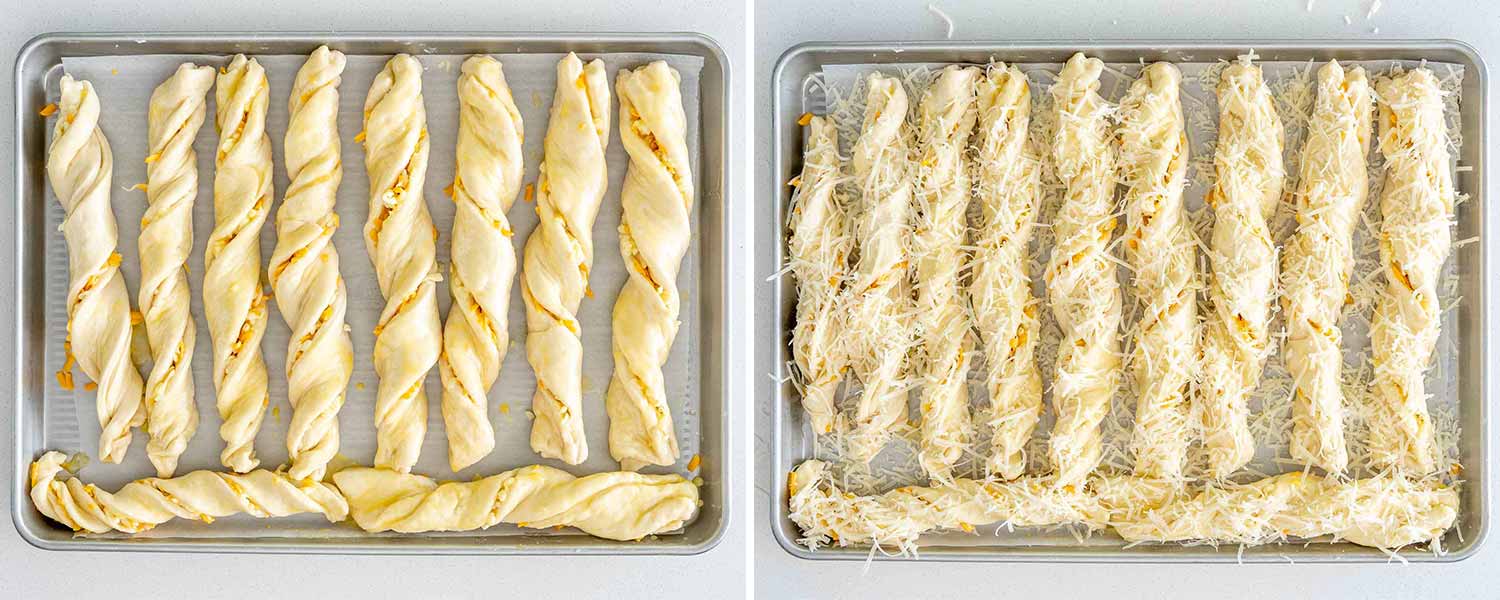
Before baking them, you want to brush the top of the breadsticks with a bit more butter and finally generously top them with lots of yummy Parmesan cheese.
Finally let’s bake! When the oven is fully preheated, transfer the breadsticks to the oven to bake for about 15 to 20 minutes until golden brown. Then remove them from the oven, and serve right away. Nothing better than warm, cheesy breadsticks fresh out of the oven.

What Can I Add To The Breadsticks?
You can flavor these breadsticks in a variety of ways, but the dough ratios need to stay the same. For example, you could brush the dough with olive oil, pesto, or tapenade instead of butter. Then sprinkle with the cheese and twist. You could also sprinkle the dough with minced garlic or fresh herbs like rosemary, basil, or oregano. There are many ways that you can customize this cheesy breadstick recipe.
Can I Make Gluten-Free Breadsticks?
Probably yes, but I’ve not tried. However, make sure to use a 1-to-1 gluten-free flour that has xanthan gum in it, which acts as a replacement for the gluten that is naturally in all-purpose flour.

Expert Tips
- Check the date on your yeast. Expired yeast will not work. Also, if your yeast doesn’t foam or bubble this also means it’s dead and you need new yeast.
- Warm water is a must. If your water is super cold or super hot the yeast may not bloom correctly. The water has to be warm between 98℉ and 105℉ (36.5°C to 40.5°C) to properly activate the yeast.
- Don’t overwork your dough. When rolling out and forming the dough into breadsticks, try to do it just once. Over-handling it can push the air out, which can make the bread dense.
Storage
These cheesy breadsticks will keep at room temperature for up to 4 days in a container or bag. You can also store them in the freezer for up to 3 months in a sealed freezer bag or wrapped in a double layer of plastic wrap.
Then to reheat, just allow the bread to thaw out at room temperature for a few hours and rewarm them at 300°F (149°C) for 10 minutes. However, if you want to reheat them from frozen, you’ll need to increase the time to about 20 minutes.

Other Delicious Baked Morsels To Try
Before You Begin! If you make this, please leave a review and rating letting us know how you liked this recipe! This helps our business thrive & continue providing free recipes.

Cheesy Breadsticks
Ingredients
- 1½ cups warm water (between 98℉ and 105℉ (36.5°C to 40.5°C))
- 2 tablespoons sugar
- 1 tablespoon active dry yeast
- 3½ cups all purpose flour
- 1 teaspoon salt
- 4 tablespoons butter (unsalted, melted)
- 1½ cups cheddar cheese (shredded)
- 1 cup Parmesan cheese (freshly grated)
Before You Begin! If you make this, please leave a review and rating letting us know how you liked this recipe! This helps our business thrive & continue providing free recipes.
Instructions
- In a small bowl mix the water, yeast and sugar together and let it sit for 10 minutes until the yeast bubbles and foams up.

- In the bowl of your mixer add the flour and salt and mix. Pour the yeast water to the bowl and using the dough hook mix for about 5 to 7 minutes until the dough is smooth and comes clean from the side of the bowl.
- Transfer the dough to a well oiled bowl and cover it with plastic wrap, or just oil the dough in the mixer bowl and cover it up with plastic wrap. Then set it in a warm environment for about an hour or until it doubles in size.

- Transfer the dough to a lightly floured surface. Roll out the dough into a large rectangle that's about ¼-inch in thickness. Trim the ends for a perfect rectangle. Cut the rectangle in half. Brush one half with melted butter.

- Next, sprinkle the dough with the cheddar cheese. Place the other half of dough over the one with the cheese. Cut the dough into long strips that are about 1-inch in thickness. I find using a pizza cutter works best.
- Twist each strip and place on an ungreased baking sheet lined with parchment paper.

- Preheat oven to 400°F. Allow the breadsticks to continue rising while the oven is preheating. Brush the breadsticks with remaining melted butter and generously top each of them with grated Parmesan cheese.
- Transfer the baking sheet to the oven and bake for 15 to 20 minutes or until golden brown.


Notes
- Check the date on your yeast. Expired yeast will not work. Also, if your yeast doesn’t foam or bubble this also means it’s dead and you need new yeast.
- Warm water is a must. If your water is super cold or super hot the yeast may not bloom correctly. The water has to be warm between 98℉ and 105℉ (36.5°C to 40.5°C) to properly activate the yeast.
- Don’t overwork your dough. When rolling out and forming the dough into breadsticks, try to do it just once. Over-handling it can push the air out, which can make the bread dense.
- These will keep at room temperature for up to 4 days in a container or bag. You can also store them in the freezer for up to 3 months in a sealed freezer bag or wrapped in a double layer of plastic wrap.
- To reheat, just allow the bread to thaw out at room temperature for a few hours and rewarm them at 300°F (149°C) for 10 minutes. However, if you want to reheat them from frozen, you’ll need to increase the time to about 20 minutes.
Nutrition Information
Notice: Nutrition is auto-calculated for your convenience. Where relevant, we recommend using your own nutrition calculations.
