Instant Pot Mongolian Beef
This post may contain affiliate links. Please read my disclosure policy.
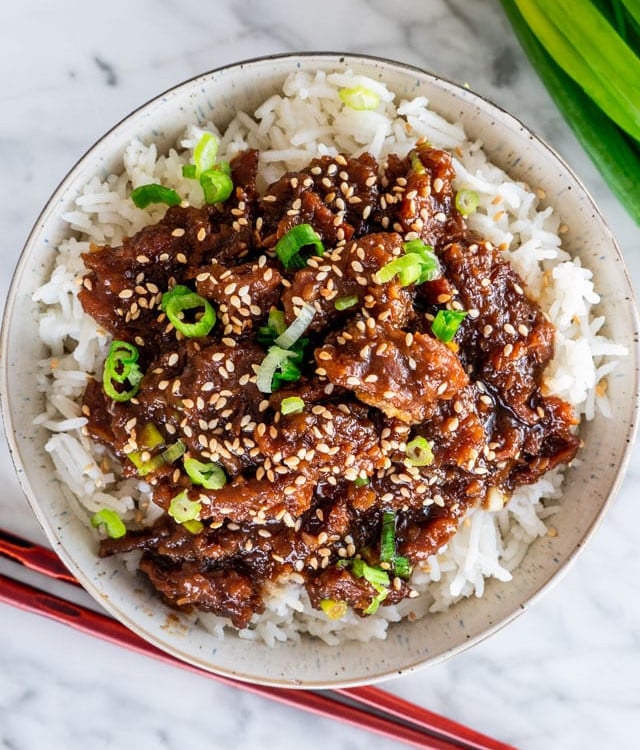
This Instant Pot Mongolian Beef recipe is your answer to “take-out” at home! Much better than the restaurant version, easy, saucy, tender beef, delicious, and ready in minutes!

Instant Pot Mongolian Beef
After all this time, I still love my Instant Pot and I still use it on a weekly basis. Sometimes even twice or three times in a week. By this point I think I can call myself an Instant Pot pro! It’s incredible for soups, curry, and this ultra tender Mongolian Beef.
Mongolian Beef is one of my favorite take-out dishes, but I no longer go out to restaurants for it. I make it myself at home! It’s really easy and tastes so much better. This sauce has been carefully tried and tested to create perfect flavors. The balance of sweetness from the brown sugar with tangy rice vinegar, fresh garlic and ginger, and a hint of heat. You won’t believe what’s come out of your kitchen!

How to Make Instant Pot Mongolian Beef
- Prepare the beef and sauce: Toss the strips of beef with the cornstarch and let everything sit together for about 5 minutes. In this time, you can make the sauce. Mix the rice vinegar, soy sauce, water, garlic, ginger, brown sugar, and red pepper flakes together in a small bowl and set aside.
- Sear the beef: Turn your Instant Pot onto its “saute” setting and add half the sesame oil. Once it’s nice and hot, add half the beef and sear for a few minutes on each side. Remove the cooked beef and repeat with the remaining oil and meat.
- Cook the beef: Add all the beef back to the pot, and stir in the sauce. Close the lid and set the Instant Pot to high pressure, and cook for 10 minutes.
- Depressurize and serve: Use the quick release to let all the pressure out of your Instant Pot once the 10 minutes is up. Mix in the fresh green onions, garnish with sesame seeds, and serve.
Tips for Making the Best Instant Pot Mongolian Beef:
Use the right cut of beef. Typically Mongolian beef is made with flank steak, but top round beef can also be used. To slice it easier, place the beef in the freezer for about 20 minutes before slicing. This will make it so much easier to slice it as thinly as possible. Always slice the beef against the grain.
Make sure to toss the beef with cornstarch before cooking and let it sit for 5 minutes before searing. This is known as velveting and you’ll end up with very tender meat. Do not use flour; the results will not be the same.
When searing the beef, do not overcrowd the pan. Do it in batches. If you add too much beef to the pan, you will not sear the meat. It will steam it instead. This step can also be done separately from the Instant Pot in a skillet if preferred.
Can I Use Chicken Instead of Beef?
This recipe will be fantastic with chicken! You can use thin slices of either chicken thigh or breast depending on what you like better. You can also try it out with thinly sliced pork loin! Placing these meats in the freezer for 20 minutes, like the beef, will help you cut them nice and thin.

Can You Make Mongolian Beef in the Slow Cooker?
This recipe will work very well in your slow cooker because you’ll get the same ultra-tender pieces of meat. Sear the meat in a skillet; the sear imparts so much incredible flavor and is a step I wouldn’t skip. Add the seared beef and prepared sauce to your slow cooker, give it all a good stir, and cover. Cook for 4-5 hours on low or 2-3 hours on high.
What to Serve with Mongolian Beef
- Rice- brown or white will work. I love to use basmati or jasmine.
- Steamed vegetables.
- Noodles- try out soba, udon, ramen, or rice noodles.
How to Store Mongolian Beef
Store this Mongolian Beef in an airtight container in the fridge for 3-4 days. You can either reheat it in the microwave, or use a skillet over medium heat. If you’re using the skillet method, feel free to add a splash of water or broth to thin out the sauce if it cooks off too much during the reheating process.
How to Freeze Mongolian Beef
Store in an airtight container to freeze. You can also split it up into individual portions to make thawing easier. It will last 3-4 months frozen. Reheat either in the microwave, or in a skillet over medium heat.

Looking for More Instant Pot Recipes? Try These:
Before You Begin! If you make this, please leave a review and rating letting us know how you liked this recipe! This helps our business thrive & continue providing free recipes.
Instant Pot Mongolian Beef
Video
Ingredients
- 2 pound flank steak (cut into thin strips)
- ½ cup cornstarch
- 2 tablespoon rice vinegar
- 1 cup soy sauce (low sodium)
- ⅔ cup water
- 4 cloves garlic (minced)
- 1 teaspoon ginger (minced)
- 1 cup brown sugar (packed)
- ½ teaspoon red pepper flakes
- 3 tablespoon sesame oil
- 2 green onions (chopped)
- 2 tablespoon sesame seeds
Before You Begin! If you make this, please leave a review and rating letting us know how you liked this recipe! This helps our business thrive & continue providing free recipes.
Instructions
- Prepare the beef: In a large bowl toss the flank steak strips with the cornstarch together and let them sit for 5 minutes. This will ensure the cornstarch penetrates the beef.
- Make the sauce: In a medium size bowl add the rice vinegar, soy sauce, water, garlic, ginger, brown sugar, red pepper flakes and whisk well. Set aside.
- Turn your Instant Pot to the saute setting. (See your manufacturer’s guide for detailed instructions on how to use your instant pot.)
- Sear the beef: Add half of the sesame oil to the pot. When the oil is hot add half of the flank steak and cook 2 to 3 minutes until it starts to brown. Remove from the pot and repeat with remaining sesame oil and beef. Return all the beef to the pot and press the cancel button on your Instant Pot.
- Pour the sauce over the beef and stir well.
- Cook: Close the lid (follow the manufacturer’s guide for instructions on how to close the instant pot lid). Set the Instant Pot to the Manual (high pressure) setting and set the timer to 10 minutes.
- When cooking is complete, use a quick release to depressurize.
- Stir in the green onions and garnish with sesame seeds. Serve over rice.
Notes
- TIP: To slice the steak easier, place it in the freezer for 20 minutes before slicing.
- MEAT: Top round beef can also be used for this. You can also use chicken breast or thighs instead of beef.
- What is an Instant Pot: An IP is a multi-cooker, it’s like seven different appliances all in one! It does the job of a slow cooker, pressure cooker, rice cooker, steamer, yogurt maker, etc.
- I don’t have an Instant Pot, can I still make this: Yes! Check out my Mongolian Beef recipe here.
Nutrition Information
Notice: Nutrition is auto-calculated for your convenience. Where relevant, we recommend using your own nutrition calculations.
