Ham and Cheese Pockets
This post may contain affiliate links. Please read my disclosure policy.

Hold onto your taste buds! These Ham and Cheese Pockets are the comfort food you didn’t know you were missing. Imagine dough softer than your favorite pillow, loaded with savory ham and oozing cheddar. This isn’t just a snack; it’s a flavor event!

Homemade Ham And Cheese Pockets
Look, everyone loves a good ham and cheese sandwich, right? But what if I told you we’re taking it to the next stratosphere? Get ready for Ham and Cheese Pockets that will make you do a happy dance.
No special gadgets required, no fancy ingredients—just real, honest-to-goodness food that’s packed with flavors you won’t be able to resist. Imagine a pocket of pure joy, crammed with top-quality ham and the kind of cheddar that dreams are made of. Once you try these, there’s no turning back!

Why You’ll Love These Ham And Cheese Pockets
- Simple Ingredients, Big Flavors: You don’t need a laundry list of obscure ingredients to make these Ham and Cheese Pockets a hit. Just good quality ham, cheddar cheese, and a homemade dough that’s easier than you’d think.
- Portable and Convenient: These pockets are the epitome of grab-and-go deliciousness. Whether you’re rushing to work or need a quick snack for the kids, these little wonders are a lifesaver.
- Customizable and Versatile: Want to add a dash of herbs or perhaps some other types of cheese? Go ahead! These pockets are incredibly forgiving and adaptable to whatever you have in your fridge.
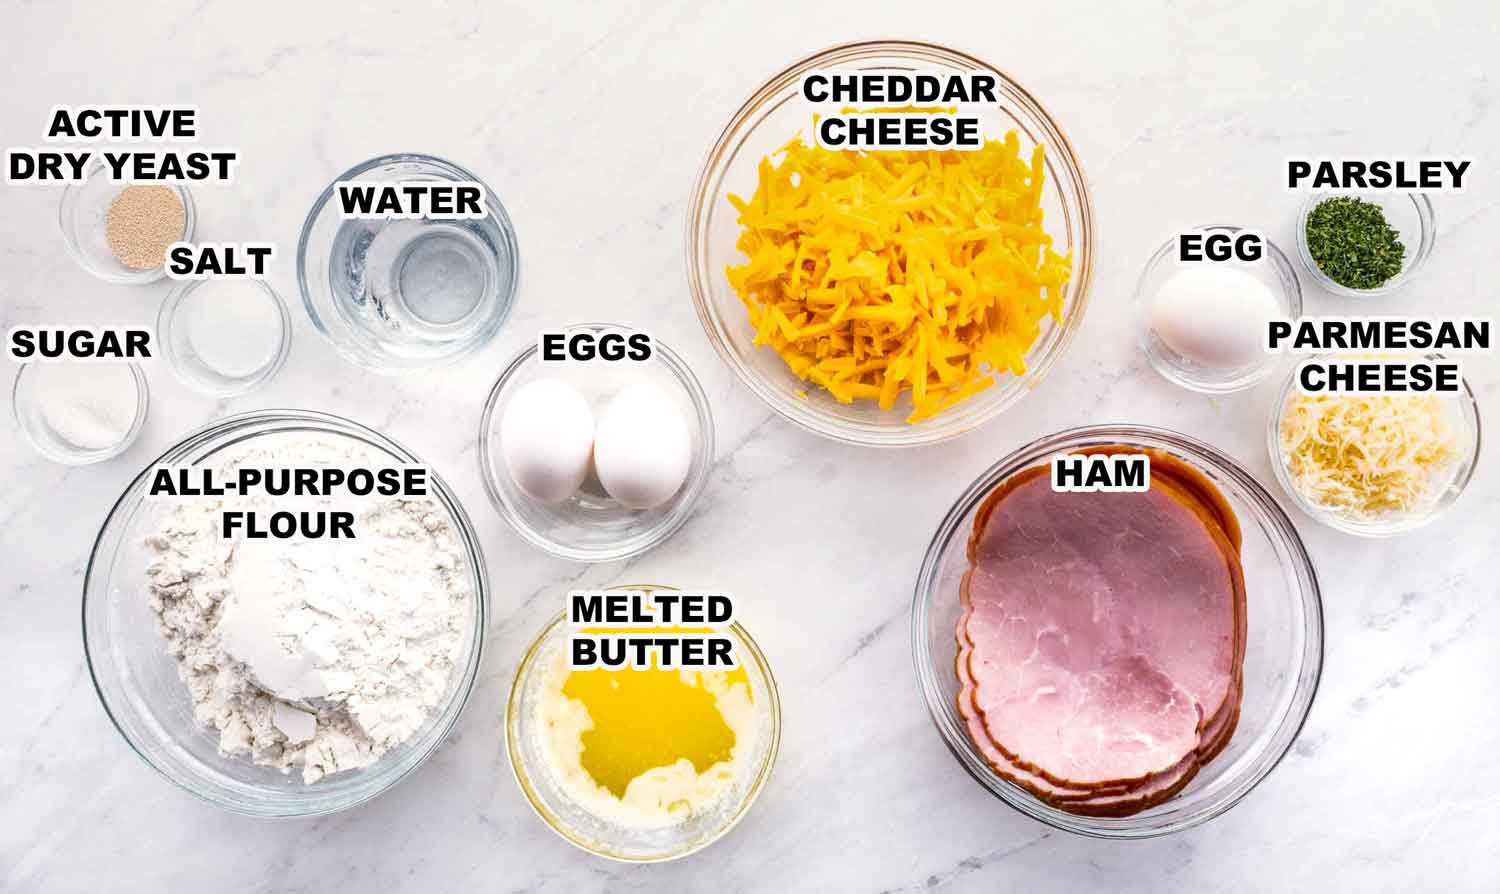
- Active Dry Yeast: The lifeline for your dough to rise and be pillowy. Instant yeast can work too, just remember to adjust the proofing time.
- Sugar: A touch of sugar not only sweetens the dough but also boosts the yeast activity. You can use honey if you prefer.
- Water: Lukewarm water helps activate the yeast. Always aim for water that is neither too hot nor too cold.
- All-Purpose Flour: The structural base for your dough. You could experiment with whole-wheat flour but it will change the texture.
- Salt: Balances the flavors in the dough. Don’t skip it, but feel free to adjust to your taste.
- Butter: Unsalted, and melted, it adds richness to your dough.
- Eggs: Adds moisture and helps with the texture of the dough. If you’re vegan or allergic, try using an egg substitute.
- Cheddar Cheese: Shredded, because the more cheese, the merrier. Mozzarella or Gruyere can make good stand-ins.
- Ham: Sliced medium, because it’s the protein star here. Turkey or even cooked sausage could work in a pinch.
- Parmesan Cheese: Grated, to give that crusty top layer an extra bite. No real substitute, but feel free to omit if you don’t have it.
- Parsley: Dried, for that extra dash of color and flavor. Fresh parsley or even chives could be a fine replacement.
- Egg Wash: To give your pockets that shiny, golden finish. Milk can work too, but it won’t be as glossy.
Whipping up these Ham and Cheese Pockets is as easy as pie, but way cheesier and with a hammy twist!

First off, making this dough is a cinch, I promise. So, grab a small bowl and stir together the yeast, sugar, and lukewarm water. Let it hang out for about 10 minutes. You’ll know it’s ready when it starts to bubble up.
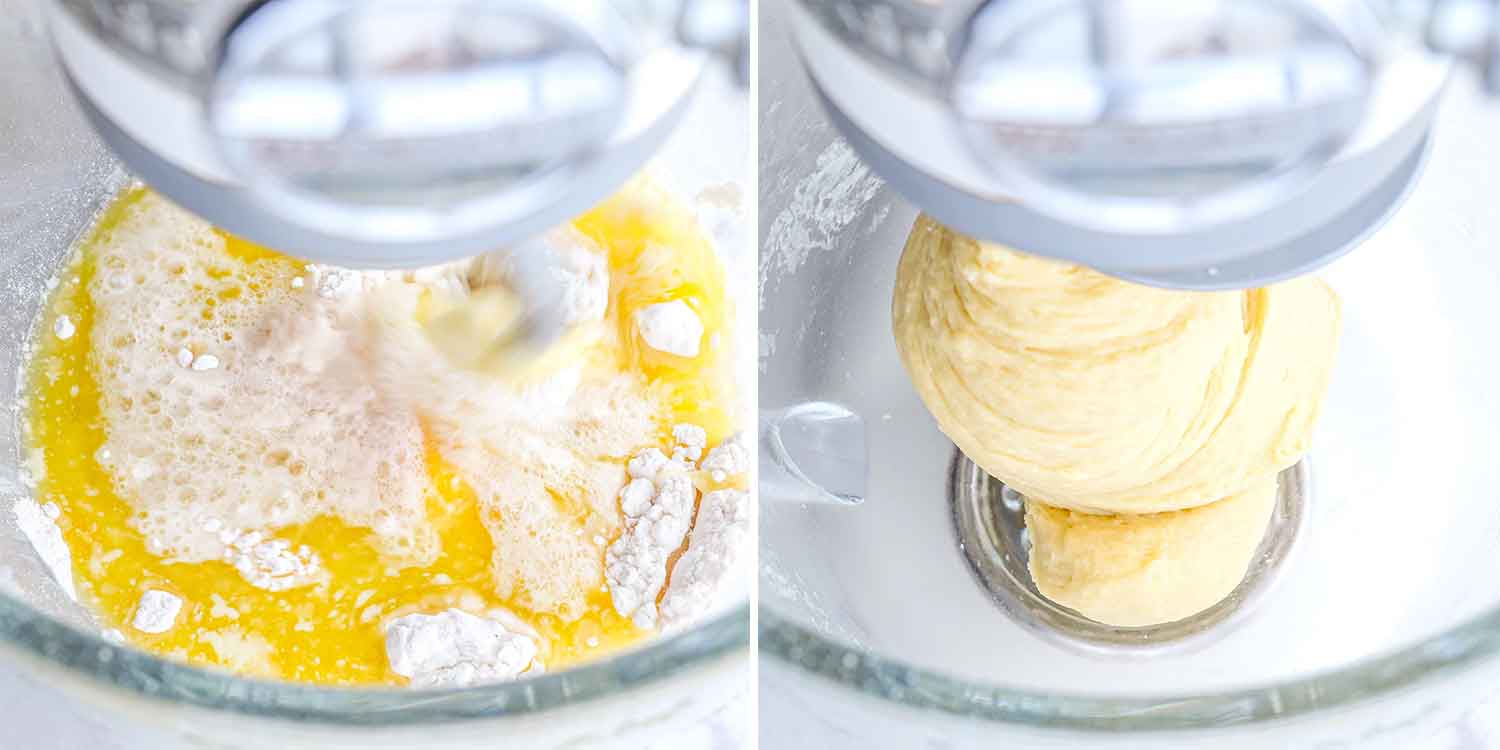
Next, toss your flour, salt, melted butter, and eggs into your mixer. Pour in that bubbly yeast concoction. Mix away for about 5 minutes until it’s soft but not sticky. If it clings to the bowl add a sprinkle more flour.
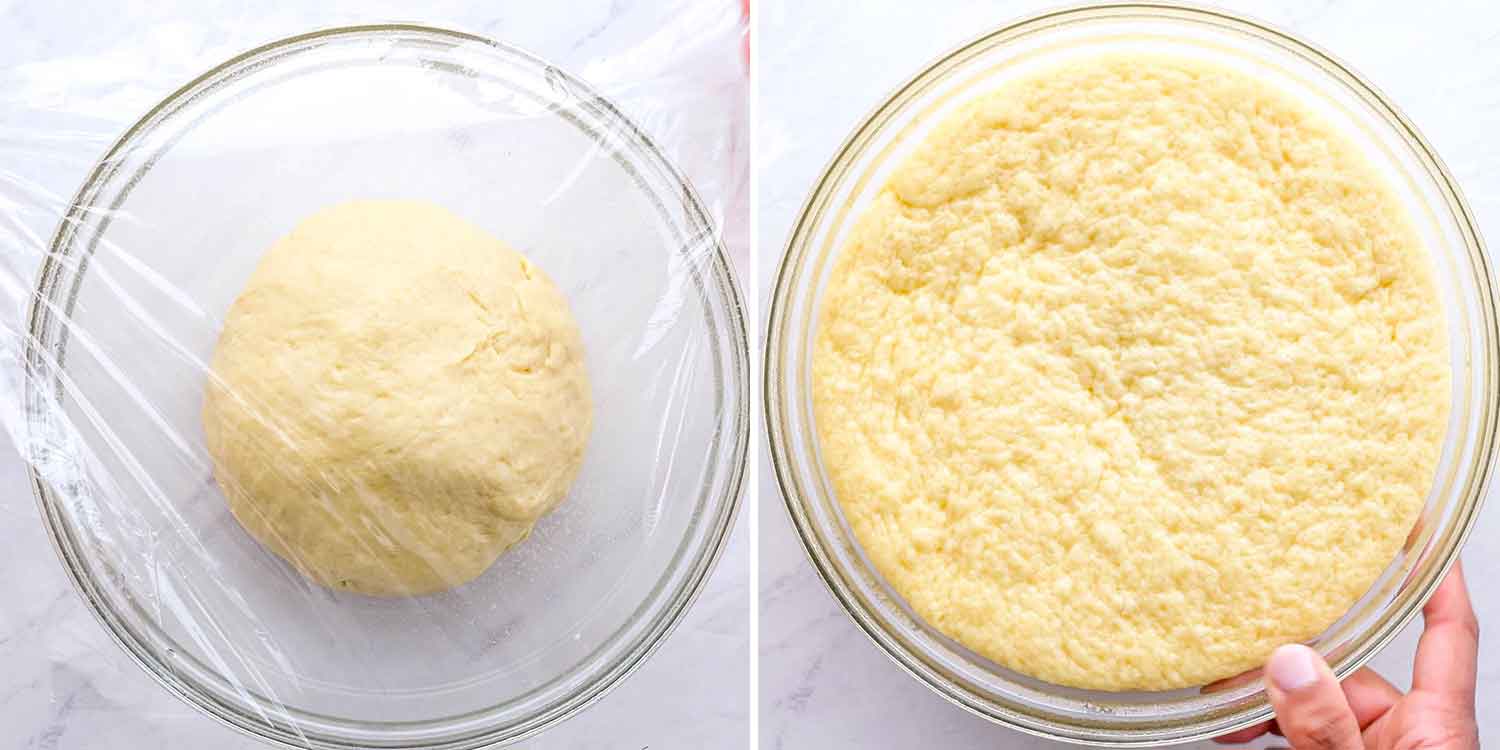
Scoop that dough into an oiled bowl and cover it with plastic wrap. It needs some beauty sleep to double in size, so find it a cozy, warm spot for an hour.
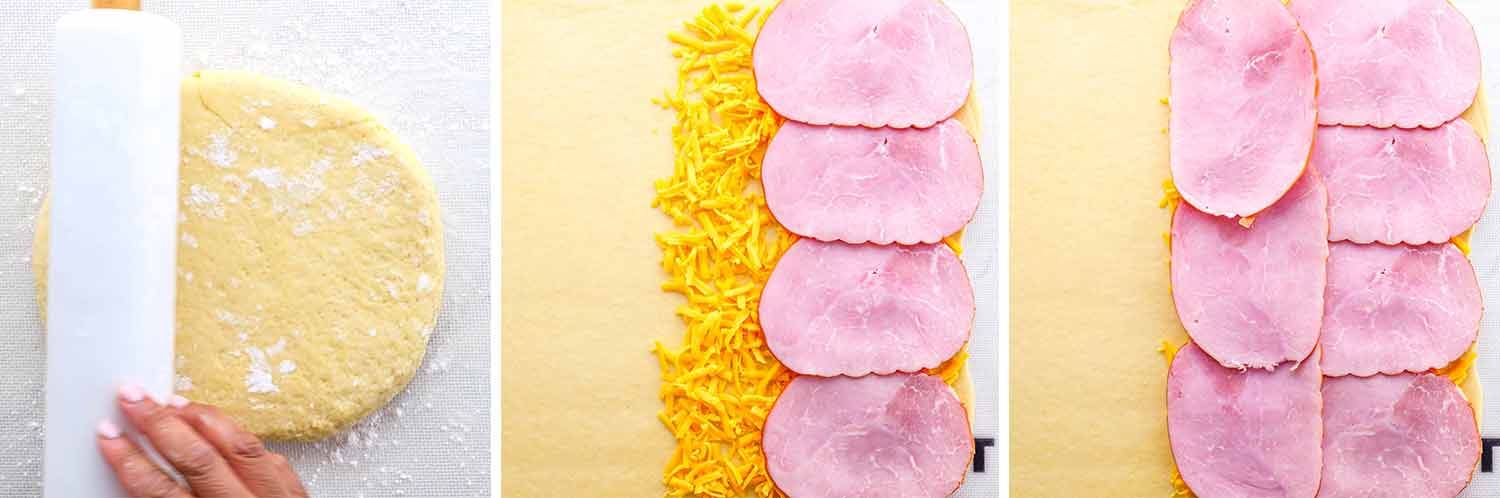
While the dough is rising, preheat your oven to 350°F and line a baking sheet with parchment paper. Once the dough is good and puffy, roll it out. Aim for a 14×18-inch rectangle and about 1/4-inch thick. Sprinkle the cheddar cheese on half of it, then stack the ham slices on top. Fold the other half over to create a cheesy, hammy pocket of love.
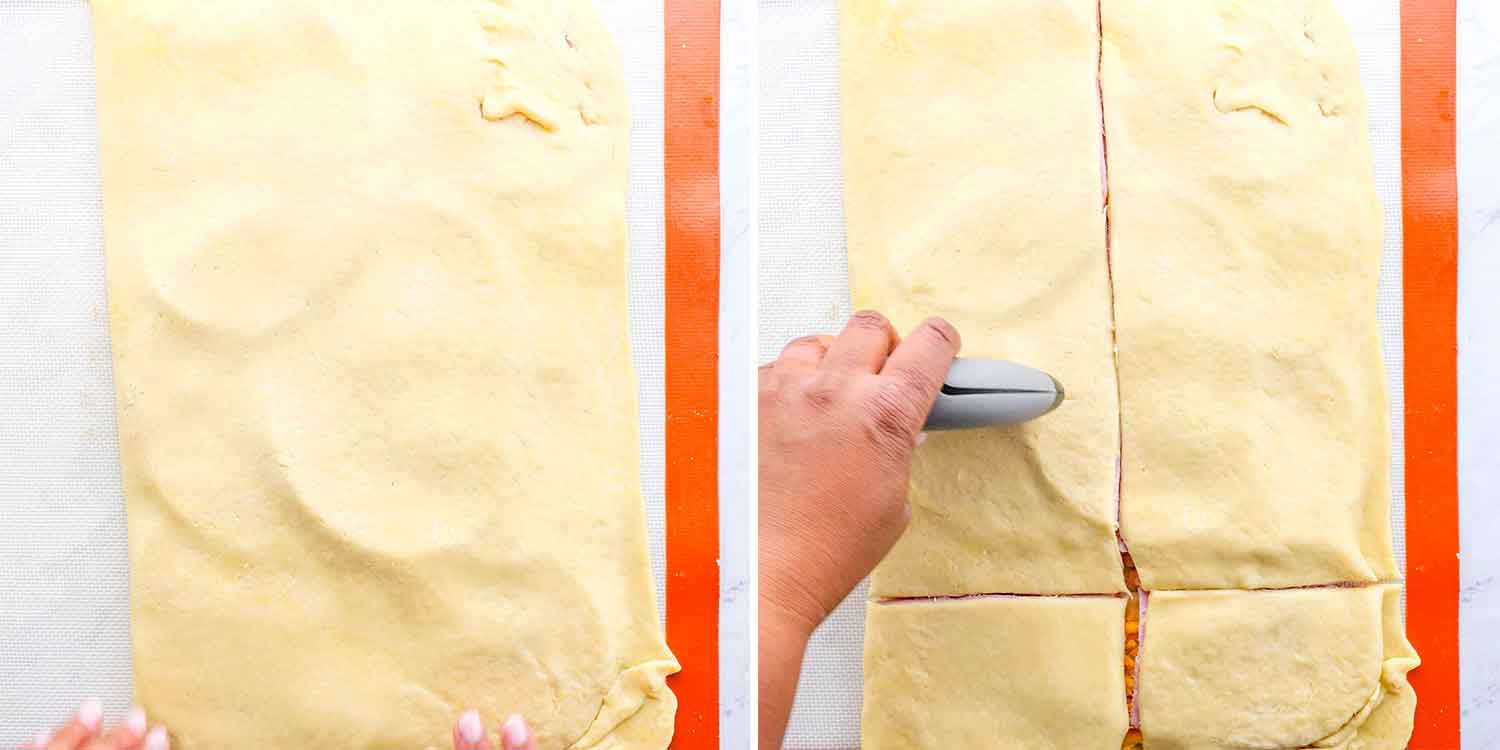
With your dough all filled, slice it into 8 even pieces. Place them on your prepped baking sheet.
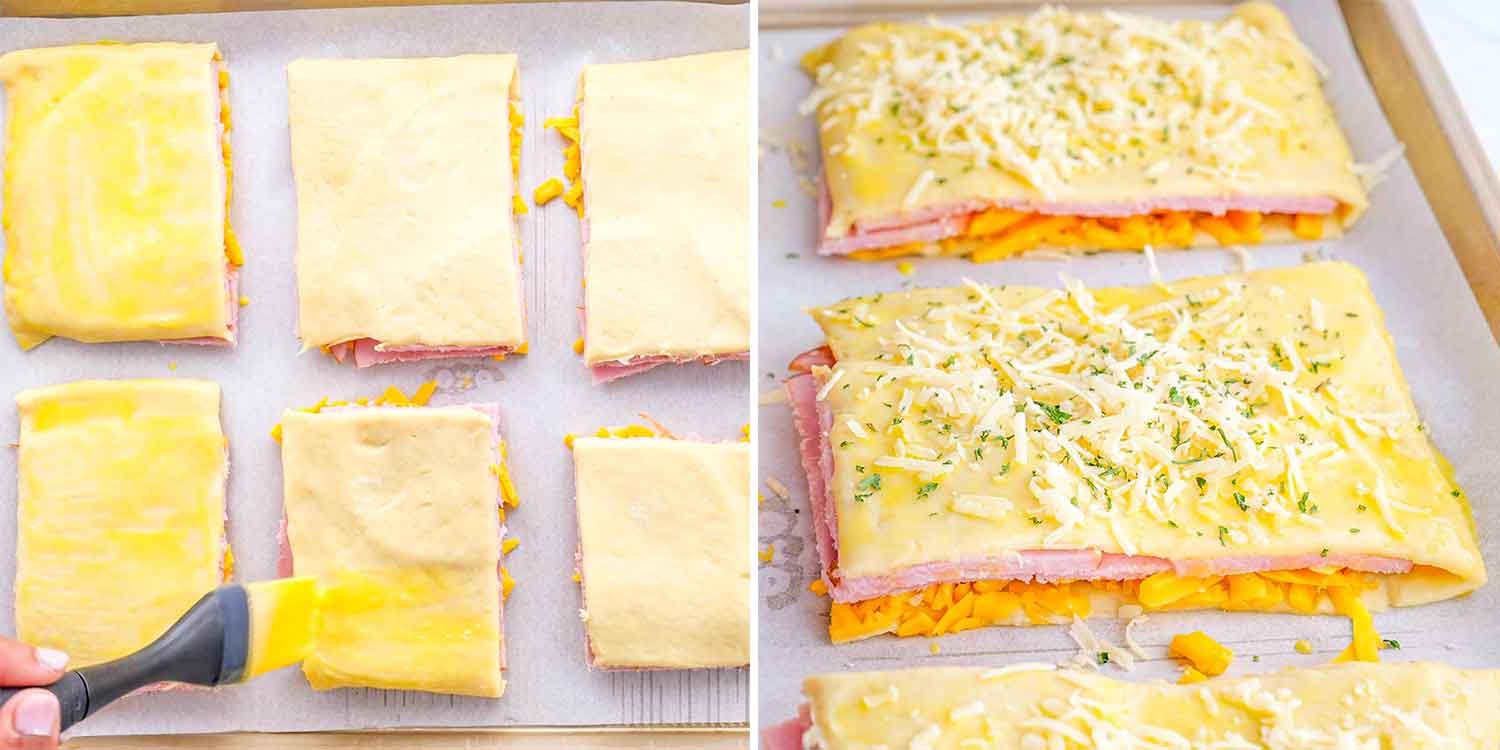
Give them a nice egg wash for that golden glow. Sprinkle on some Parmesan cheese and a pinch of parsley for pizazz. Let them rise for another half hour, you know, for added fluff.

Finally, slide those pockets into the oven. They’ll need about 20 to 25 minutes to reach golden-brown perfection. Now let them cool a bit and they’re all ready to enjoy!
Frequently Asked Questions
Can I use a different type of cheese?
Absolutely, feel free to get creative! Swiss, mozzarella, or even pepper jack could add a different, delightful twist.
What’s the best way to serve these pockets?
These beauties are versatile! They’re perfect as a quick snack, a lunchbox filler, or even paired with a salad for a complete meal. Serve them warm for the most indulgent experience.
Can I use store-bought dough to save time?
If you’re pressed for time, using store-bought pizza dough is a totally acceptable shortcut. The end result will be just as delicious.
Any tips for making the pockets extra crispy?
For that extra crunch, make sure to brush the tops with a good amount of egg wash and perhaps a sprinkle of coarse sea salt. Your oven should also be fully preheated for optimal crispiness.

Expert Tips
- Proper Yeast Activation: Make sure your water is at the correct temperature (usually around 110°F) when activating the yeast. Too hot and you might kill the yeast; too cold and it won’t activate. This is crucial for a dough that rises well.
- Quality of Ingredients: Use high-quality cheese and ham for the best flavor. Trust me, it makes a difference. If you can find aged cheddar, it will give the pockets a much richer taste.
- Rolling Out The Dough: Try to roll the dough uniformly. Uneven thickness can lead to some parts of the pocket cooking quicker than others, which we definitely don’t want. A rolling pin is your friend here.
- Egg Wash: Don’t skip the egg wash as it gives the pockets that gorgeous golden-brown finish. For an extra twist, you could mix a little garlic powder into the egg wash for added flavor.
- Resting Time: Don’t rush the resting time after the pockets are assembled. This allows the dough to rise a bit more, resulting in a lighter, airier texture. Patience is a virtue, especially in baking.
Storage
Once the ham and cheese pockets have cooled to room temperature, place them in an airtight container and store in the fridge for up to 3 days.
These pockets are also freezer-friendly. Just wrap each pocket individually in aluminum foil and then place them in a zip-top freezer bag. They’ll keep well for up to 3 months. To reheat, you can either let them thaw in the fridge overnight and then pop them in the oven until warm, or go straight from freezer to oven, adding a few extra minutes to the baking time. Either way, they’ll come out just as delicious as the day you made them!

Discover More Treats
- Pizza Dough
- Fried Dough Filled With Feta Cheese
- Pasca – Romanian Easter Bread
- Homemade Croissants
- Classic Dinner Rolls
- Honey Rolls
- Soft Buttermilk Dinner Rolls
- Texas Roadhouse Rolls
- Hawaiian Sweet Rolls
- Grilled Cheese Sandwich
Before You Begin! If you make this, please leave a review and rating letting us know how you liked this recipe! This helps our business thrive & continue providing free recipes.

Ham and Cheese Pockets
Video
Ingredients
For Dough
- 1 teaspoon active dry yeast
- 1 tablespoon sugar
- ⅔ cup water (lukewarm)
- 3 cups all-purpose flour
- 1 teaspoon salt
- ½ cup butter (unsalted, melted)
- 2 eggs
For Pockets
- 2 cups cheddar cheese (shredded)
- 8 slices ham (sliced medium)
- 1 egg (beaten, for egg wash)
- ¼ cup Parmesan cheese (grated)
- 1 tablespoon parsley (dried, optional)
Before You Begin! If you make this, please leave a review and rating letting us know how you liked this recipe! This helps our business thrive & continue providing free recipes.
Instructions
- In a small bowl mix the yeast, sugar and water together and let the yeast rest for about 10 minutes, until it dissolves and starts bubbling up.
- In the bowl of your mixer add the flour, salt, butter, eggs and yeast mixture and mix for about 5 minutes. Dough should be soft, but not sticky. If dough is sticky add a bit more flour and continue mixing until it comes clean from the sides of the bowl. Place the dough in an oiled bowl, cover with plastic wrap and let rise until doubled in size in a warm place. It should take about an hour.
- Preheat oven to 350℉. Line a baking sheet with parchment paper.
- Roll out the dough so that it's about 14 inches by 18 inches and about ¼ inch in thickness. On half of the dough sprinkle all the cheddar cheese. Lay the ham slices over the cheese. Fold the dough over the filling and if you want you can pinch the ends together, but not really necessary.
- Cut the dough into 8 pieces. Place the pockets on the prepared baking sheet.
- Brush with egg wash. Sprinkle each piece with Parmesan cheese and parsley. Let the pockets rest and rise a bit, for about half hour.
- Bake in the preheated oven for about 20 to 25 minutes or until golden brown. Serve warm.
Notes
- Dough Consistency: The dough should be soft but not sticky. If it’s too sticky, add a little more flour.
- Cheese Choices: Feel free to experiment with different cheeses like Swiss or Gouda for a unique flavor profile.
- Ham Alternatives: Turkey or even cooked sausage could be used in place of ham if you’re looking to switch things up.
- Herbs: The recipe uses dried parsley for garnish, but fresh parsley or even a sprinkle of chives would work well too.
- Egg Wash: Don’t skip the egg wash, as it gives the pockets a lovely golden-brown finish.
- Resting Time: Letting the pockets rest for about 30 minutes before baking helps them puff up nicely.
- Storage: These pockets freeze well, so make a big batch and enjoy them later!
Nutrition Information
Notice: Nutrition is auto-calculated for your convenience. Where relevant, we recommend using your own nutrition calculations.

Hi, I had difficulty cutting them before baking so just threw it in the oven in two big pieces. Any tips for me? Longer baking time perhaps? Thanks in advance!
Sure, here are some tips:
Use a sharp knife or pizza cutter: A sharp knife or a pizza cutter will help you make clean and even cuts. When using a knife, opt for a long, sharp one to make slicing easier.
Lightly flour the cutting tool: To prevent the dough from sticking to your knife or pizza cutter, lightly dust the cutting edge with flour before slicing.
Use a ruler or straight edge as a guide: To ensure straight and even cuts, you can use a ruler or any straight edge as a guide while slicing the pockets.
Chill the dough if necessary: If the dough becomes too soft or difficult to handle, you can place it in the refrigerator for a few minutes to firm up before cutting.
Cut before baking: Remember to cut the pockets before baking, as this will make them easier to separate once they are cooked. After cutting, let them rest and rise for about half an hour before baking, as per the recipe instructions.
Very good and easy to make
Thanks for another great recipe, Jo!! I’ve made these a bunch of times, they always come out amazing. Tonight I’m serving them with your broccoli cheddar soup.
My pleasure, so glad you liked it!
This looks delicious! Will substituting margarine for the butter in the dough make the texture of the final product too off?
We haven’t made this with margarine, but find a product that will allow you to use a 1:1 margarine to butter ratio and you should be fine.
Looking forward to making a breakfast version this weekend- if crescent rolls are substituted, how many tubes would you say you need for this recipe?
One tube should do it! You can get a backup tube just in case.
Jo, All of your recipes are dynamite! You must be in the kitchen all the time and it certainly shows in your fantastic recipes.
They are outstanding. Keep up with all of the winners. Very special lady. Thanks. I’m looking for your recipe for chocolate
zucchini bread. Can you help me find that one? Many thanks.
Thank you, my dear! Here you go: https://www.jocooks.com/recipes/chocolate-zucchini-bread/
Are you an angel? Cuz these are heavenly! Seriously though first time making them and I just know my husband will be asking me for more. Thank you!
Not yet! Glad you guys enjoyed them. 🙂
Just made this today. The bread was very soft and pillowy.. to be honest it was bloody amazing. Best bread recipe I’ve ever tried if you want a bread without a crusty exterior. Jo is my new baking God.
🙂 So happy you enjoyed this!
Could you replace the active dry yeast with a quick rise yeast. Would that affect the rising. (By no means a baker)
You can, absolutely! The difference between active dry yeast and quick rise yeast is that the quick rise yeast doesn’t require you to activate it, you can just add it with the rest of the ingredients. Just keep in mind you still need to add the water and sugar.
the dough is it like a pizza dough? coz i wanna try it with marinara and some pepproni so its kinda like pizza pockets
It’s a bit softer than pizza dough with that butter but that would taste amazing! Give it a go.
This sounds great I’ll be trying this out maybe play with different centres. Ready made sandwiches what more do you need
Exactly!
These looks SUPER GREAT, Jo! My wife just saw these and said, “Why haven’t you made these for me yet?” I better get cooking!
Recipe looks so good. Do you have to use the dough hook to make the dough??
If you’re doing it in the mixer, yes. You could also just knead it by hand.
Thank you so much, this is so good love the recipe, it is my littleones first day of school lunch, I am sure she will love it.
I don’t leave reviews but I have to for this. I had extra Easter ham and a craving for Hot Pockets. I followed the dough instructions but let it rise in my food processor and didn’t let it rise a second time. I also only mixed it for 30 seconds and kneaded it when it came out a few hours later. I added about extra 1/2 cup of flour to get it soft, not sticky. It was better than a hot pocket! The dough was out of this world soft and yummy! The gentleman friend loved it!
Yay! That’s so awesome, Renee! So glad you both liked it. 🙂