Homemade Croissants
This post may contain affiliate links. Please read my disclosure policy.
This Homemade Croissants recipe is so buttery, flaky, and will make your morning breakfast so much more delicious! A complete recipe guide with pictures and video to teach you to make the most perfect croissants from scratch.

Homemade Croissants
It’s been over 6 years since I have shared my croissant recipe with you and have since been pleasantly surprised to see so much croissant making success! After all, this is why I do this. Especially when it comes to baking, because many of you have never baked before or are scared to attempt to make a recipe like this.
However, I want to show you that baking is not so difficult and with a little practice anyone can be successful at it. Even when it comes to making something as decadent as these croissants! They are a labor of love, but they are so worth it and surprisingly simple to put together.
What Are Croissants?
Croissants are flaky, layered French pastry in the shape of a crescent. They’re loved by everyone and for a good reason! We’re talking cloud-like puff pastry, buttery, flaky, yeasty, chewy bread. It really is one of the most decadent things you can eat.
Croissant dough gets its many layers as a result of “laminating” the dough. This means we are rolling and folding over and over, giving you many thin layers of dough and butter. As you bake them, the butter melts and gives off steam. This puffs each paper-thin layer of dough up giving your croissants hundreds of buttery layers.

- Milk – I used 2% milk for this recipe, but it really doesn’t matter if you use a different fat content.
- Brown sugar – Adding a bit of sugar to your croissants pairs so well with the buttery flavor! It will also help give a bit more crunch to the outside of each croissant.
- Active dry yeast – Make sure to double check that you are using active dry yeast rather than instant yeast. If your yeast does not foam up after step #1, your yeast is dead and the croissants will not turn out. Buy a new jar or package and store it in the freezer so it’ll last longer.
- All-purpose flour – While you can use bread flour in this recipe, I find it’s much more convenient to use all-purpose. We all have it in out pantries, and it makes fantastic bread. The difference is that bread flour has a higher protein content, resulting in better gluten formation.
- Salt – You can adjust the salt in this recipe to suit your own sodium preference. I wouldn’t leave it out, though. That touch of salt really brings out the buttery flavor.
- Butter – Make sure you use unsalted! I only ever cook with unsalted butter so that I have full control of the salt content. Since most of the flavor of these croissants come from the butter, make sure to find a good quality brand.
- Egg – The egg doesn’t actually make it into the dough! This will actually be used for an egg wash. That’s what gives our croissants a glossy and golden brown exterior.

How to Make Croissants
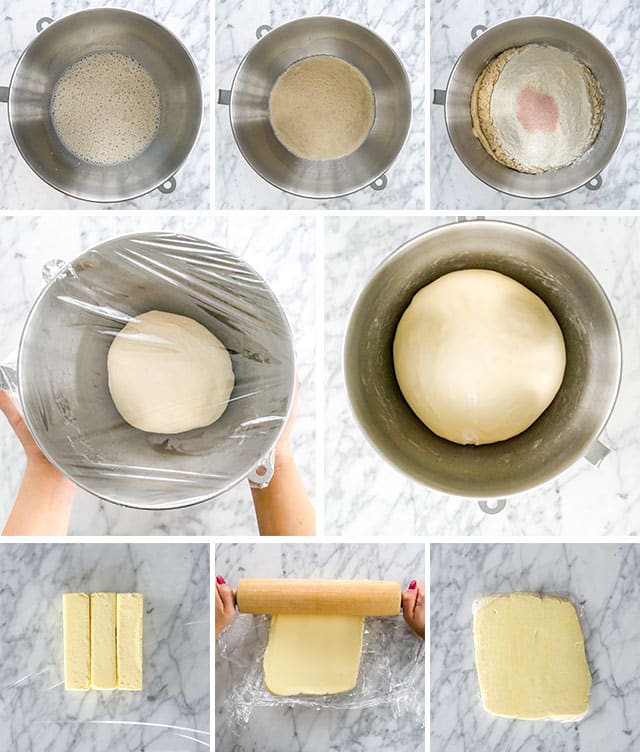
- Bloom the yeast: In the bowl of your mixer, add the warm milk, brown sugar, and yeast. Give it a quick stir with a fork or small whisk and let it sit for 5-10 minutes, until the yeast foams up well.
- Make the dough: To your bloomed yeast, add the flour and salt. Use the dough hook on your mixer and let the dough knead for about 5 minutes on low speed. The dough should turn out nice, soft, elastic, and slightly sticky. Because of varying environment conditions, you may need more flour than I used. Add 1 tbsp at a time until your dough feels perfect. Knead the dough by hand for a few minutes, then add it back to the bowl. Wrap the bowl well with plastic and let the dough sit in the fridge for 1 hour.
- Prepare the butter: Arrange the sticks of butter on a sheet of plastic wrap horizontally. Lay another piece of plastic over the sticks, and use a rolling pin to flatten the sticks until you have approximately an 8×5 inch rectangle. Put the butter, still wrapped in plastic, in the fridge until the dough is ready.
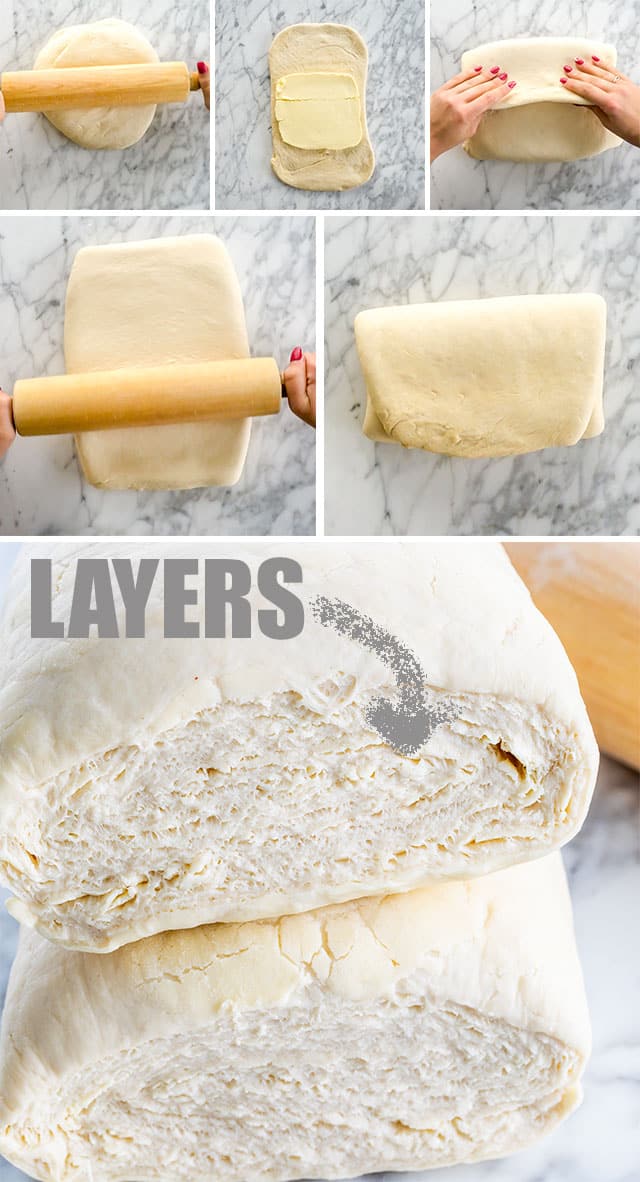
- Laminate the dough: Laminating dough is the process of folding butter into the dough many times, which is what creates all those layers. Turn the dough out onto a lightly floured surface and roll it to a 16×10 inch rectangle. Place your butter in the center, and fold the edges of the dough rectangle over to cover the butter completely. Roll the dough out so it’s back to 16×10 inches, then fold it letter-style into thirds. Wrap the dough with plastic and place it in the fridge for an hour. I like to repeat this process a total of 5 times giving us a total of 729 layers. Yes, that’s right! 729 layers!
- Bake the croissants: Roll the dough out, one last time, until you have a long rectangle about 1/4″ thick. I like to cut the dough into thirds to make this part easier. Slice the dough into long triangles, and roll each one starting at the wide end until you have a crescent shape. Brush with a lightly beaten egg, and bake on a parchment paper lined sheet for 8-12 minutes at 400F, then turn the oven down to 375 and bake for another 8-12 minutes.

How to Make Pain Au Chocolate Aka Chocolate Croissants
For fillings, you can either cut the dough in triangles to keep the crescent shape or you can leave the dough at long 4″ wide strips. Place a piece of chocolate at the end of the dough, and then roll it up until it’s nicely wrapped with the strip of croissant dough.
Don’t be afraid to try other fun fillings for your croissants! Try out your favorite fillings. I love using Nutella, jam, peanut butter, or even savory fillings such as ham and cheese, or pesto and chopped sun dried tomatoes. Get creative!

Why Are These Homemade Croissants the Best?
- These are a labor of love. No cutting corners here! Keeping the dough nice and cold, working in very deliberate steps, will ensure you have the most buttery and flaky croissants.
- The ingredients used are common everyday ingredients; you probably already have everything you need to make this recipe.
- This is a great recipe that you can customize with fillings. You can even make sandwiches out of these delicious croissants!
- The dough or the finished croissants are great for freezing. Fresh croissants every day? I think so!
- Readers love them!
We came home from France and I decided to make homemade croissants. I’m so glad I found this recipe. I’m on my third batch! My grandkids love them, and so does the rest of my family that the croissants don’t even last two days! I make some plain and some chocolate! Excellent recipe, thank you!!!

How to Store Homemade Croissants
Make sure to keep them in an airtight container, freezer bag, or tightly wrapped in foil so that they don’t dry out. These croissants will last about 2-3 days. In the fridge, they can last up to 1 week.
How to Freeze Homemade Croissants
To freeze baked croissants, let them fully cool down to room temperature. Place them in an airtight container, a freezer bag, or wrapped tightly in both plastic wrap and foil. They will last 1-2 months frozen. Thaw them by letting them sit at room temperature for 1 hour.
To freeze unbaked croissants, shape them first and let them sit covered with plastic wrap on a baking sheet in the freezer for a few hours until they freeze. Transfer the par-frozen croissants to a freezer bag or airtight container and they will last 1-2 months.
When ready to bake, place the unbaked croissants on a parchment paper lined baking sheet, cover with plastic wrap, and leave to proof at room temperature overnight or for about 12 hours.

Want to Make Homemade Croissant Sandwiches? Try These Recipes:
More Related Recipes:
Before You Begin! If you make this, please leave a review and rating letting us know how you liked this recipe! This helps our business thrive & continue providing free recipes.

Homemade Croissants
Video
Ingredients
- 1 ½ cups milk (lukewarm)
- ¼ cup brown sugar (packed)
- 3 ¼ teaspoon active dry yeast
- 3 ¼ cups all-purpose flour (up to 4 cups if needed)
- 1 tablespoon salt
- 1 ½ cups butter (unsalted, cold)
- 1 egg ( for egg wash)
Before You Begin! If you make this, please leave a review and rating letting us know how you liked this recipe! This helps our business thrive & continue providing free recipes.
Instructions
- Bloom the yeast: In the bowl of a mixer, add the warm milk, brown sugar, yeast and stir it with a fork slightly. Let it stand for about 5 minutes. If the yeast is good, the mixture will get all foamy as the yeast dissolves. It could take a bit longer but if your yeast does not dissolve, see recipe notes.
- Make the dough: Add the flour and salt to the bowl. Using the dough hook, mix on low speed for about 5 minutes until the dough is smooth and very soft. I used about 3 1/4 cups of flour, but if you need more because the dough is too sticky than just add more, about 1 tbsp at a time. You might want to start with 3 cups and add as needed. Remove the dough from the mixing bowl and knead for a couple more minutes on your working surface. The dough needs to be soft and slightly sticky. Place the dough back in the bowl, wrap it with plastic wrap and refrigerate it for an hour.
- Prepare the butter: While the dough is chilling, prepare the butter. Arrange the sticks of butter horizontally on a piece of plastic wrap. Cover the butter with another piece of plastic wrap. Pound and roll out on both sides until the butter forms a nice 8 by 5 inch rectangle. Cover with plastic wrap and refrigerate until ready to use.
- Laminate the dough: Flour your work surface lightly then roll out the dough into a big rectangle that’s about 16 by 10 inches. Place the butter directly in the center of the dough and fold the dough as you would a letter, bottom third of dough over butter, then top third down over the dough. If you have any excess flour, make sure you brush that off.
- Turn the dough so that the short side is nearest you and start rolling it another 16 by 10 inch rectangle. Fold in thirds like a letter again. This was the first fold. Wrap it up in plastic wrap and chill it for another hour.
- Repeat as above. With the short side near you, start rolling until you get another 16 by 10 inch rectangle. Fold it in thirds again, wrap and chill for another hour. Repeat this 3 more times so that it will make a total of 5 folds. After the last fold, refrigerate it over night or at least for 8 hours.
- Shape croissants: Cut the dough in half, freeze half if you’re only going to use half of it. Roll out each piece of dough into a long rectangle, so that it’s about 1/4 of an inch in thickness. I found it easier if I cut the piece into 3 pieces, so that I work with 3 squares. Using a pizza cutter, cut each square into 4 triangles.
- Using one triangle at a time, start rolling from the wide side, at the same time, stretching the end of the triangle. Continue rolling the croissant, and as you’ll notice because you stretched into a long piece, you’ll be able to roll the croissant a few times.
- Repeat this with remaining dough and place the croissants on an ungreased baking sheet, with about 1 to 2 inches in between them.
- Let the croissants sit for another hour, you’ll notice they’ll rise a bit, then brush them with egg wash. You can make the croissants ahead of time and refrigerate them for up to 18 hours before baking. If you’re making them ahead, make sure to cover the baking sheet with plastic wrap.
- Bake croissants: Preheat your oven to 400℉. Place the baking sheet in the oven and bake the croissants for 8 to 12 minutes at 400℉ then turn down the heat to 375 F degrees and bake them for another 8 to 12 minutes. You want to make sure they are nice and golden brown.
Notes
- YEAST: Always check the expiration date on your yeast and make sure it hasn’t expired. All your yeast products whether it’s in a jar or a package should be stamped with a “Best if Used by” date. Always make sure you check this date, even when you purchase the yeast, who knows it could have been on the shelf past its expiry date.
- Milk: Make sure your milk is not too hot or it could kill the yeast which will cause your dough not to rise at all. The ideal temperature for the milk should be between 105 F degrees and 110 F for proofing. While 95 F degrees is the best temperature for yeast to multiply, that’s not warm enough for proofing active dry yeast.
- Storing yeast: To keep your yeast fresh and longer lasting, unopened yeast packages or jars should be stored in a cool or dry place such as your cupboard. However, you can also store your yeast in the fridge or freezer. If you do store it in the freezer and need to use yeast for your baking, make sure you take out the amount you need and let it sit at room temperature for at least half hour before using.
- Once your yeast package or jar has been opened, you must refrigerate the yeast or freeze it in an airtight container.
- One thing to remember about your yeast, is that it is a living organism and over time it will lose activity, even if you’ve never opened the jar or package. So if you don’t bake often, buy the smaller yeast packages rather than a big jar of yeast.
- FILLING: You can add various fillings to your croissants just before rolling them. Try chocolate, fruit jams or even ham and cheese!
- Yields: 24 croissants or 32 smaller croissants. In the pictures above I made 32 smaller croissants, but nutritional information per croissant shown below assumes 24 croissants.
Nutrition Information
Notice: Nutrition is auto-calculated for your convenience. Where relevant, we recommend using your own nutrition calculations.
Originally shared Feb 2012

