• Skip to primary navigation
  • Skip to main content
  • Skip to primary sidebar
Facebook
Instagram
Pinterest
YouTube
TikTok

Jo Cooks

Simple - Easy - Comfort

  • All Recipes
    • Course
      • Breakfast
      • Appetizers
      • Lunch
      • Dinner
      • Desserts
      • Side Dishes
      • Soups
      • Salads
      • Sandwiches
      • Drinks/Cocktails
      • Sauces & Dressings
    • Method
      • Crockpot
      • Instant Pot
      • One Pot
      • Air Fryer
      • Casseroles
    • Season
      • Spring
      • Summer
      • Fall
      • Winter
    • Cuisine
      • Asian
      • Italian
      • Mexican
      • European
      • Indian
      • Romanian
      • Mediterranean
      • Middle Eastern
      • American
    • Ingredient
      • Chicken
      • Pork
      • Beef
      • Seafood
      • Lamb
      • Vegetarian
      • Pasta
      • Spices
    • Holiday
      • Christmas
      • Easter
      • Thanksgiving
      • Game Day
      • Valentine's Day
      • St. Patrick's Day
      • Cinco de Mayo
      • Mother's Day
      • Memorial Day
      • Father's Day
      • 4th Of July
      • Labor Day
      • Halloween
    • Recipe Index
  • Cookbooks
    • The Big Book of Jo’s Quick and Easy Meals
    • 30-Minute One-Pot Meals
  • Shop
  • About Jo
FREE recipe eBook!
Search...
All Recipes
Instant Pot
30 Minute
One Pot Meals
Soups
Dips & Dressings
Baking
Pasta
Sandwiches
Sides
Breakfast Breads
4.5 from 880 votes

Homemade Croissants

Jump to RecipeVideoPrintRate
By: Joanna Cismaru •8/23/22 636 Comments

This post may contain affiliate links. Please read my disclosure policy.

This Homemade Croissants recipe is so buttery, flaky, and will make your morning breakfast so much more delicious! A complete recipe guide with pictures and video to teach you to make the most perfect croissants from scratch.

Homemade Croissants on baking sheet
Table of Contents Open
  • Homemade Croissants
  • What Are Croissants?
  • Ingredients You’ll Need
  • How to Make Croissants
  • How to Make Pain Au Chocolate Aka Chocolate Croissants
  • Why Are These Homemade Croissants the Best?
  • How to Store Homemade Croissants
  • How to Freeze Homemade Croissants
  • Want to Make Homemade Croissant Sandwiches? Try These Recipes:
  • More Related Recipes:
  • Homemade Croissants
    • Ingredients
    • Instructions
    • Equipment
    • Video
    • Notes
    • Nutrition Information
  • Did You Make This?

Homemade Croissants

It’s been over 6 years since I have shared my croissant recipe with you and have since been pleasantly surprised to see so much croissant making success! After all, this is why I do this. Especially when it comes to baking, because many of you have never baked before or are scared to attempt to make a recipe like this.

However, I want to show you that baking is not so difficult and with a little practice anyone can be successful at it. Even when it comes to making something as decadent as these croissants! They are a labor of love, but they are so worth it and surprisingly simple to put together.

What Are Croissants?

Croissants are flaky, layered French pastry in the shape of a crescent. They’re loved by everyone and for a good reason! We’re talking cloud-like puff pastry, buttery, flaky, yeasty, chewy bread. It really is one of the most decadent things you can eat.

Croissant dough gets its many layers as a result of “laminating” the dough. This means we are rolling and folding over and over, giving you many thin layers of dough and butter. As you bake them, the butter melts and gives off steam. This puffs each paper-thin layer of dough up giving your croissants hundreds of buttery layers.

Homemade Croissants process shots for making dough

Ingredients You’ll Need

  • Milk – I used 2% milk for this recipe, but it really doesn’t matter if you use a different fat content.
  • Brown sugar – Adding a bit of sugar to your croissants pairs so well with the buttery flavor! It will also help give a bit more crunch to the outside of each croissant.
  • Active dry yeast – Make sure to double check that you are using active dry yeast rather than instant yeast. If your yeast does not foam up after step #1, your yeast is dead and the croissants will not turn out. Buy a new jar or package and store it in the freezer so it’ll last longer.
  • All-purpose flour – While you can use bread flour in this recipe, I find it’s much more convenient to use all-purpose. We all have it in out pantries, and it makes fantastic bread. The difference is that bread flour has a higher protein content, resulting in better gluten formation.
  • Salt – You can adjust the salt in this recipe to suit your own sodium preference. I wouldn’t leave it out, though. That touch of salt really brings out the buttery flavor.
  • Butter – Make sure you use unsalted! I only ever cook with unsalted butter so that I have full control of the salt content. Since most of the flavor of these croissants come from the butter, make sure to find a good quality brand.
  • Egg – The egg doesn’t actually make it into the dough! This will actually be used for an egg wash. That’s what gives our croissants a glossy and golden brown exterior.
Homemade Croissants process shots for rolling dough

How to Make Croissants

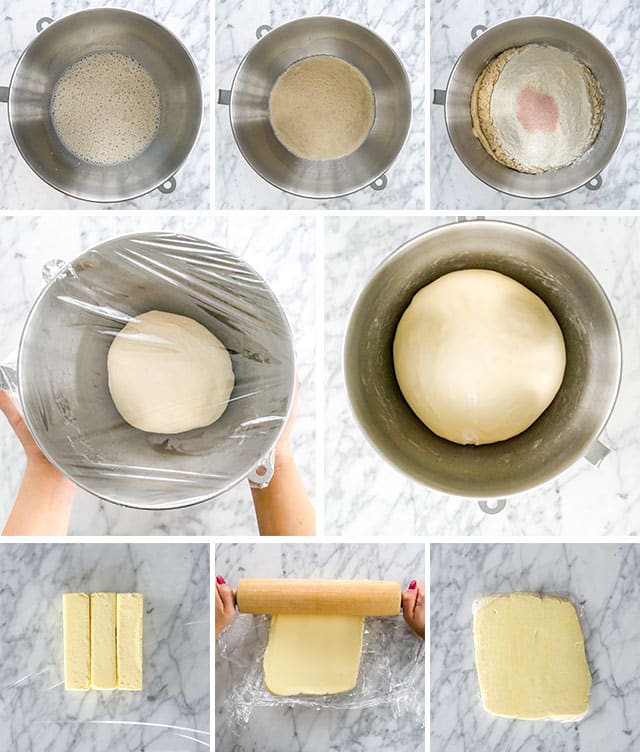
  1. Bloom the yeast: In the bowl of your mixer, add the warm milk, brown sugar, and yeast. Give it a quick stir with a fork or small whisk and let it sit for 5-10 minutes, until the yeast foams up well.
  2. Make the dough: To your bloomed yeast, add the flour and salt. Use the dough hook on your mixer and let the dough knead for about 5 minutes on low speed. The dough should turn out nice, soft, elastic, and slightly sticky. Because of varying environment conditions, you may need more flour than I used. Add 1 tbsp at a time until your dough feels perfect. Knead the dough by hand for a few minutes, then add it back to the bowl. Wrap the bowl well with plastic and let the dough sit in the fridge for 1 hour.
  3. Prepare the butter: Arrange the sticks of butter on a sheet of plastic wrap horizontally. Lay another piece of plastic over the sticks, and use a rolling pin to flatten the sticks until you have approximately an 8×5 inch rectangle. Put the butter, still wrapped in plastic, in the fridge until the dough is ready.
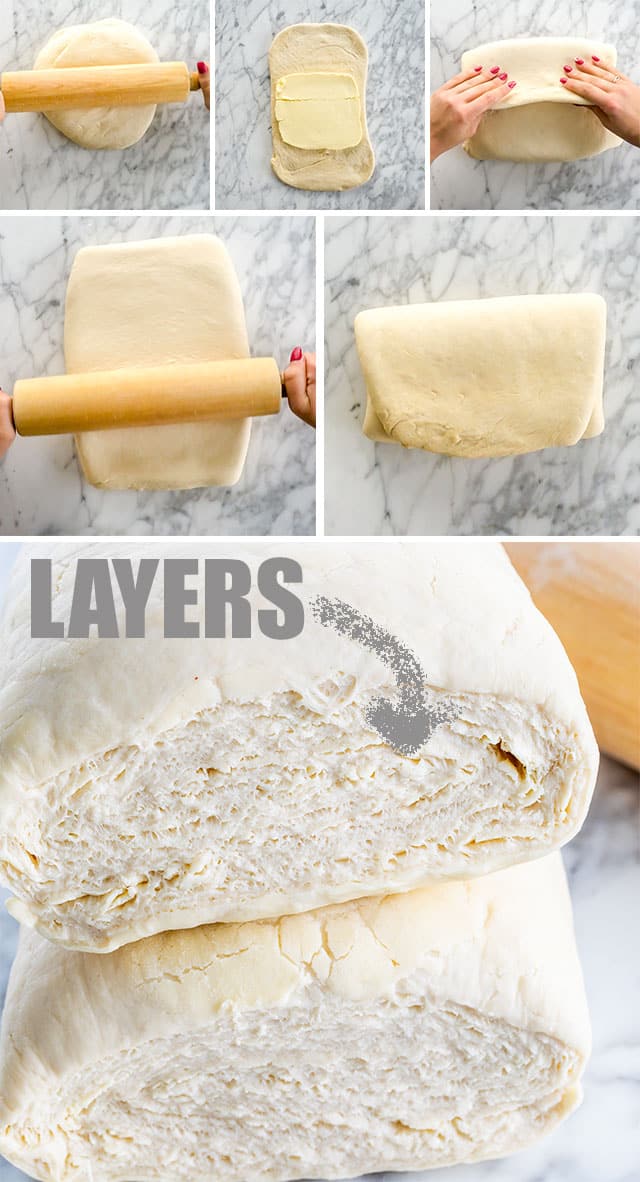
  4. Laminate the dough: Laminating dough is the process of folding butter into the dough many times, which is what creates all those layers. Turn the dough out onto a lightly floured surface and roll it to a 16×10 inch rectangle. Place your butter in the center, and fold the edges of the dough rectangle over to cover the butter completely. Roll the dough out so it’s back to 16×10 inches, then fold it letter-style into thirds. Wrap the dough with plastic and place it in the fridge for an hour. I like to repeat this process a total of 5 times giving us a total of 729 layers. Yes, that’s right! 729 layers! 
  5. Bake the croissants: Roll the dough out, one last time, until you have a long rectangle about 1/4″ thick. I like to cut the dough into thirds to make this part easier. Slice the dough into long triangles, and roll each one starting at the wide end until you have a crescent shape. Brush with a lightly beaten egg, and bake on a parchment paper lined sheet for 8-12 minutes at 400F, then turn the oven down to 375 and bake for another 8-12 minutes.
Homemade Croissants for forming croissants

How to Make Pain Au Chocolate Aka Chocolate Croissants

For fillings, you can either cut the dough in triangles to keep the crescent shape or you can leave the dough at long 4″ wide strips. Place a piece of chocolate at the end of the dough, and then roll it up until it’s nicely wrapped with the strip of croissant dough.

Don’t be afraid to try other fun fillings for your croissants! Try out your favorite fillings. I love using Nutella, jam, peanut butter, or even savory fillings such as ham and cheese, or pesto and chopped sun dried tomatoes. Get creative!

Homemade Croissants on a baking sheet

Why Are These Homemade Croissants the Best?

  • These are a labor of love. No cutting corners here! Keeping the dough nice and cold, working in very deliberate steps, will ensure you have the most buttery and flaky croissants.
  • The ingredients used are common everyday ingredients; you probably already have everything you need to make this recipe.
  • This is a great recipe that you can customize with fillings. You can even make sandwiches out of these delicious croissants!
  • The dough or the finished croissants are great for freezing. Fresh croissants every day? I think so!
  • Readers love them!

We came home from France and I decided to make homemade croissants. I’m so glad I found this recipe. I’m on my third batch! My grandkids love them, and so does the rest of my family that the croissants don’t even last two days! I make some plain and some chocolate! Excellent recipe, thank you!!!

Homemade Croissants

How to Store Homemade Croissants

Make sure to keep them in an airtight container, freezer bag, or tightly wrapped in foil so that they don’t dry out. These croissants will last about 2-3 days. In the fridge, they can last up to 1 week.

How to Freeze Homemade Croissants

To freeze baked croissants, let them fully cool down to room temperature. Place them in an airtight container, a freezer bag, or wrapped tightly in both plastic wrap and foil. They will last 1-2 months frozen. Thaw them by letting them sit at room temperature for 1 hour.

To freeze unbaked croissants, shape them first and let them sit covered with plastic wrap on a baking sheet in the freezer for a few hours until they freeze. Transfer the par-frozen croissants to a freezer bag or airtight container and they will last 1-2 months.

When ready to bake, place the unbaked croissants on a parchment paper lined baking sheet, cover with plastic wrap, and leave to proof at room temperature overnight or for about 12 hours.

Homemade Croissants

Want to Make Homemade Croissant Sandwiches? Try These Recipes:

  • Chicken Salad Sandwiches
  • Egg Salad Sandwich
  • Avocado Tuna Salad
  • Waldorf Salad

More Related Recipes:

  • Cheese Spiral Pie
  • Flour Tortillas
  • Nutella Stuffed Pumpkin Cruffins
  • Apple Dumplings
  • Butter Biscuits

Before You Begin! If you make this, please leave a review and rating letting us know how you liked this recipe! This helps our business thrive & continue providing free recipes.

close up of the layers on the homemade croissant
Print
4.51 from 880 votes

Homemade Croissants

Prep 14 hours
Cook 24 minutes
Total 14 hours 24 minutes
Rate Recipe
These Flaky Buttery Homemade Croissants will make your morning breakfast so much more delicious! A complete recipe guide with pictures and video to teach you to make the most perfect croissants from scratch.
24

Ingredients

  • 1 ½ cups milk (lukewarm)
  • ¼ cup brown sugar (packed)
  • 3 ¼ teaspoon active dry yeast
  • 3 ¼ cups all-purpose flour (up to 4 cups if needed)
  • 1 tablespoon salt
  • 1 ½ cups butter (unsalted, cold)
  • 1 egg ( for egg wash)

Before You Begin! If you make this, please leave a review and rating letting us know how you liked this recipe! This helps our business thrive & continue providing free recipes.

Instructions 

  • Bloom the yeast: In the bowl of a mixer, add the warm milk, brown sugar, yeast and stir it with a fork slightly. Let it stand for about 5 minutes. If the yeast is good, the mixture will get all foamy as the yeast dissolves. It could take a bit longer but if your yeast does not dissolve, see recipe notes.
  • Make the dough: Add the flour and salt to the bowl. Using the dough hook, mix on low speed for about 5 minutes until the dough is smooth and very soft. I used about 3 1/4 cups of flour, but if you need more because the dough is too sticky than just add more, about 1 tbsp at a time. You might want to start with 3 cups and add as needed. Remove the dough from the mixing bowl and knead for a couple more minutes on your working surface. The dough needs to be soft and slightly sticky. Place the dough back in the bowl, wrap it with plastic wrap and refrigerate it for an hour.
  • Prepare the butter: While the dough is chilling, prepare the butter. Arrange the sticks of butter horizontally on a piece of plastic wrap. Cover the butter with another piece of plastic wrap. Pound and roll out on both sides until the butter forms a nice 8 by 5 inch rectangle. Cover with plastic wrap and refrigerate until ready to use. 
  • Laminate the dough: Flour your work surface lightly then roll out the dough into a big rectangle that’s about 16 by 10 inches. Place the butter directly in the center of the dough and fold the dough as you would a letter, bottom third of dough over butter, then top third down over the dough. If you have any excess flour, make sure you brush that off.
  • Turn the dough so that the short side is nearest you and start rolling it another 16 by 10 inch rectangle. Fold in thirds like a letter again. This was the first fold. Wrap it up in plastic wrap and chill it for another hour.
  • Repeat as above. With the short side near you, start rolling until you get another 16 by 10 inch rectangle. Fold it in thirds again, wrap and chill for another hour. Repeat this 3 more times so that it will make a total of 5 folds. After the last fold, refrigerate it over night or at least for 8 hours.
  • Shape croissants: Cut the dough in half, freeze half if you’re only going to use half of it. Roll out each piece of dough into a long rectangle, so that it’s about 1/4 of an inch in thickness. I found it easier if I cut the piece into 3 pieces, so that I work with 3 squares. Using a pizza cutter, cut each square into 4 triangles.
  • Using one triangle at a time, start rolling from the wide side, at the same time, stretching the end of the triangle. Continue rolling the croissant, and as you’ll notice because you stretched into a long piece, you’ll be able to roll the croissant a few times.
  • Repeat this with remaining dough and place the croissants on an ungreased baking sheet, with about 1 to 2 inches in between them.
  • Let the croissants sit for another hour, you’ll notice they’ll rise a bit, then brush them with egg wash. You can make the croissants ahead of time and refrigerate them for up to 18 hours before baking. If you’re making them ahead, make sure to cover the baking sheet with plastic wrap.
  • Bake croissants: Preheat your oven to 400 F degrees. Place the baking sheet in the oven and bake the croissants for 8 to 12 minutes at 400 F degrees then turn down the heat to 375 F degrees and bake them for another 8 to 12 minutes. You want to make sure they are nice and golden brown.

Equipment

  • KitchenAid Hand Mixer
  • Classic Wooden Rolling Pin
  • Aluminum Baking Sheet (2 pack)

Video

Notes

  1. YEAST: Always check the expiration date on your yeast and make sure it hasn’t expired. All your yeast products whether it’s in a jar or a package should be stamped with a “Best if Used by” date. Always make sure you check this date, even when you purchase the yeast, who knows it could have been on the shelf past its expiry date.
  2. Milk: Make sure your milk is not too hot or it could kill the yeast which will cause your dough not to rise at all. The ideal temperature for the milk should be between 105 F degrees and 110 F for proofing. While 95 F degrees is the best temperature for yeast to multiply, that’s not warm enough for proofing active dry yeast. 
  3. Storing yeast: To keep your yeast fresh and longer lasting, unopened yeast packages or jars should be stored in a cool or dry place such as your cupboard. However, you can also store your yeast in the fridge or freezer. If you do store it in the freezer and need to use yeast for your baking, make sure you take out the amount you need and let it sit at room temperature for at least half hour before using.
  4. Once your yeast package or jar has been opened, you must refrigerate the yeast or freeze it in an airtight container.
  5. One thing to remember about your yeast, is that it is a living organism and over time it will lose activity, even if you’ve never opened the jar or package. So if you don’t bake often, buy the smaller yeast packages rather than a big jar of yeast.
  6. FILLING: You can add various fillings to your croissants just before rolling them. Try chocolate, fruit jams or even ham and cheese!
  7. Yields: 24 croissants or 32 smaller croissants. In the pictures above I made 32 smaller croissants, but nutritional information per croissant shown below assumes 24 croissants.
  8. Nutrition: Please keep in mind that nutritional information is a rough estimate and can vary greatly based on products used.

Nutrition Information

Serving: 1croissantCalories: 185kcal (9%)Carbohydrates: 16g (5%)Protein: 2g (4%)Fat: 12g (18%)Saturated Fat: 7g (44%)Cholesterol: 38mg (13%)Sodium: 302mg (13%)Potassium: 52mg (1%)Sugar: 3g (3%)Vitamin A: 390IU (8%)Calcium: 26mg (3%)Iron: 0.8mg (4%)

Notice: Nutrition is auto-calculated for your convenience. Where relevant, we recommend using your own nutrition calculations.

close up of the layers on the homemade croissant

Did You Make This?

We love seeing what you made! Tag us on Instagram at @jocooks or hashtag #jocooks so we can see your creations!

Rate Recipe
Add Your Photo!

Originally shared Feb 2012

  • 2514
  • 3
Home Recipes
Joanna Cismaru

Joanna Cismaru

I’m Joanna (Jo for short) and this is my blog where I share with you my culinary adventures. Here you will find a variety of recipes using simple everyday ingredients and creating wonderful, delicious and comforting meals, including some decadent desserts.

Read More
iPad showing title of ebook 30 recipes from around the world
Subscribe

Get our FREE recipe eBook + weekly newsletter!

Loading

guest
Did you make this recipe? Rate it:


The comment form collects your name, email and content to allow us keep track of the comments placed on the website. Please read and accept our website Terms and Privacy Policy to post a comment.

guest
Did you make this recipe? Rate it:


The comment form collects your name, email and content to allow us keep track of the comments placed on the website. Please read and accept our website Terms and Privacy Policy to post a comment.

This site uses Akismet to reduce spam. Learn how your comment data is processed.

636 Comments
Newest
Oldest Most Voted
Inline Feedbacks
View all comments
Deb
Deb
Posted: 4 days ago

5 stars
Absolutely perfect recipe. Possibly the best thing I’ve ever baked and very authentic.

EC33D59A-7184-40E0-B9E4-C511C9F0505E.jpeg
0
Reply
Joanna Cismaru
Joanna Cismaru
Author
Reply to  Deb
Posted: 4 days ago

They look great, glad you enjoyed it!

0
Reply
Jame
Jame
Posted: 12 days ago

Best recipe ever I make them every week. Thank you.

0
Reply
Zanna
Zanna
Posted: 1 month ago

5 stars
I have baked a lot of croissants, trying to find the best recipe. My search has ended. These are amazing. No butter leak when baking. The rise and the LAYERS. My husband said do not share! Thank you for the great recipe. My oven runs high will adjust at next batch. For the butter, I check it on the edge of the counter, if it bends slightly, it’s usually the right temperature.

0A71CE6E-0D4B-484D-9B34-0FF9CD0E7A0F.jpeg
1
Reply
Rebecca Ford
Rebecca Ford
Posted: 2 months ago

I’m making these croissants right now, and about the laminating process: do I fold the dough so the ends overlap when they meet in the center, or should they just barely touch?

1
Reply
Joanna Cismaru
Joanna Cismaru
Author
Reply to  Rebecca Ford
Posted: 2 months ago

It doesn’t really matter, they can overlap.

0
Reply
M
M
Posted: 3 months ago

Hi! Wanting to try your recipe but a little confused about the butter part. Once you place butter in dough you say fold it and let it rest (repeat 5x) how long do I need to let it rest every time I do this?

0
Reply
Joanna Cismaru
Joanna Cismaru
Author
Reply to  M
Posted: 3 months ago

An hour, step 5. 🙂

0
Reply
Hannah Bodolosky
Hannah Bodolosky
Posted: 3 months ago

5 stars
Amazing, light, and flaky croissants! I’ve tried like 5 different recipes and this is the best!

1
Reply
Katherine
Katherine
Posted: 3 months ago

5 stars
Hi Joanna! My Mom & I gave your recipe a go, the results were so, so wonderful! I’m hoping to bake more but would like to freeze half of the dough. When I’m ready to use it, what is the process? Thanks 🙂

0
Reply
Joanna Cismaru
Joanna Cismaru
Author
Reply to  Katherine
Posted: 3 months ago

So glad you liked them! There are instructions on how to freeze them, under “How To Freeze Homemade Croissants”. It’s easier to shape them first then freeze them, as per instructions.

0
Reply
Juwairiyyah
Juwairiyyah
Posted: 3 months ago

Tried this recipe and it came out absolutely amazing ! So soft and flaky . Was a bit hesitant because I’ve never made croissants before but very impressed with the results .

0
Reply
Joanna Cismaru
Joanna Cismaru
Author
Reply to  Juwairiyyah
Posted: 3 months ago

So glad you liked them!

0
Reply
Nova Kane
Nova Kane
Posted: 4 months ago

I usually use a bread a bread machine to mix the dough for me due to arthritis. Could the dough be mixed that way, or is there a similar recipe i can make?

0
Reply
Joanna Cismaru
Joanna Cismaru
Author
Reply to  Nova Kane
Posted: 4 months ago

I’ve never tried this recipe using a bread machine, but I don’t see why not. However, you’ll still need to do the laminating process by hand.

0
Reply
Danielle B
Danielle B
Posted: 4 months ago

5 stars
I loved these! The recipe is so easy and made me look astoundingly impressive to my family. I want to make a few more batches and freeze them after all of the folding so that when time is short I still can have these perfect treats. Can you tell me if I can freeze before baking and at what step would be optimal? Thanks!

0
Reply
Joanna Cismaru
Joanna Cismaru
Author
Reply to  Danielle B
Posted: 4 months ago

Glad you love these! All the freezing instructions are in the post right here: https://www.jocooks.com/baking/breads/homemade-croissants/#How_to_Freeze_Homemade_Croissants

0
Reply
Elyssa
Elyssa
Posted: 5 months ago

5 stars
I originally made this recipe out of spite because some people told me croissants were too hard to make and I could never do it. They all beg me to make them now. This recipe is delicious and flaky, especially if you don’t forget the 1 tbsp of salt like I did the first go round haha. I’ve made them a couple times now and absolutely love them! I can’t wait to make them for my coworkers! Thanks so much for the wonderful recipe!

0
Reply
Joanna Cismaru
Joanna Cismaru
Author
Reply to  Elyssa
Posted: 5 months ago

My pleasure, so glad you guys liked them!

0
Reply
Phil
Phil
Posted: 5 months ago

I noticed some other croissant recipes include a small amount of butter in the dough itself, and I’m just curious why your recipe doesn’t do this? I’ve been getting into baking and trying to learn more about the process. I’ve made your recipe before and it was fantastic.

0
Reply
Joanna Cismaru
Joanna Cismaru
Author
Reply to  Phil
Posted: 5 months ago

I’ve just never found it was necessary.

0
Reply
Georgia
Georgia
Posted: 5 months ago

Hi! I’ve made these croissants a few times and they’ve always turned out amazing and so delicious. I decided to make these for an event (3 batches!), but they are not working this time around and I’m in desperate need of help. The butter layer broke in chunks and is breaking thru the dough while laminating. My butter wasn’t perfect last time and it still ended up great..but I just took the first batch out of the oven and it was a fail-pools of butter everywhere and they’re very dense and bad. Is there anything I can do to salvage the other 2 batches?? They have been in the fridge overnight and I’m too nervous to mess with them any further. Should I let soften and then re-laminate once or twice? Also, how can I patch up the broken dough so the butter doesn’t spill out again? Can I use extra dough or maybe they need more moisture? Please let me know!! This isn’t the recipes fault it’s completely mine..I’m just desperately trying to make these work for my event and don’t have time to remake from scratch. Thanks

0
Reply
Joanna Cismaru
Joanna Cismaru
Author
Reply to  Georgia
Posted: 5 months ago

I think that’s what I’d probably do now, is try and laminate the dough a couple more times, give the butter a chance to blend in to the dough so that it doesn’t spill out while baking. Sorry to hear you’re having problems this time. It’s also possible the dough hasn’t had enough time to proof, so giving it some extra time should help. Usually when butter breaks like that in chunks, it’s possible it has a higher water content and could potentially ruin the layers. Go for an organic butter with a high fat content and low water content. Hope these tips help. Let me know how they turn out for you.

0
Reply
Theodora
Theodora
Posted: 5 months ago

Hi! I’m currently making this recipe now😊I only had 1.5 sticks of butter, so I divided the recipe in half. Does this change the dimensions of the dough/butter rectangles? Also, to clarify, do you refrigerate for an hour after every fold? So 5 hours + overnight after the last fold? Very excited! Thanks😊

0
Reply
Joanna Cismaru
Joanna Cismaru
Author
Reply to  Theodora
Posted: 5 months ago

Even if you halve the amounts of the ingredients, you can make the rectangles as big as you like. To answer your questions, yes and yes. Hope they turn out for you.

0
Reply
Theodora
Theodora
Reply to  Joanna Cismaru
Posted: 5 months ago

5 stars
I just wanted to follow up—they turned out AMAZING. In fact I’m already making them again right now, but with the full amount. They were gone in minutes!!

0
Reply
Joanna Cismaru
Joanna Cismaru
Author
Reply to  Theodora
Posted: 5 months ago

I’m so happy to hear it!

0
Reply
Janet Levy
Janet Levy
Posted: 7 months ago

I used this recipe before (I use European butter) and want to split the labor into two days. Would you recommend finishing step 6 and refrigerating overnight to complete the process the next day?

0
Reply
Joanna Cismaru
Joanna Cismaru
Author
Reply to  Janet Levy
Posted: 7 months ago

Yes, you can definitely do that.

0
Reply

sidebar

Headshot of Joanna Cismaru

Hey there!

I’m Joanna (Jo for short) and this is my blog where I share with you my culinary adventures. Here you will find a variety of recipes using simple everyday ingredients and creating wonderful, delicious and comforting meals, including some decadent desserts.

Read More
Collage of recipe ebooks
Subscribe

Get our FREE recipe eBook + weekly newsletter!

Loading

Pasta Favorites

baked mac and cheese in a black cast iron skillet.
45 mins

Baked Mac And Cheese

freshly made crack chicken penne with a wooden spoon in a skillet.
40 mins

Crack Chicken Penne

chicken pot pie pasta in a white serving bowl with a wooden serving spoon.
50 mins

Chicken Pot Pie Pasta

freshly made one pot pasta in a dutch oven.
20 mins

One Pot Pasta

tomato spinach chicken pasta in a white bowl.
30 mins

Tomato Spinach Chicken Pasta

homemade hamburger helper lasagna from scratch in a skillet.
30 mins

One Pot Hamburger Helper Lasagna

baked feta pasta in a white bowl garnished with fresh basil.
50 mins

Baked Feta Pasta (Tik Tok Pasta)

sideview shot of chicken fajita pasta in a white bowl with a fork inside
45 mins

Chicken Fajita Pasta

side close up shot of swedish meatball pasta in a beige braised garnished with parsley
30 mins

Swedish Meatball Pasta

overhead shot of a bowl of haluski
40 mins

Haluski (Cabbage and Noodles)

A stack of cookbooks
Grab a copy!

My Cookbooks

Order Now: Amazon | Indigo | Barnes & Noble | Indie Bound | Books-A-Million

Dinner Favorites

smothered pork chops in a skillet garnished with parsley.
1 hr 15 mins

Smothered Pork Chops

a wooden spoon lifting a salisbury steak out of the skillet
30 mins

Salisbury Steak

beef lo mein in a black wok.
30 mins

Beef Lo Mein

side shot of beef and broccoli in a skillet
15 mins

Easy Beef and Broccoli Stir Fry

shepherd's pie in a skillet with a serving taken out of it.
1 hr 25 mins

Skillet Shepherd’s Pie

a serving spoon inside a skillet with chicken broccoli rice casserole.
30 mins

One Pot Cheesy Chicken Broccoli Rice Casserole

side view shot of two italian stuffed peppers in a bowl
2 hrs 30 mins

Italian Stuffed Peppers

side view shot of a bowl with a scoop of spaghetti bolognese in it
40 mins

Spaghetti Bolognese

Facebook
Instagram
Pinterest
YouTube
TikTok
Visit our Other Site: Craving Home Cooked

Explore

Recipes
Cookbooks
About Jo
Contact

Legal

Privacy Policy
Accessibility
Disclaimers
© 2023 Jo Cooks
Site Credits
Designed by Melissa Rose Design Developed by Once Coupled
Back to Top
wpDiscuz