Halloween Red Velvet Cupcakes
This post may contain affiliate links. Please read my disclosure policy.
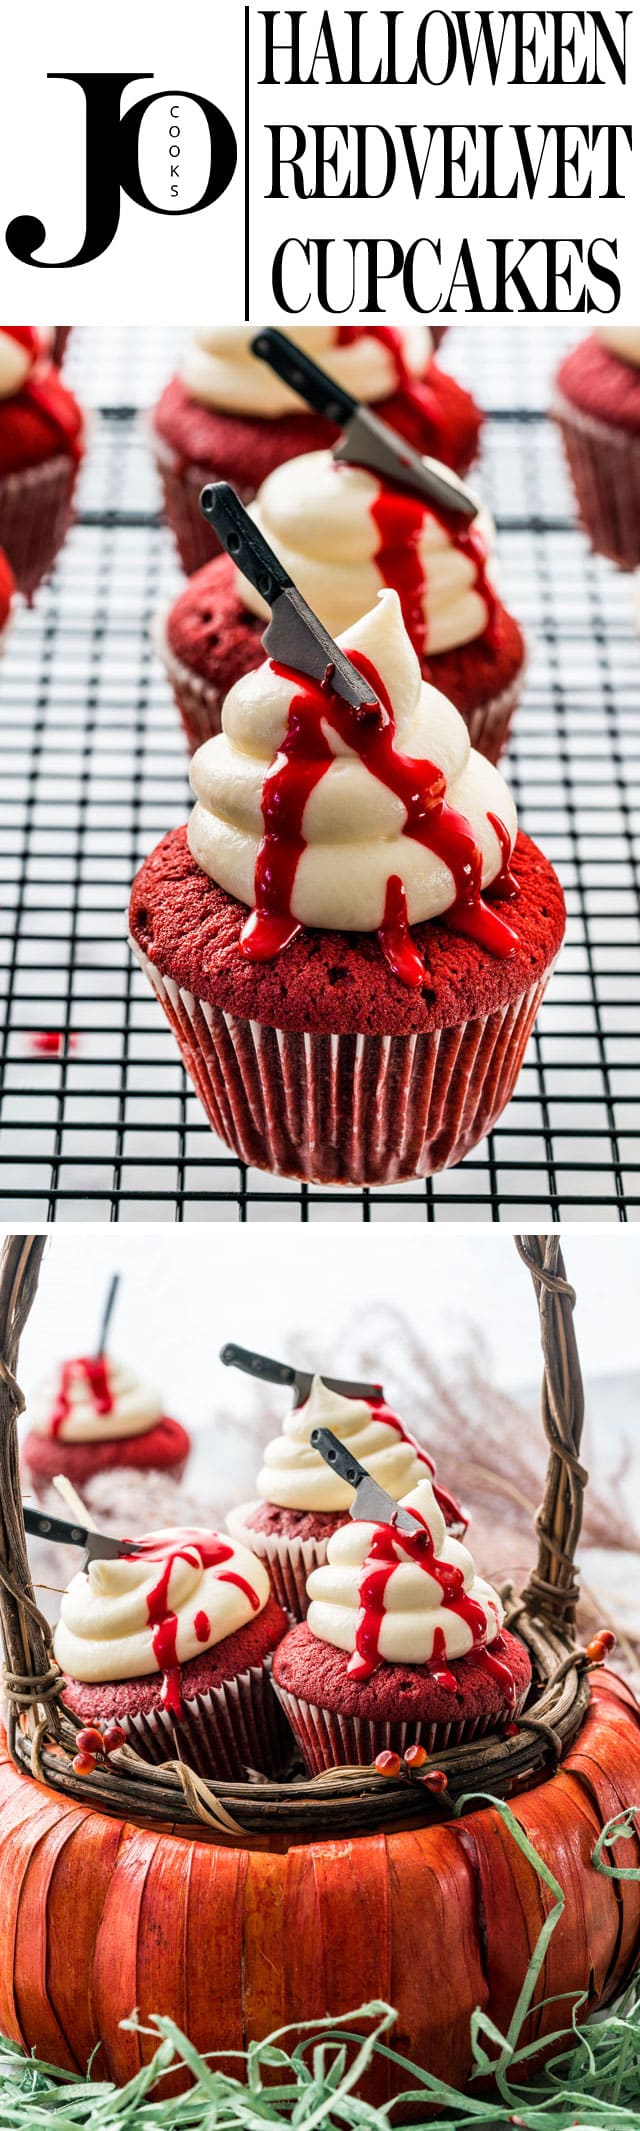
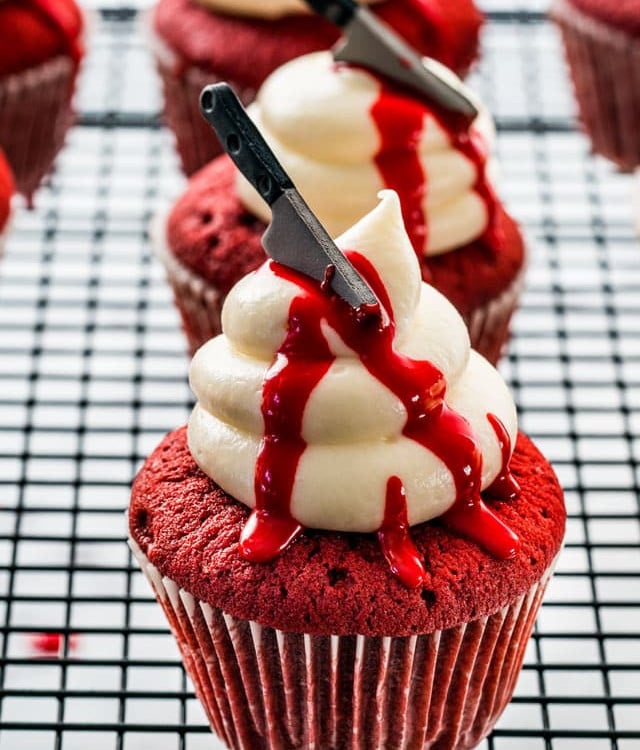
These bloody Red Velvet Cupcakes are perfect for Halloween. Traditional red velvet cupcakes, topped with a cream cheese frosting and decorated with a red icing for a bloody effect.

I can’t believe Halloween is just around the corner. I love Halloween mostly because I love making desserts, and the gore and home made nature of Halloween means that you don’t need perfectly made treats! People just appreciate the effort, just as they appreciate you guessing their costumes right on the first try.
I love Halloween, not because I still dress up, because I don’t, those years passed by a long time ago. It’s the candy, when it comes to candy I don’t think hubs and I ever grew up.
Why bother anyways? Believe me when I say that the inner child in you will squeal with delight when these are finished.
Pretty much every year, before Halloween, I make a trip to Michael’s to see what decorations they have, and they never disappoint. This time I found these cute little royal icing knives which I thought were perfect to decorate cupcakes.
But let’s be serious for a moment, red velvet cake and cream cheese frosting really is a marriage made in heaven. Which is why these cupcakes are perfect. They’re perfect even if you don’t decorate them because they’re still super cute.

Isn’t Red Velvet Just Chocolate Cake Dyed Red?
A lot of people think red velvet is just chocolate cake with coloring but that’s not quite true. There’s less cocoa than in a chocolate cake and the addition of sour cream make it tangier and give it the “velvet” texture. So these cupcakes are all about texture and flavor, combined with a visually stunning finish.
Ingredients
Cupcakes
- Flour – We just want some all purpose flour today, if you’d like to make this gluten free I’ll include a section detailing how to do just that.
- Food coloring – Red food coloring, we’re using quite a bit of coloring today as the cocoa powder in our batter lends it’s own color and makes it a bit more difficult to achieve that true red. We want a super rich, pigmented color!
- Leavening – We’re using both baking soda and baking powder.
- Cocoa – We’re using some cocoa powder today, it’s a key aspect of the flavor profile of red velvet cake, so be sure to include it.
- Vanilla – Vanilla extract is our secret weapon flavor booster.
- Butter – Unsalted and softened to room temperature.
- Sugar – Plain white sugar and packed brown sugar is all we need for these cupcakes today, believe me it may be unconventional but it’s going to give our treats some great depth of flavor.
- Sour cream – Most red velvet cakes include vinegar but to achieve this brightness and tang while still ensuring tons of moisture I’m using sour cream instead. Believe me – it works!
- Eggs – The binding agent for our batter recipe.
- Salt – All baked goods and the frosting that tops them needs a little salt. My printable recipe card gives details on the exact amount needed below.
Frosting
- Butter –Unsalted again as we want to control our sodium in this recipe.
- Vanilla – Vanilla extract is our secret weapon flavor booster.
- Salt – All baked goods and the frosting that tops them needs a little salt. My printable recipe card gives details on the exact amount needed below.
- Cream cheese – Softened to room temperature this is the rich base of our creamy rich frosting.
- Sugar – We need icing sugar for this part of the recipe as it will ensure our frosting is sweet and non grainy.
Decorations
- Halloween Knife Icing Decorations – Now these are available on Amazon and are totally optional – but it isn’t Halloween-y without them!
- Sugar – Again we want icing sugar to ensure the texture of our icing is correct – we want it to not be too runny but with zero graininess.
- Milk – Any kind you’d like – whatever fat content you have will work just fine.
- Food coloring – In past recipes I’ve used red gel food coloring and the more common food dye, either work well so use what you have on hand!
Not A Sour Cream Fan?
I know there’s some of you out there and that’s totally fine! To substitute sour cream but still get tang and moisture just replace it with an equal amount of Greek yogurt. Just mix half a teaspoon of baking soda into the yogurt before incorporating.

How To Make Halloween Red Velvet Cupcakes
Cupcakes
- Preheat your oven to 350 F degrees. Line a 12-cup standard muffin tin with paper liners. Spray the paper liners with cooking spray. This will ensure your cupcakes won’t stick to the paper liners.
- Combine the dry ingredients: In a medium bowl combine the flour, cocoa powder, baking powder and salt. Set aside.
- Combine wet ingredients: In another bowl, or the bowl of your mixer, add the butter, granulated sugar and brown sugar and mix until well combined and it lightens in color. Add the eggs, one at a time, beating well after each egg. Mix in the vanilla extract and sour cream.
- Add the food color and mix. I usually start with 1 tsp and keep adding until I get the desired color. I ended up using a total of 3 tsp of red food color, but the color of your cupcakes may depend on which product you use.
- Combine wet and dry: Add the flour mixture and mix on low until until well incorporated, scraping the sides of the bowl as you go along.
- Assemble the cupcakes: Using an ice cream scoop, scoop the batter into the prepared muffin tin, filling each so that it’s about 3/4 full.
- Bake for about 20 to 25 minutes or until a toothpick inserted in the center comes out clean. Cool the cupcakes in the muffin tin for 5 minutes, then transfer them to a wire rack to cool completely.
Frosting
- Combine the frosting: Beat the cream cheese and butter first until smooth. Add the vanilla extract, salt and icing sugar and continue mixing until smooth and fluffy.
- Prepare a piping bag and fill it with the frosting and frost the cupcakes.
Decorate
- Create the icing: In a small bowl whisk all the icing ingredients. Use as much red food color until you achieve a dark blood like icing. The icing should be quite thin so that you can easily drizzle it.
- Finish the cupcakes: Dip a knife, with the blade side down, into the red icing, then place it into the frosting of each cupcake. Drizzle with additional red icing for more of a bloody effect.
Use The Right Frosting Tip
I don’t recommend using a star tip for this frosting because it’s a little too thin. You can also just use a knife to frost the cupcakes, no piping bag needed.

Not A Fan Of Food Coloring?
If you’re rather not use coloring it won’t affect the flavor or structure of the cake, it’ll just keep it brown. But I do recommend living a little and using it if you can! It’ll ensure these cupcakes are bright, vivid, and totally visually stunning. So why not?
Can I Use A Different Frosting?
Cream cheese icing is perfect for the tang from the sour cream but some people just don’t like it, in that case you can use any type of thick frosting you like. Whether it be buttercream, chocolate icing, your favorite out of a can.
How To Make Gluten Free Red Velvet Cupcakes
These can definitely be made without gluten if you’re cutting it out of your diet – and they’re just as delicious! Just substitute equal amounts of your favorite gluten free flour and add 1 teaspoon of xanthan gum and 1/4 cup of cornstarch.

Some tips
- Prepare your frosting while your cake is baking to make the process nice and efficient.
- Cool the cupcakes completely before frosting them – trust me all that frosting will be wasted otherwise as it’ll melt immediately. They should be barely warm to the touch.
- Test if your cupcakes are done by sticking a tooth pick into the center of your little cake, if it comes out clean then it’s done! Otherwise it needs a bit more oven time.
Leftovers
In the fridge these red velvet cupcakes will last up to 5 days, just be sure it’s stored in an airtight container.
This recipe can also be frozen! In the freezer it’ll keep for up to a year also stored properly in an airtight container. Wrap the cupcakes securely with plastic wrap before placing in the airtight container to protect your cake and allow it to thaw fully at room temperature before frosting.
Craving More Spooky Treats?
Before You Begin! If you make this, please leave a review and rating letting us know how you liked this recipe! This helps our business thrive & continue providing free recipes.
Halloween Red Velvet Cupcakes
Video
Ingredients
For Red Velvet Cupcakes
- 1 ¼ cups all-purpose flour
- 1 tablespoon cocoa powder (unsweetened)
- ¾ teaspoon baking powder
- ¼ teaspoon salt
- ¾ cup butter (unsalted, softened)
- ½ cup sugar (granulated)
- ½ cup brown sugar (packed)
- 3 eggs
- 2 teaspoon vanilla extract
- ½ cup sour cream
- 2-3 teaspoon red food color
For Cream Cheese Frosting
- 8 ounce cream cheese
- 4 tablespoon butter (unsalted, softened)
- 2 teaspoon vanilla extract
- ⅛ teaspoon salt
- 2 cups icing sugar
For Decorations
- 12 Halloween Knife Icing Decorations (optional)
- ¼ cup icing sugar
- 3 tablespoon milk (or more)
- 2 teaspoon red food color
Before You Begin! If you make this, please leave a review and rating letting us know how you liked this recipe! This helps our business thrive & continue providing free recipes.
Instructions
Make the Cupcakes
- Preheat your oven to 350℉. Line a 12-cup standard muffin tin with paper liners. Spray the paper liners with cooking spray. This will ensure your cupcakes won't stick to the paper liners.
- In a medium bowl combine the flour, cocoa powder, baking powder and salt. Set aside.
- In another bowl, or the bowl of your mixer, add the butter, granulated sugar and brown sugar and mix until well combined and it lightens in color. Add the eggs, one at a time, beating well after each egg. Mix in the vanilla extract and sour cream.
- Add the food color and mix. I usually start with 1 tsp and keep adding until I get the desired color. I ended up using a total of 3 tsp of red food color, but the color of your cupcakes may depend on which product you use.
- Add the flour mixture and mix on low until until well incorporated, scraping the sides of the bowl as you go along.
- Using an ice cream scoop, scoop the batter into the prepared muffin tin, filling each so that it's about ¾ full.
- Bake for about 20 to 25 minutes or until a toothpick inserted in the center comes out clean. Cool the cupcakes in the muffin tin for 5 minutes, then transfer them to a wire rack to cool completely.
Make the Cream Cheese Frosting
- Beat the cream cheese and butter first until smooth. Add the vanilla extract, salt and icing sugar and continue mixing until smooth and fluffy.
- Prepare a piping bag and fill it with the frosting and frost the cupcakes.
Decorate the Cupcakes
- In a small bowl whisk all the icing ingredients. Use as much red food color until you achieve a dark blood like icing. The icing should be quite thin so that you can easily drizzle it.
- Dip a knife, with the blade side down, into the red icing, then place it into the frosting of each cupcake. Drizzle with additional red icing for more of a bloody effect.
Equipment
Notes
- I don’t recommend using a star tip for this frosting because it’s a little too thin. You can also just use a knife to frost the cupcakes, no piping bag needed.
- In the fridge this recipe will last up to 5 days, just be sure it’s stored in an airtight container.
- This recipe can also be frozen! In the freezer it’ll keep for up to a year also stored properly in an airtight container. Wrap the cupcakes securely with plastic wrap before placing in the airtight container to protect your cake and allow it to thaw fully at room temperature before frosting.
Nutrition Information
Notice: Nutrition is auto-calculated for your convenience. Where relevant, we recommend using your own nutrition calculations.
