Watermelon Bread
This post may contain affiliate links. Please read my disclosure policy.

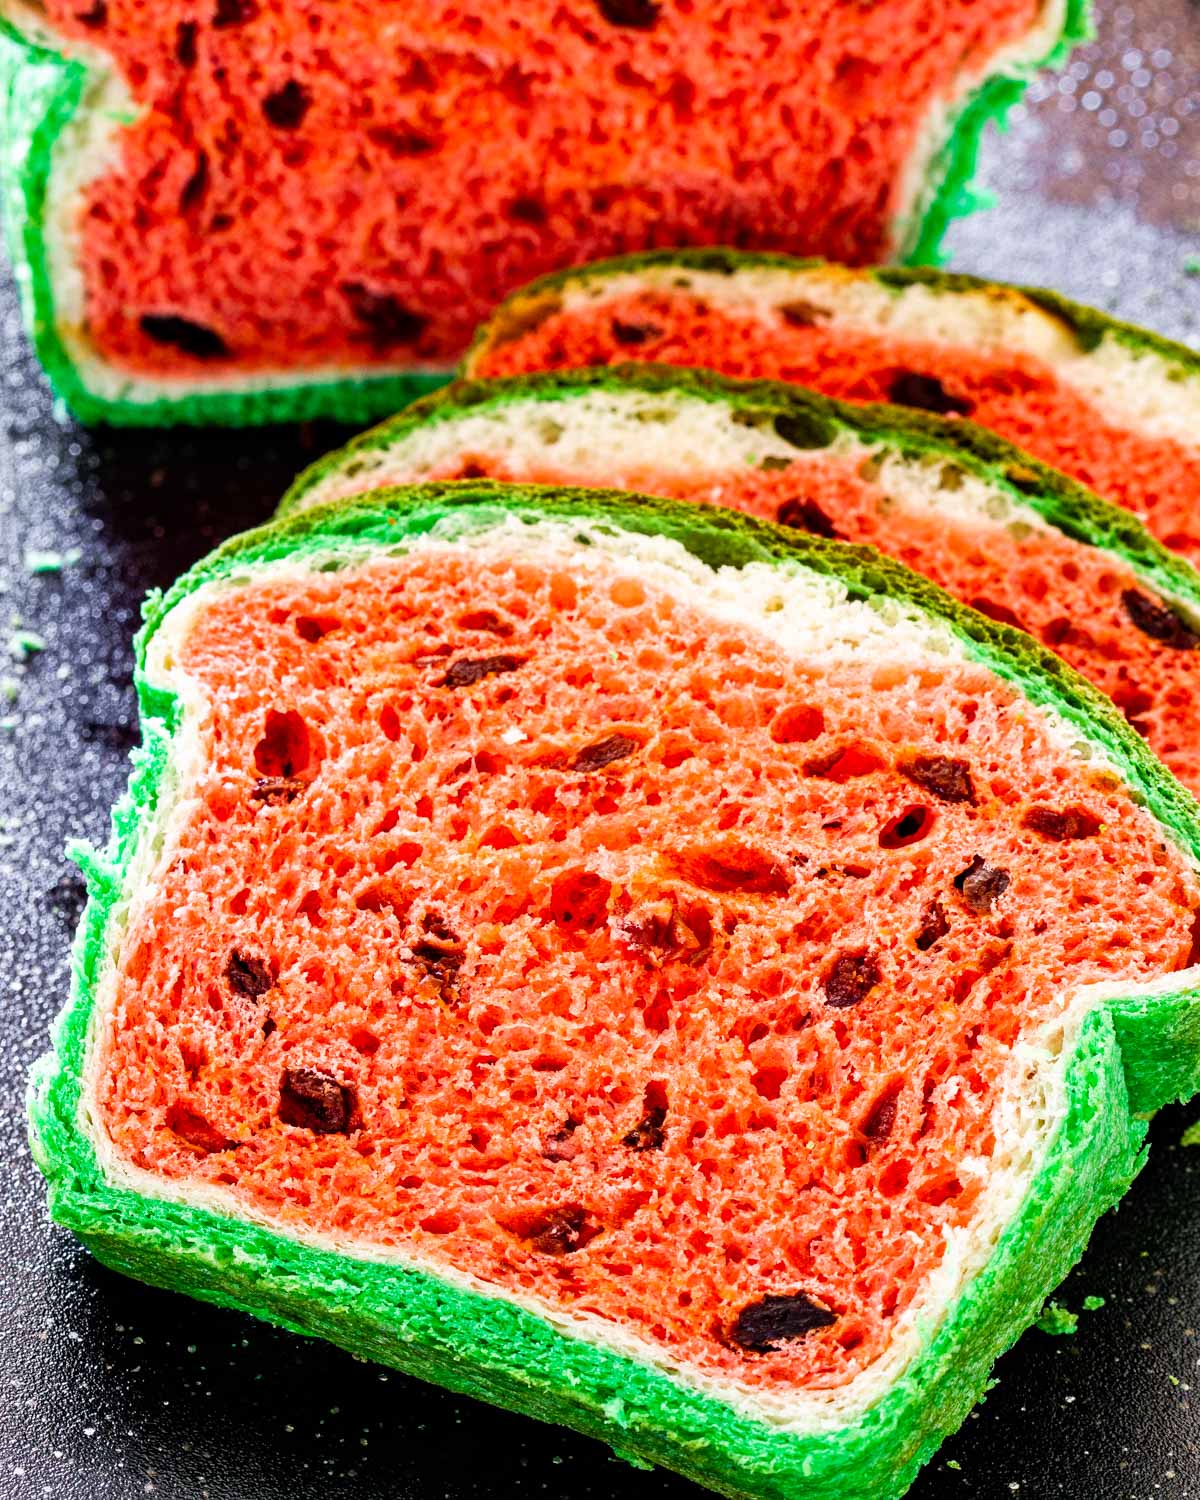
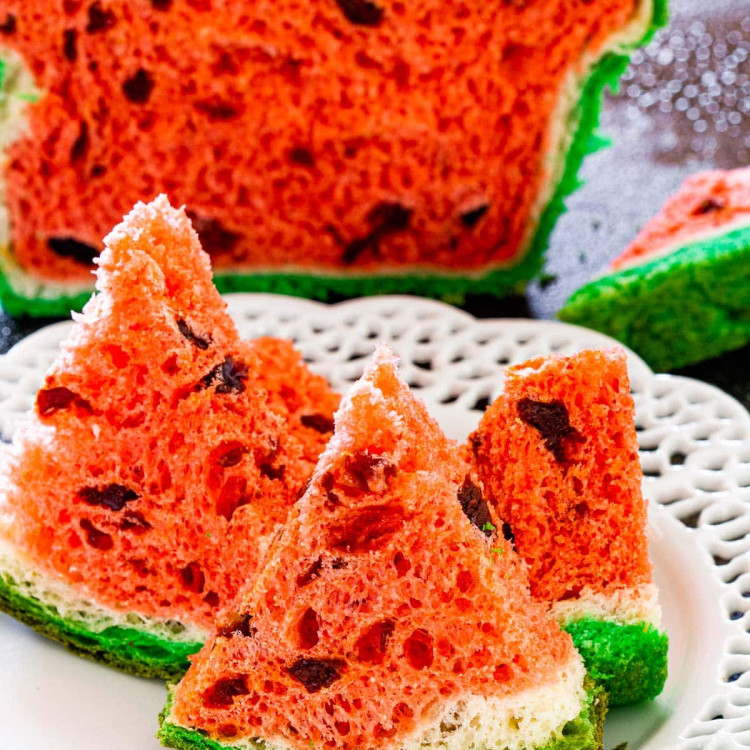
Watermelon Bread – learn the secret to making this delicious raisin bread that looks like a watermelon when sliced.

I must admit, I LOVE bread. Biscuits, white, whole wheat, rolls – you name it, I’ve probably made it. I taught myself how to bake the perfect homemade bread a while back, and it has totally changed my outlook! Not only does it taste better than store-bought, it’s also not as hard as it looks and will make you feel wonderfully accomplished.
Once I had mastered making my own bread, I wanted to get creative with it – cue my watermelon look-alike raisin bread! This bread is fun, different and will certainly impress whoever you serve it to.
Ingredients
- Milk – Any type you have handy will work.
- Butter – I like to use unsalted.
- Sugar – Regular granulated sugar.
- Salt – Use more or less per your own discretion.
- Yeast – I used instant yeast. If you use active yeast, you will have to proof is by mixing it with the warm milk and 1 tsp sugar. Let it sit for 5-10 minutes or until bubbly.
- Egg – I used a large egg.
- Flour – All purpose flour works best, however bread flour will be okay if that’s what you have.
- Raisins – These are your watermelon seeds! Other dark dried fruit like craisins or dried cranberries will work, but the shape of raisins work best for replicating watermelon seeds.
- Food Coloring – I used red and green for this bread. Use any type of food coloring you prefer.
How to make watermelon bread

Making the Dough
- Prepare Dough – Warm the butter and milk together in the microwave for 30 seconds or until butter is melted. Add milk mixture to a large bowl. Next, add the instant yeast, egg, sugar and salt, then whisk together. Add flour gradually, I added about 2 cups of flour, one cup at at a time, mix with wooden spoon. Don’t add the last cup of flour yet. The dough should be very sticky.
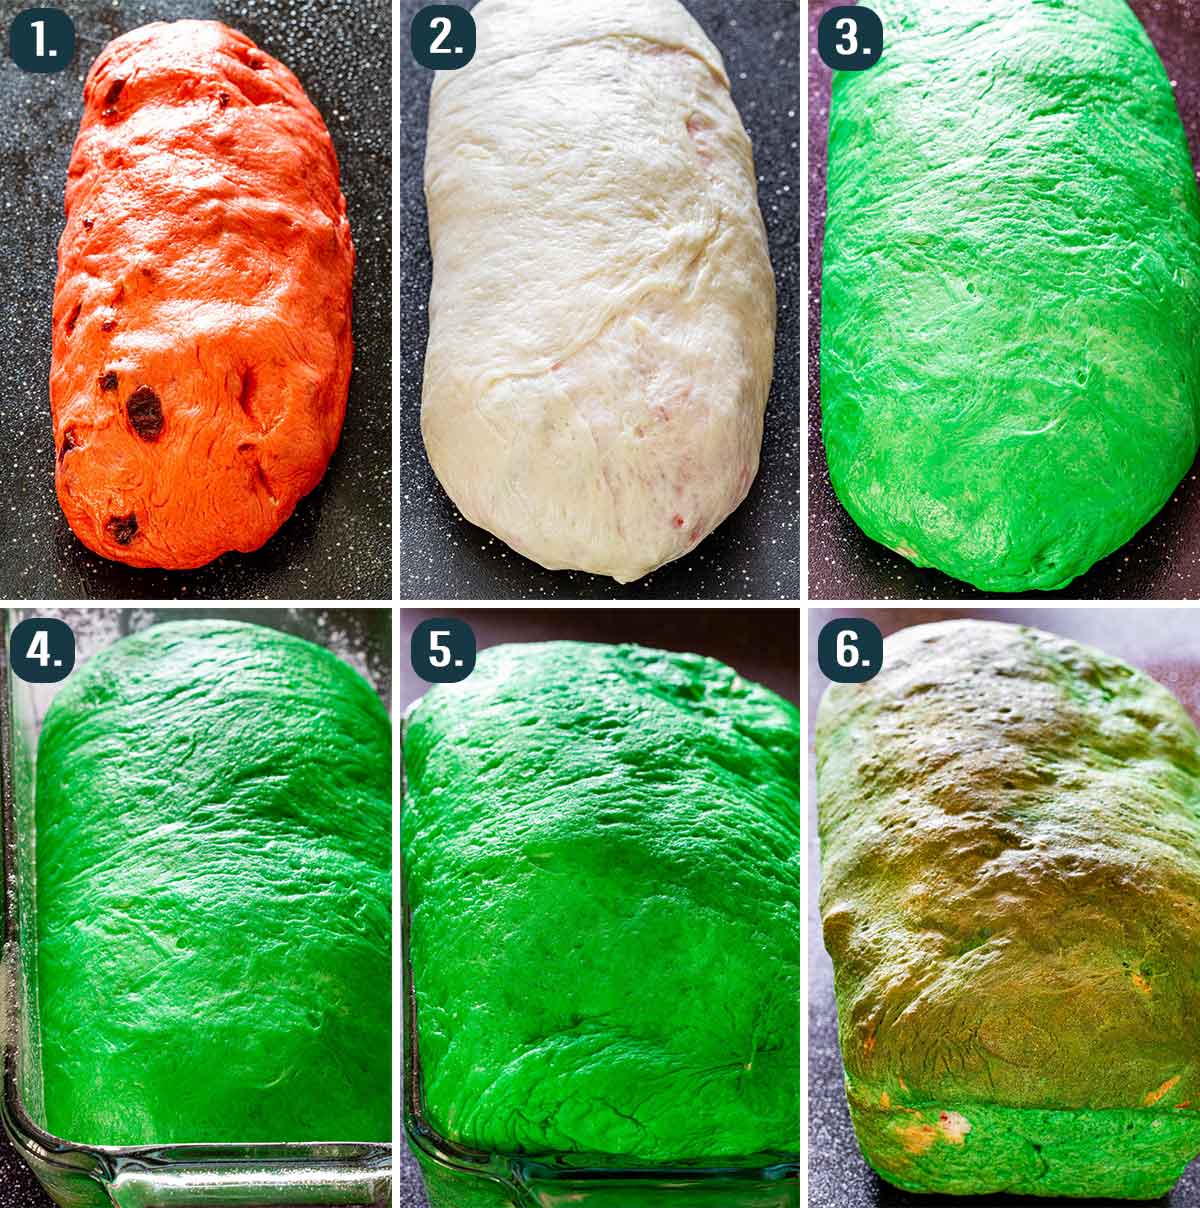
- Red Dough – Divide the dough into 2 parts. One half needs to be divided again in two, you will have 3 pieces of dough altogether. Take the bigger piece of dough and add red food coloring until you get the color you desire. Add the raisins and about 1/2 cup of flour. Knead together until color is fully mixed in.
- Green and White Dough – Take one of the smaller pieces of dough and add the green food coloring, mix until the color is fully incorporated. Add about 1/4 cup of flour and knead. Add more flour as needed. Next, add 1/4 cup of flour to remaining, white dough and knead until no longer sticky, but still soft.
- Let Dough Rise – You should have 3 pieces of dough – red with raisins, white and green dough. Cover the bowls with plastic wrap and let them rise in a warm, draft free place until doubled in size.
- Form Watermelon Bread – Take the red dough and punch down to remove the air, form it into a log that’s the same length as your bread pan. Take the white dough and roll it out until it’s large enough to completely cover the red log. Wrap this dough around the red log and make sure the seams are sealed. Take the green dough now and repeat same process. Place in greased bread pan.
Baking the Bread
- Preheat Oven – Preheat oven to 350 F degrees.
- Second Rise and Bake – Let the bread rise again until it doubles in size, depending on how warm your kitchen is, it should take anywhere from half hour to an hour. Bake it in a preheated 350 F degree oven for about 35 minutes. Take it out of the oven and remove it from the bread pan immediately onto a cooling rack.
- Cool and Serve – Let it cool completely before slicing into it. Serve.
Tips for Making Perfect Bread
- Read the Instructions – It’s so important to follow the full recipe instructions to ensure your bread comes out perfectly! Take your time and read through the recipe thoroughly.
- Prep Your Ingredients – It helps immensely to lay out your ingredients beforehand. I find that laying out everything I need first, makes the process much faster and easier. It helps to have everything at the tip of your fingers so you aren’t leaving your dough out while trying to find something.
- Don’t Over-Knead – Kneading is VERY important in how your bread will turn out. You don’t want it too sticky, too soft or too firm. It needs to be just the right texture. It does take time to be able to determine the perfect bread consistency but practice makes perfect! Take your time and knead gently.
- Keep an Eye on Your Bread – One of the most common mistakes when it comes to bread or baking in general, is tossing it in the oven and leaving it. Make sure you keep a watchful eye on how your bread is baking so you can adjust the temperature or time if needed.
- Practice Makes Perfect! – Don’t fret if your bread doesn’t turn out perfectly the first time you make it, you aren’t alone. It can help to keep notes on what you did the last time to go back and see what went wrong and what you could do differently. Baking should be fun, so don’t stress!
How Long Does Homemade Bread Last?
It’s best to store your watermelon bread at room temperature in a cool, dry place – this will allow it to keep for up to 2-4 days. Heat and humidity cause homemade bread to mold and storing it in the refrigerator can cause it to turn stale quickly. To keep your bread soft, store in an airtight plastic bag.
Can I Freeze Homemade Bread?
Yes you can! If you are going to freeze your bread, make sure you freeze it at it’s freshest. Make sure to allow it to cool before freezing to avoid soggy bread or mold! You can keep your homemade bread in the freezer for up to 3 months.

Looking for More Bread Recipes? Try These!
- No Knead Bread
- Chocolate Apple Pie Monkey Bread
- Zucchini Bread
- Easy Cornbread Recipe
- Slow Cooker Bread
- Buttermilk Parmesan Biscuits
- Sunflower and Flax Seed Whole Wheat Cast Iron Bread
- Honey Rolls
- Healthy Whole Wheat Banana Nut Bread
- Sunflower Bread
- No Knead Cast Iron Whole Wheat Bread
Before You Begin! If you make this, please leave a review and rating letting us know how you liked this recipe! This helps our business thrive & continue providing free recipes.
Watermelon Bread
Ingredients
- 1 cup milk
- 1½ tablespoon unsalted butter
- 2¼ teaspoon instant yeast (8 g)
- 1 egg
- ¼ cup sugar
- ¾ teaspoon salt
- 3 cups all-purpose flour
- 1 cup raisins
- a few drops red food coloring
- a few drops of green food coloring
Before You Begin! If you make this, please leave a review and rating letting us know how you liked this recipe! This helps our business thrive & continue providing free recipes.
Instructions
- Warm the butter and milk together in the microwave for 30 seconds or until butter is melted. Add milk mixture to a large bowl. Add the instant yeast, the egg, sugar and salt, then whisk it all together. You can start adding flour, I added about 2 cups of flour, one cup at once and mixed it with a wooden spoon. Don’t add the last cup of flour yet.
- The dough should be very sticky but this is where you need to divide the dough into 2 parts. One part will be used for the red part of the watermelon. The other half needs to be divided in half, so you’ll end up with 1/4 of the initial dough. You’ll have 3 pieces of dough. Take the bigger piece of dough and add red food coloring, add a few drops to achieve the color you want. Also add the raisins at this time and about ½ cup of flour. Knead it all together, if you want you can transfer it to your mixer but you should be able to knead by hand too. Make sure the color is fully mixed in. The dough should no longer be sticky, so add more flour if needed.
- Take one of the smaller pieces of dough and add the green food coloring and mix until the color is fully mixed. Add about 1/4 cup of flour and knead. Add more flour as needed as well. To the other piece of dough all you need to do is add ¼ cup of flour or as much as needed and knead until it’s no longer sticky but still soft.
- Now should have 3 pieces of dough, the red dough with the raisins, the white dough and the green dough. Cover the bowls up with plastic wrap and let them rise in a warm place until doubled in size.
- Take the red dough and punch down to remove the air then form it into a log that’s the same length as your bread pan. Take the white dough and roll it out until it’s large enough to completely cover the red log. Wrap this dough around the red log and make sure the seams are sealed. Take the green dough now and repeat, roll it out until it’s big enough to cover the log, and wrap it around the log, sealing the seams. Place it in your greased bread pan.
- Preheat oven to 350°℉.
- Let the bread rise again until it doubles in size, depending on how warm your kitchen is, it should take anywhere from half hour to an hour. Bake it in a preheated 350 F degree oven for about 35 minutes. Take it out of the oven and remove it from the bread pan immediately onto a cooling rack.
- Let it cool completely before slicing into it.
Notes
- It’s best to store your watermelon bread at room temperature in a cool, dry place – this will allow it to keep for up to 2-4 days. Heat and humidity cause homemade bread to mold and storing it in the refrigerator can cause it to turn stale quickly. To keep your bread soft, store in an airtight plastic bag.
- If you are going to freeze your bread, make sure you freeze it at it’s freshest. Make sure to allow it to cool before freezing to avoid soggy bread or mold! You can keep your homemade bread in the freezer for up to 3 months.
Nutrition Information
Notice: Nutrition is auto-calculated for your convenience. Where relevant, we recommend using your own nutrition calculations.
