Asian Glazed Chicken Fingers
This post may contain affiliate links. Please read my disclosure policy.
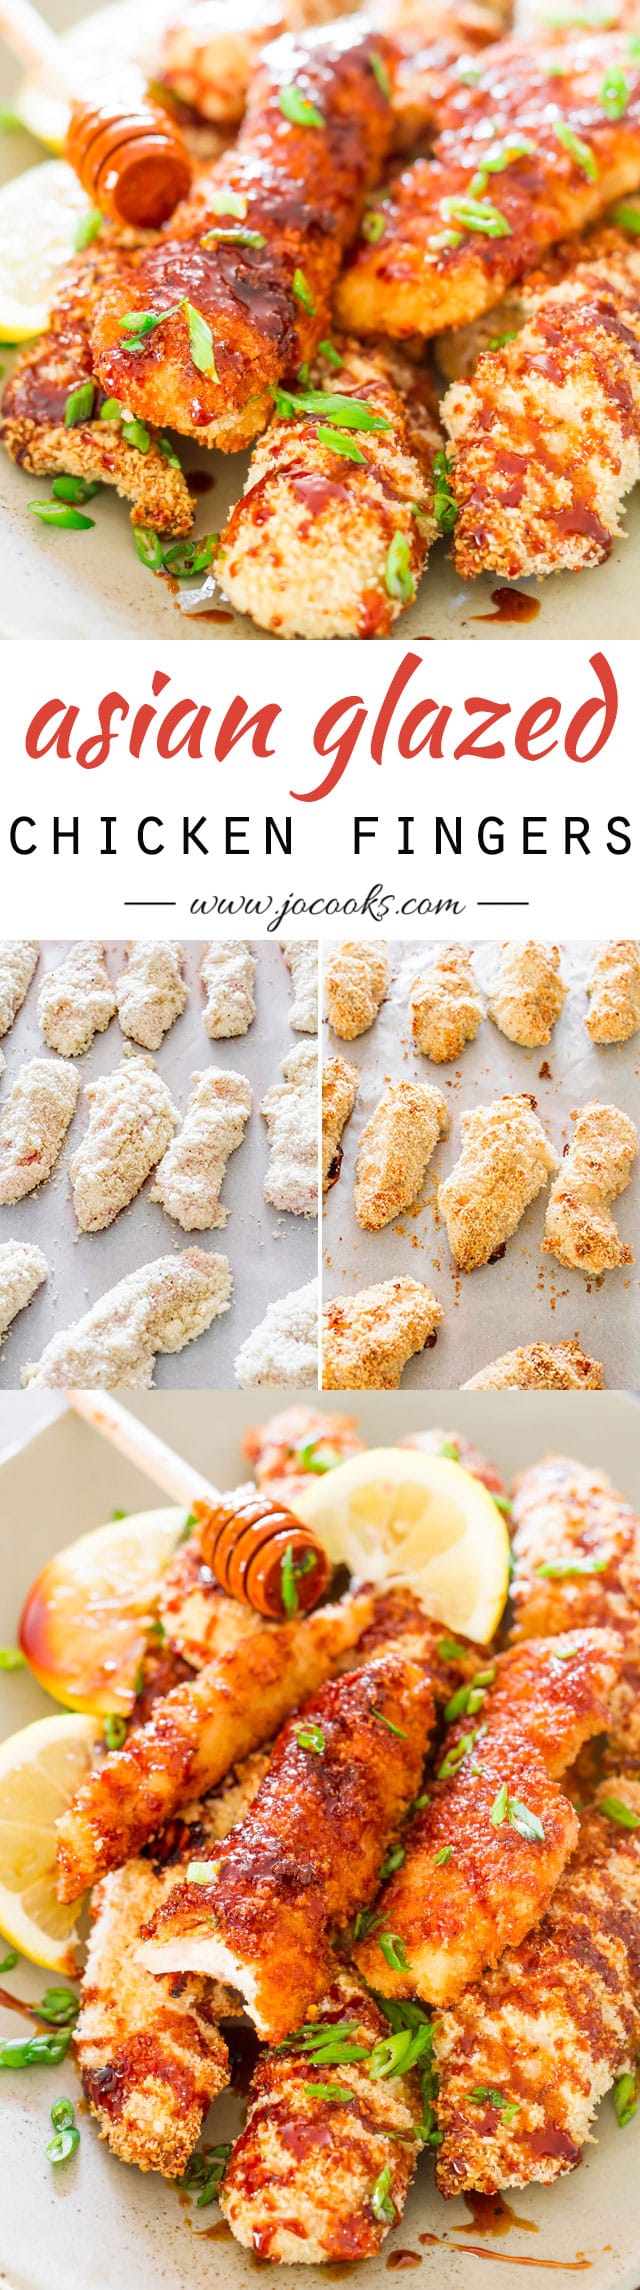
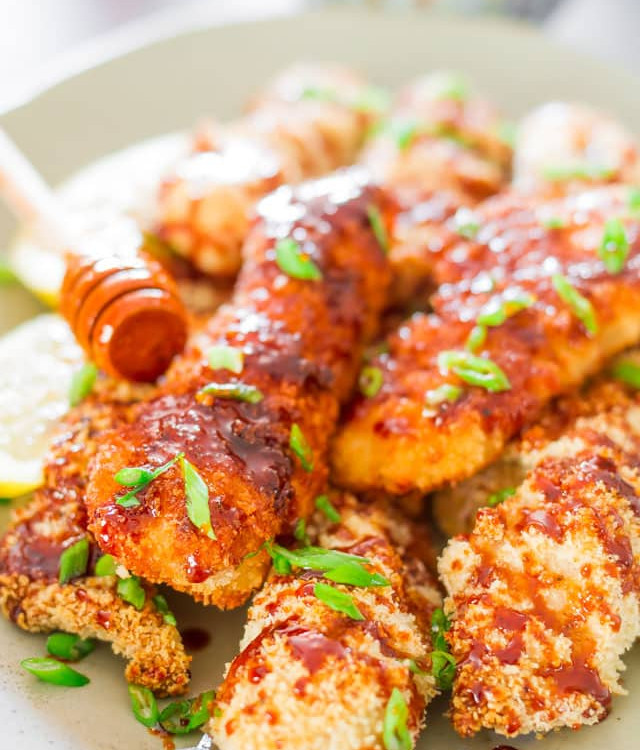
Asian Glazed Chicken Fingers – a healthy version of baked chicken fingers that are generously drizzled with an Asian inspired glaze.

I’ve got the perfect recipe for you today for super crispy chicken fingers glazed with a perfectly spiced sauce with honey, soy, sriracha and a bunch of other yummy ingredients. This chicken really is super crispy. I soaked the chicken fingers in buttermilk first to tenderize the meat, then dredged the chicken through flour, buttermilk again and finally in some nice Panko breadcrumbs before being baked in the oven.
You know why these strips are extra crispy? Because you dip them first in flour, then dredge them through some buttermilk and then finally through the breadcrumb mixture. Double the crispiness. You will not want to go to a restaurant ever again to get your chicken strips once you’ve had a bite of these.
What’s The Deal With Buttermilk?
Buttermilk is the slightly acidic liquid left behind after heavy cream is churned into butter. This acidity creates and extra tender chicken and crispy breading. It will also give your chicken some extra tang which will really bring out the flavors in the breading!
You can also marinate your chicken in buttermilk for a few hours to tenderize it. If you don’t have buttermilk, you can make your own using 2 cups of regular milk, and 2 tbsp of either lemon juice or white vinegar.
Ingredients
Glaze
- Honey – All glazes need something a little sweet, honey is also important for the texture. If you don’t have any you can substitute maple syrup.
- Sauces – Soy sauce and sriracha.
- Spices – Chinese five spice, chili flakes, garlic powder.
- Olive oil – To help with the mouth feel of our glaze, we want a nice neutral tasting oil.
- Vinegar – Rice vinegar to add brightness and acidity.
- Seasoning – Salt and pepper.
Chicken
- Chicken – Chicken breasts boneless and skinless cut into strips.
- Milk – Buttermilk is what we need today, if you can’t find any or don’t have any on hand follow my directions above for making your own.
- Breadcrumbs – I prefer panko for these recipes but feel free to use whatever kind you’d like.
- Flour – All purpose for dredging.
- Seasoning – Salt and pepper.
- Garnish – Diced green onions for garnish.

How To Make Asian Glazed Chicken Strips
- Preheat oven: To 400 F degrees. Line a baking sheet with parchment paper.
- Make the glaze: In a small sauce pan, whisk all the glaze ingredients together. Set aside.
- Assemble the strips: Cut the chicken breasts into long thin strips. Place the chicken in a bowl and pour about a cup of buttermilk over the chicken. Get 3 shallow plates ready. Fill one with flour, one with remaining buttermilk and last with breadcrumbs. Line them up like an assembly line, chicken, flour, buttermilk, breadcrumbs. Season the flour and the breadcrumbs generously with salt and pepper.
- Prep the strips for baking: Dredge each chicken finger through flour, then buttermilk, and lastly through breadcrumbs. Place on prepared baking sheet. Repeat with all chicken fingers.
- Cook the chicken strips: Bake them for about 30 to 45 minutes until they start to brown and chicken is cooked through. Cut one in half if needed to check for doneness.
- Finish the dish: While chicken is baking, bring the sauce to a boil over medium high heat. Once boiling, reduce heat to a medium and cook until sauce reduces by half and thickens. Generously drizzle sauce over chicken fingers. Garnish with chopped green onions, if preferred.
Want To Fry Your Chicken Strips?
Fry the chicken on both sides until golden brown and chicken is cooked inside, should take about 2 to 3 min per side. Repeat with remaining chicken. If oil gets too dirty between batches, clean out the skillet and start with fresh oil. Place fried chicken strips on paper towels to soak up some of the oil.
How To Cut Your Chicken Strips
The way you cut your chicken breasts matters to ensure we get juicy chicken underneath all that crispy coating. It’s important to cut against the grain to ensure our chicken retains as much moisture as possible. Just take a close look at your chicken, determine the grain and the direction it goes in and cut your strips in the opposite direction.
Want More Dip Ideas? Try Some Of These
- Fry dip: Mayo, ketchup, Worcestershire, garlic powder, salt and pepper.
- Honey mustard: Dijon mustard, honey, mayo, lemon juice, salt and pepper.
- Chicken sauce: Yellow mustard & Dijon mustard, honey, BBQ sauce, mayo.
- Red or Green Chimichurri, believe me these fresh dips are phenomenal!
How to Serve
Serve these chicken strips with the following:
- A light simple salad
- Broccoli
- Italian Roasted Mushrooms And Veggies
- Cauliflower Poppers
- Garlic Butter Mushrooms

Leftovers
Fridge
You can store these fully cooked in an airtight container in the fridge for 3 – 4 days. Feel free to crisp them bake up in the oven when ready to feast.
Freezer
You can store these in the freezer for up to 1 month if you’d like to prepare these in advance. Just dredge the chicken strips and then lay them on a baking sheet and freeze them, uncooked. Seal in an airtight container once hard and bake at 425 F degrees for 20 – 25 minutes from frozen when ready to eat.
More Delicious Chicken Recipes To Try:
- Asian Glazed Chicken Fingers
- Coconut Chicken
- Bang Bang Chicken
- Sticky Honey Sriracha Chicken Bites
- Lemon Pepper Chicken
- Honey Garlic Chicken
Before You Begin! If you make this, please leave a review and rating letting us know how you liked this recipe! This helps our business thrive & continue providing free recipes.
Asian Glazed Chicken Fingers
Ingredients
For the Asian Glaze
- ¼ cup honey
- ½ cup soy sauce
- 1 teaspoon sriracha sauce
- ½ teaspoon chili flakes
- ½ teaspoon Chinese five spice
- ½ teaspoon garlic powder
- 1 tablespoon olive oil
- 1 tablespoon rice vinegar
- salt and pepper (to taste)
For chicken
- 2 pounds chicken breasts ((I had 4 chicken breasts), boneless and skinless)
- 1 cup buttermilk
- 2 cups breadcrumbs ((I used Panko))
- 1 to 2 cups all-purpose flour (for dredging)
- salt and pepper (to taste)
- Green onions (for garnish)
Before You Begin! If you make this, please leave a review and rating letting us know how you liked this recipe! This helps our business thrive & continue providing free recipes.
Instructions
- Preheat oven to 400℉. Line a baking sheet with parchment paper.
- In a small sauce pan, whisk all the glaze ingredients together. Set aside.
- Cut the chicken breasts into long thin strips. Place the chicken in a bowl and pour about a cup of buttermilk over the chicken. Get 3 shallow plates ready. Fill one with flour, one with remaining buttermilk and last with breadcrumbs. Line them up like an assembly line, chicken, flour, buttermilk, breadcrumbs. Season the flour and the breadcrumbs generously with salt and pepper.
- Dredge each chicken finger through flour, then buttermilk, and lastly through breadcrumbs. Place on prepared baking sheet. Repeat with all chicken fingers.
- Bake them for about 30 to 45 minutes until they start to brown and chicken is cooked through. Cut one in half if needed to check for doneness.
- If you wish to fry these, heat vegetable oil in a large skillet. Fry chicken on both sides for about 3 to 5 minutes or until golden brown.
- While chicken is baking, bring the sauce to a boil over medium high heat. Once boiling, reduce heat to a medium and cook until sauce reduces by half and thickens.
- Generously drizzle sauce over chicken fingers. Garnish with chopped green onions, if preferred.
Notes
- You can store these fully cooked in an airtight container in the fridge for 3 – 4 days. Feel free to crisp them bake up in the oven when ready to feast.
- You can store these in the freezer for up to 1 month if you’d like to prepare these in advance. Just dredge the chicken strips and then lay them on a baking sheet and freeze them, uncooked. Seal in an airtight container once hard and bake at 425 F degrees for 20 – 25 minutes from frozen when ready to eat.
Nutrition Information
Notice: Nutrition is auto-calculated for your convenience. Where relevant, we recommend using your own nutrition calculations.
