Cheesecake Recipe
This post may contain affiliate links. Please read my disclosure policy.

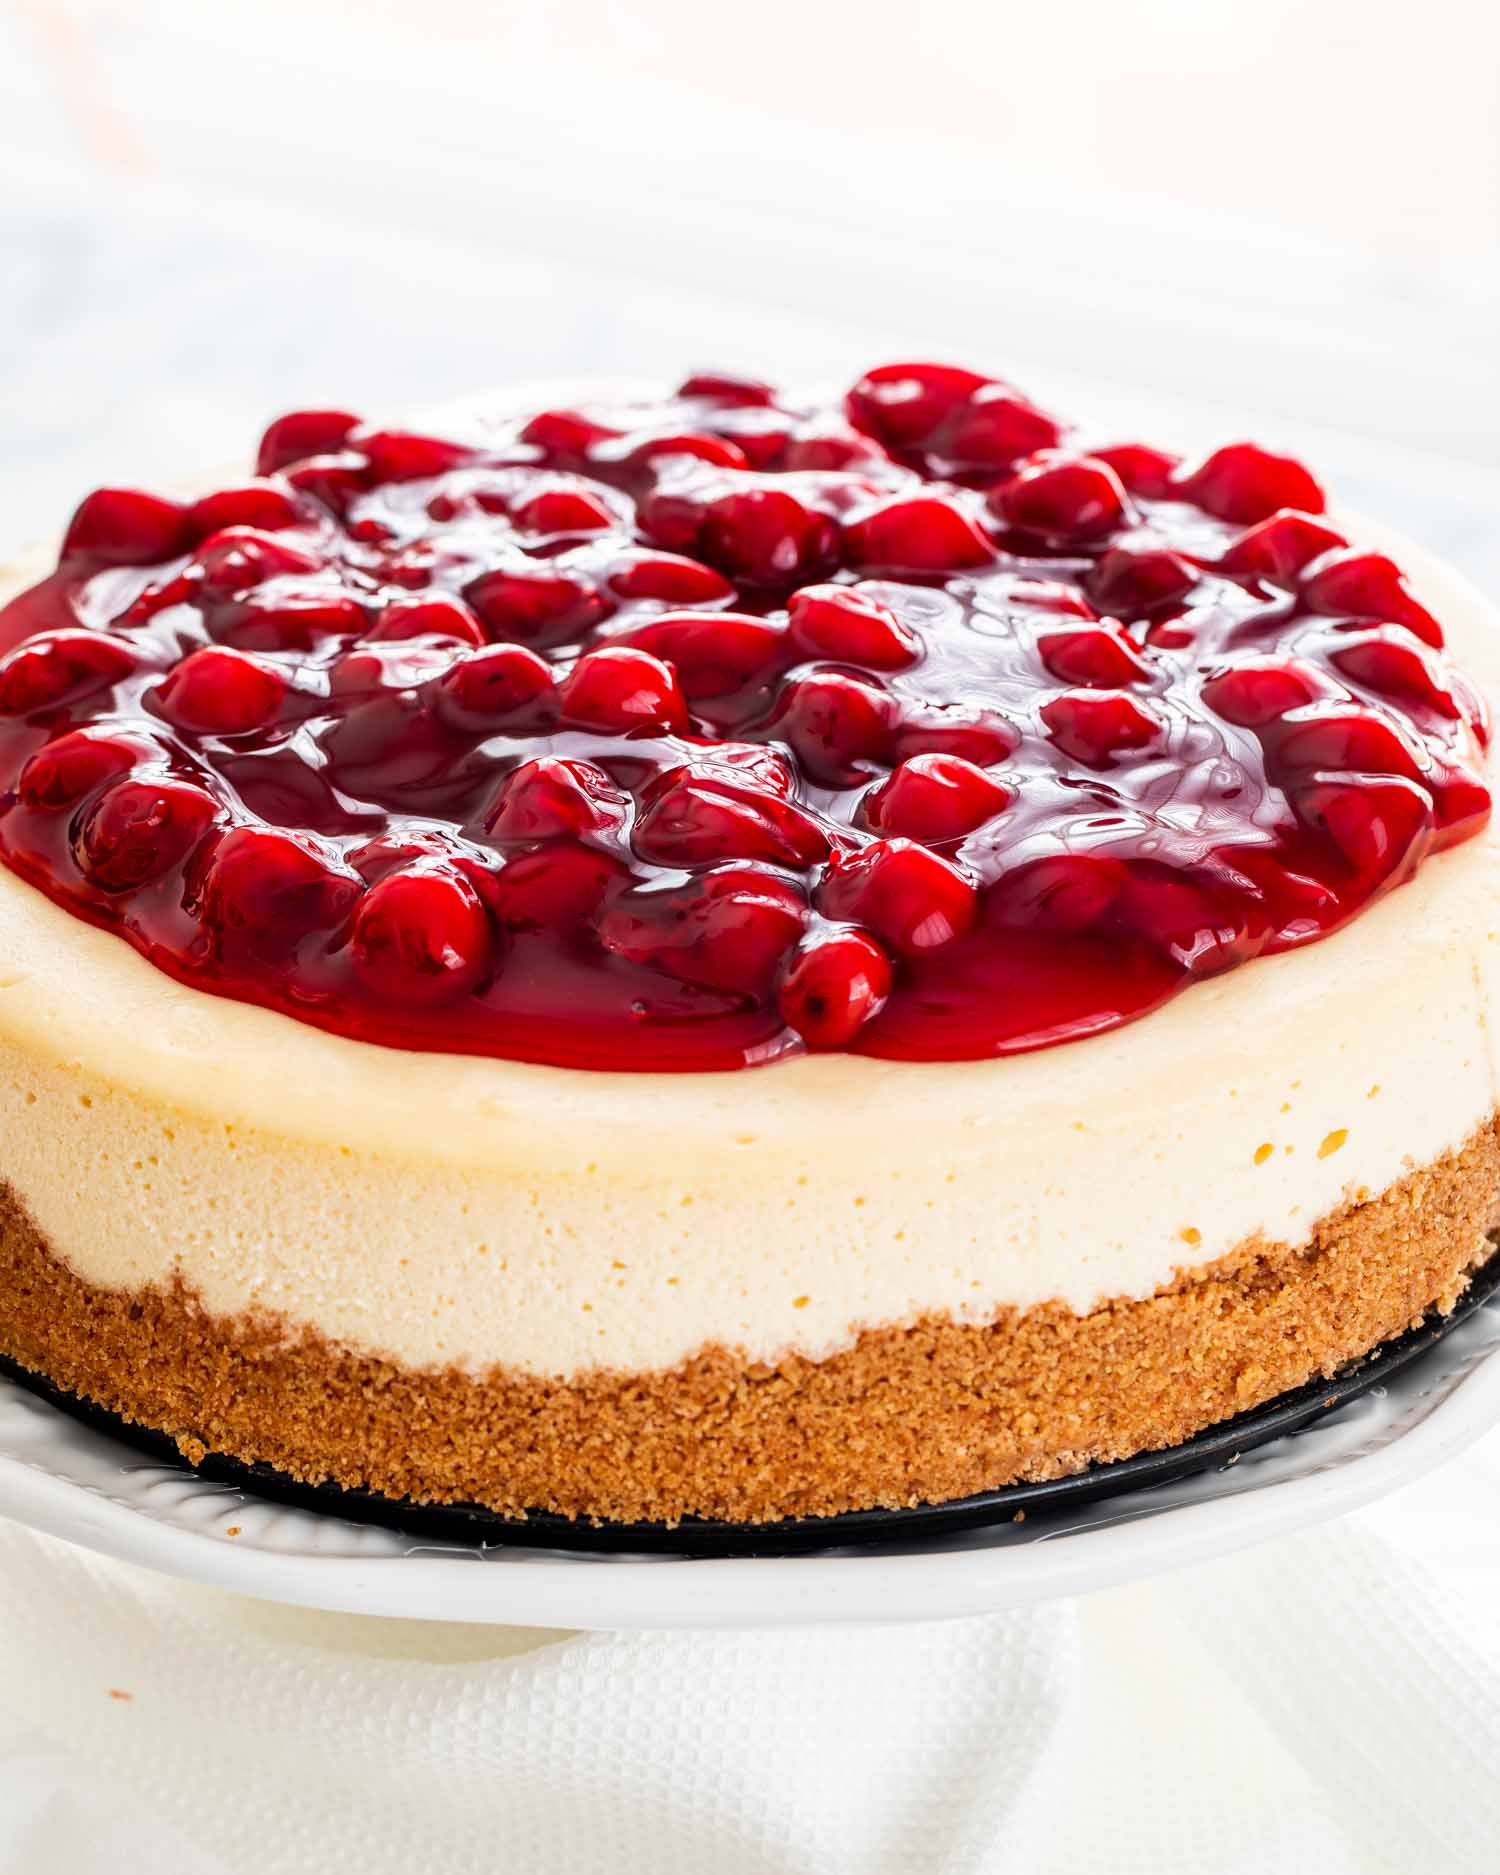
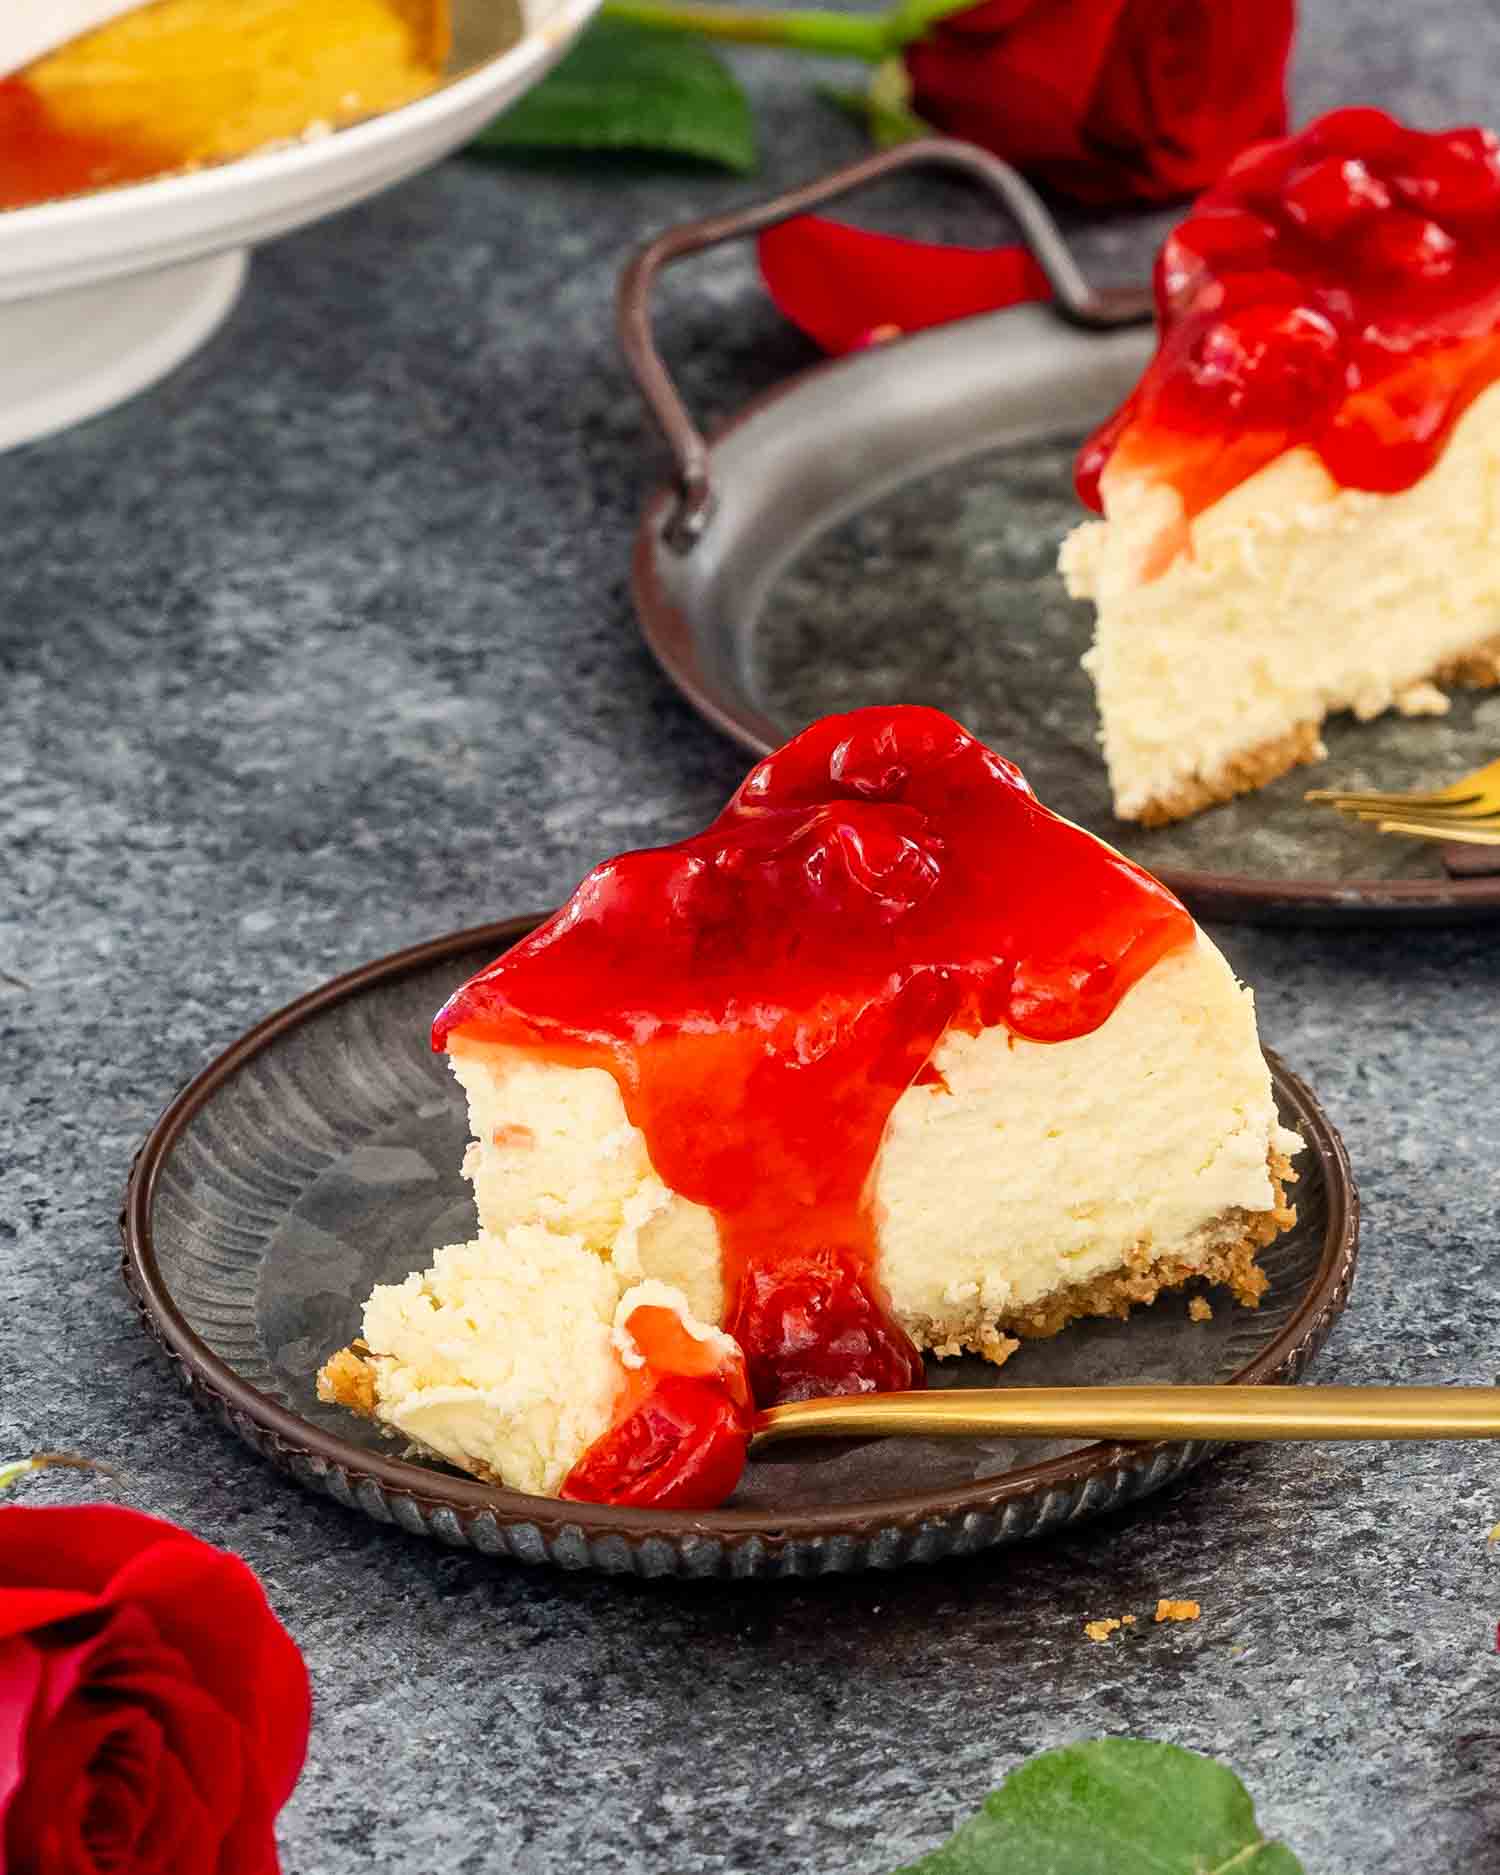
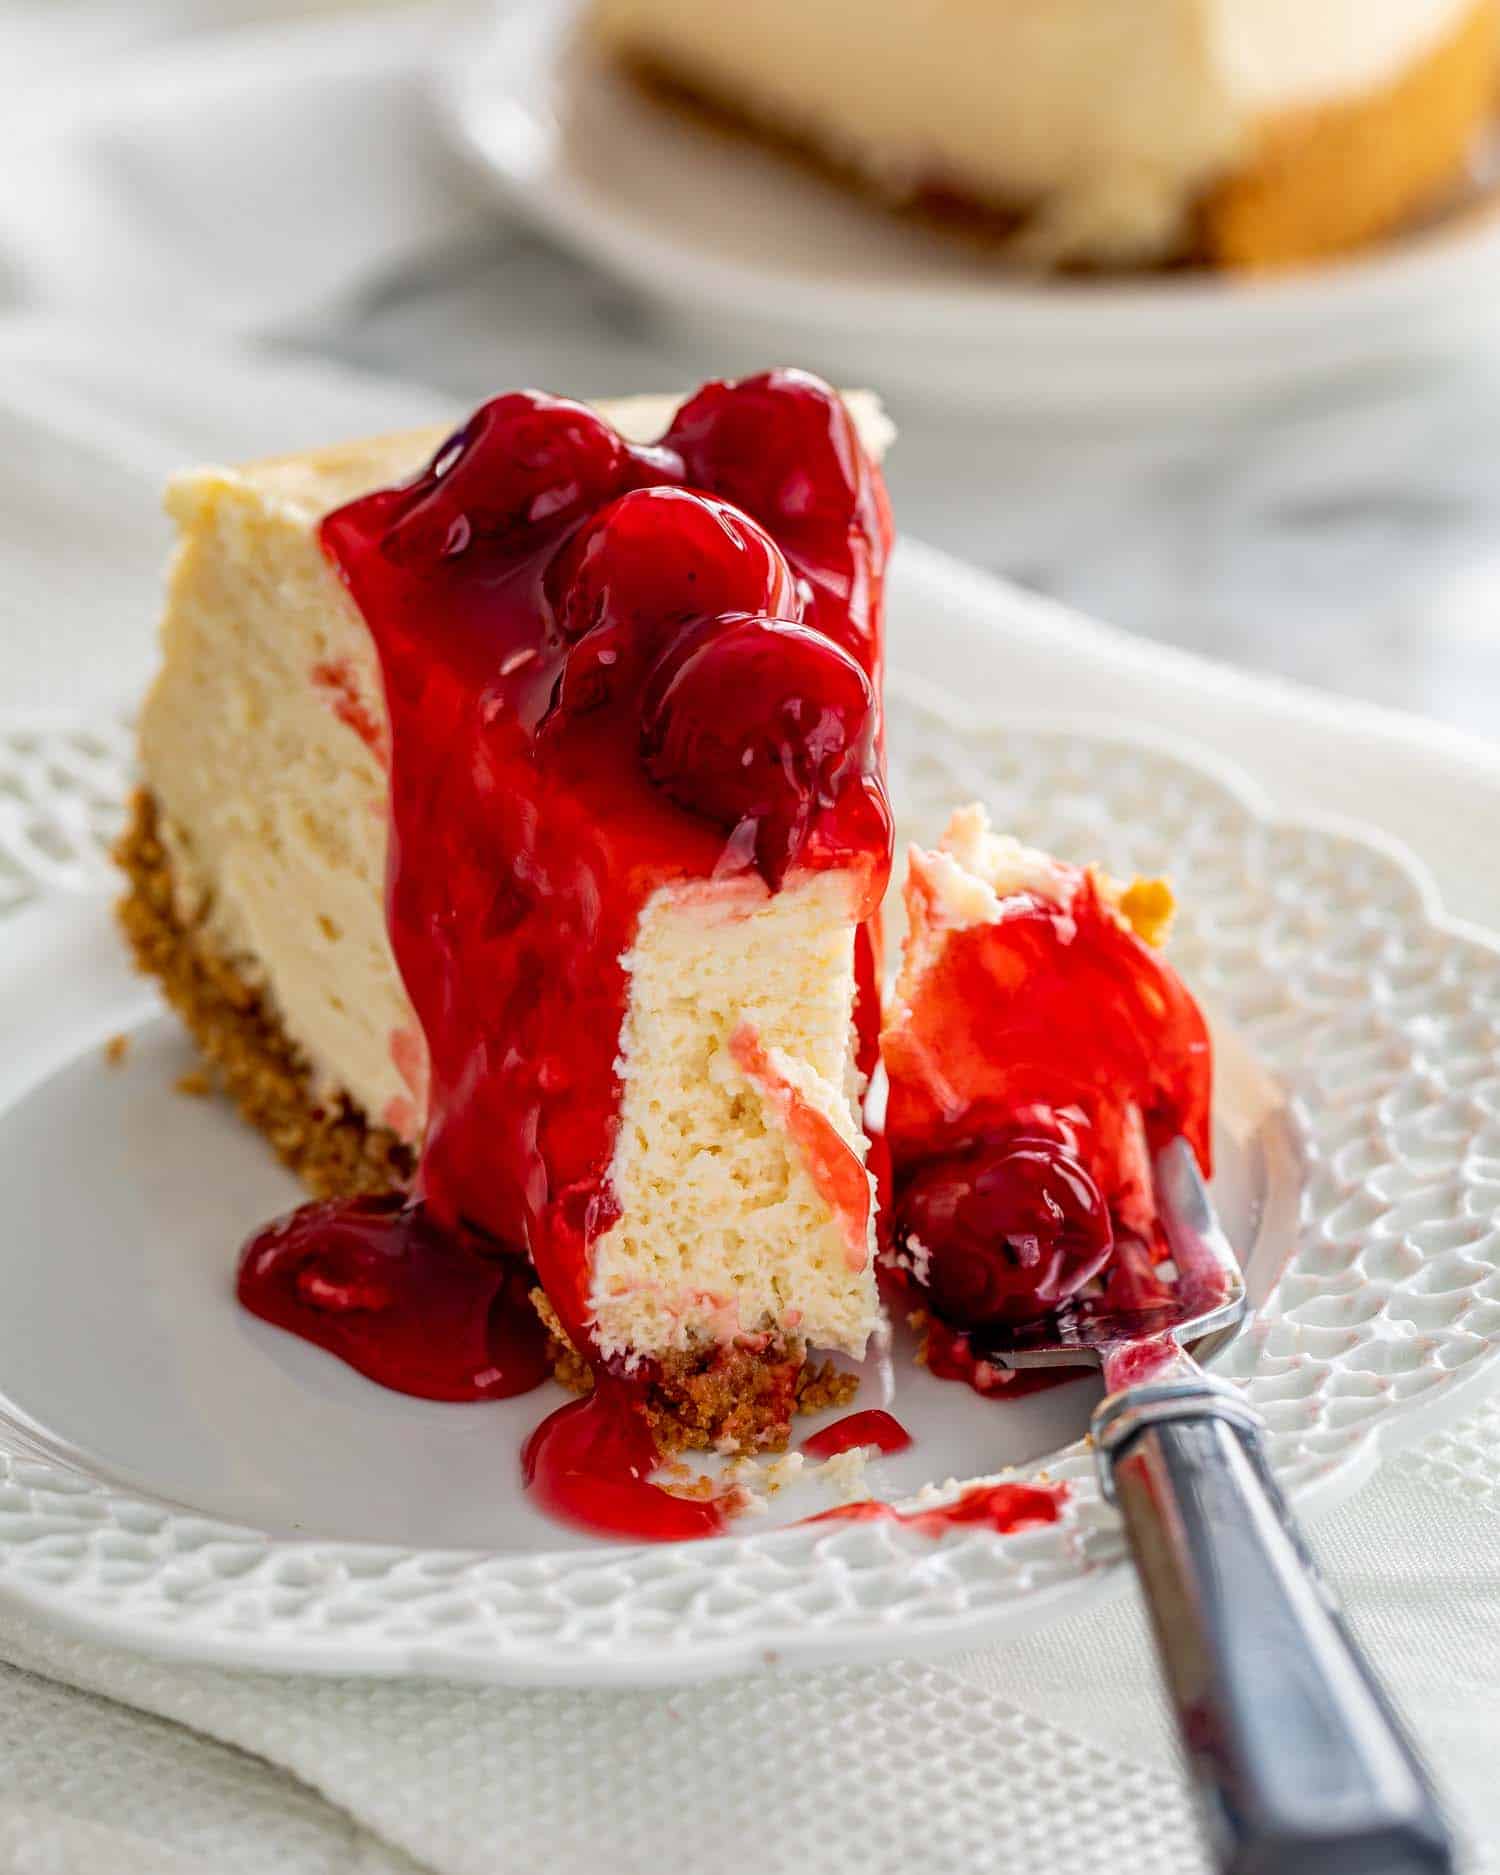
This is my go-to Cheesecake recipe and the only one you’ll ever need. It’s rich, creamy, and perfectly smooth with a buttery graham cracker crust. No cracks, no sinking, no weird lumps, just flawless, bakery quality cheesecake that tastes even better the next day.


The Only Cheesecake Recipe You Need
I’ve made a lot of cheesecakes in my life and this is the one I always come back to. It’s rich, creamy, smooth, and exactly what cheesecake should be. Every bite melts in your mouth with that perfect balance of tangy cream cheese and buttery crust.
Cheesecake might look intimidating, but once you know the method, it’s completely foolproof. I’ve tested every shortcut and every mistake so you don’t have to. This recipe gives you a tall, silky cheesecake with no cracks, no sinking, and no stress.
Top it with cherries, berries, or nothing at all. Once you master this base, you can make it your own. It’s simple, it’s classic, and it’s the kind of dessert that makes people close their eyes when they take the first bite.
Why You’ll Love This Cheesecake Recipe
- It’s foolproof. I’ve tested this recipe more times than I can count. It bakes evenly, sets perfectly, and doesn’t crack if you follow my steps.
- The texture is unreal. Dense but creamy, rich yet silky smooth. Every bite tastes like it came from a high-end bakery.
- No fancy equipment. Just a hand mixer, a bowl, and a bit of patience. You don’t need anything special to make perfect cheesecake at home.
- Classic flavor. Real cream cheese, sour cream for tang, and a hint of vanilla. Nothing overcomplicated, just the good stuff.
- Perfect for any occasion. Dinner parties, birthdays, holidays, or when you just want something decadent in the fridge.
Ingredients and Tips
- Bring everything to room temperature. Cold ingredients are the enemy of smooth cheesecake. Let your cream cheese, eggs, and sour cream sit out for at least an hour so they blend evenly and give you that silky texture.
- Use full-fat cream cheese. Now is not the time for light or fat-free versions. Full-fat gives you that rich, classic texture and flavor. I always use Philadelphia because it’s reliable and never lets me down.
- Prepare your pan properly. You’ll need a 9-inch springform pan. Wrap the outside tightly with foil so no water leaks in during the water bath. It sounds fussy but it’s worth it for that perfectly creamy texture.
- Do not skip the water bath. I know it feels like an extra step but this is what prevents cracks and keeps the cheesecake smooth and moist. The steam keeps everything at the perfect temperature while baking.
- Don’t overmix the batter. Once you add the eggs, mix gently and stop as soon as they’re blended. Overmixing adds air to the batter, which causes cracks and a puffy top.
- Let it cool slowly. Turn the oven off and leave the door slightly open so the cheesecake cools gradually. Sudden temperature changes cause cracks, and nobody wants that.
- Be patient. Cheesecake needs time to chill and set in the fridge. Overnight is best. The flavor and texture get even better the next day.
Preheat The Oven
Before beginning any baking recipe you need to preheat your oven. So turn it on to 325°F (163°C) to get it nice and hot. Then grab a 9-inch springform pan to have ready for the next step. Note, an 8-inch springform pan will not work.
Make The Crust
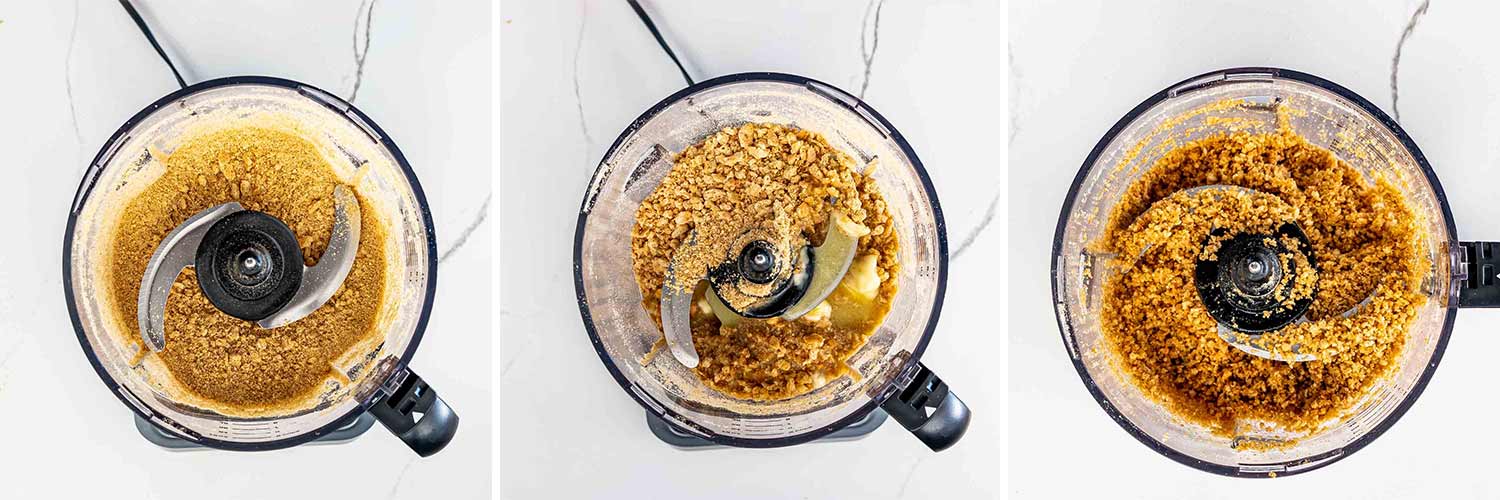
Blitz the graham crackers in a food processor until fine crumbs form. Add melted butter and pulse a few times until evenly moistened.
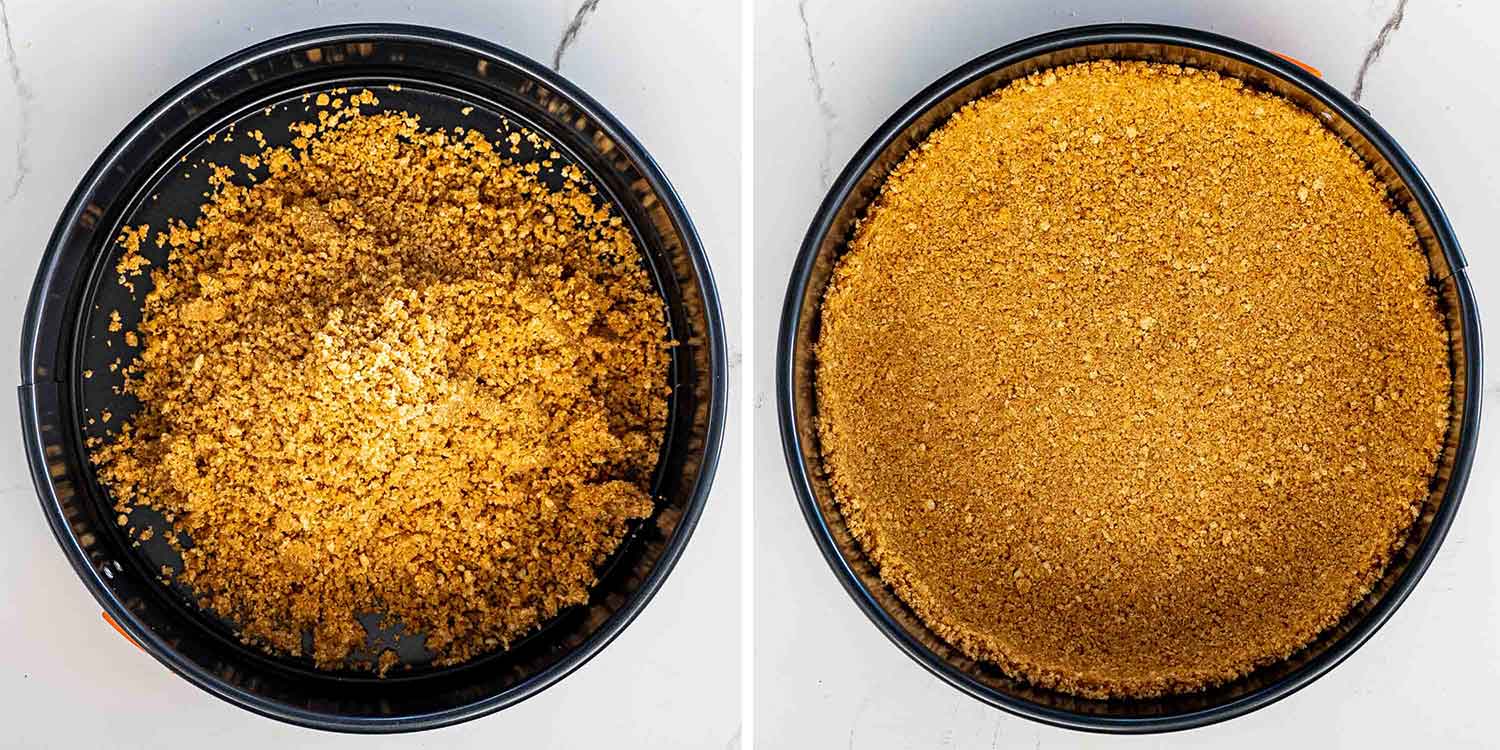
Press the mixture firmly into a 9-inch springform pan using the bottom of a measuring cup. Bake for 10 minutes, then set aside to cool while you make the filling.
Start The Cheesecake Batter
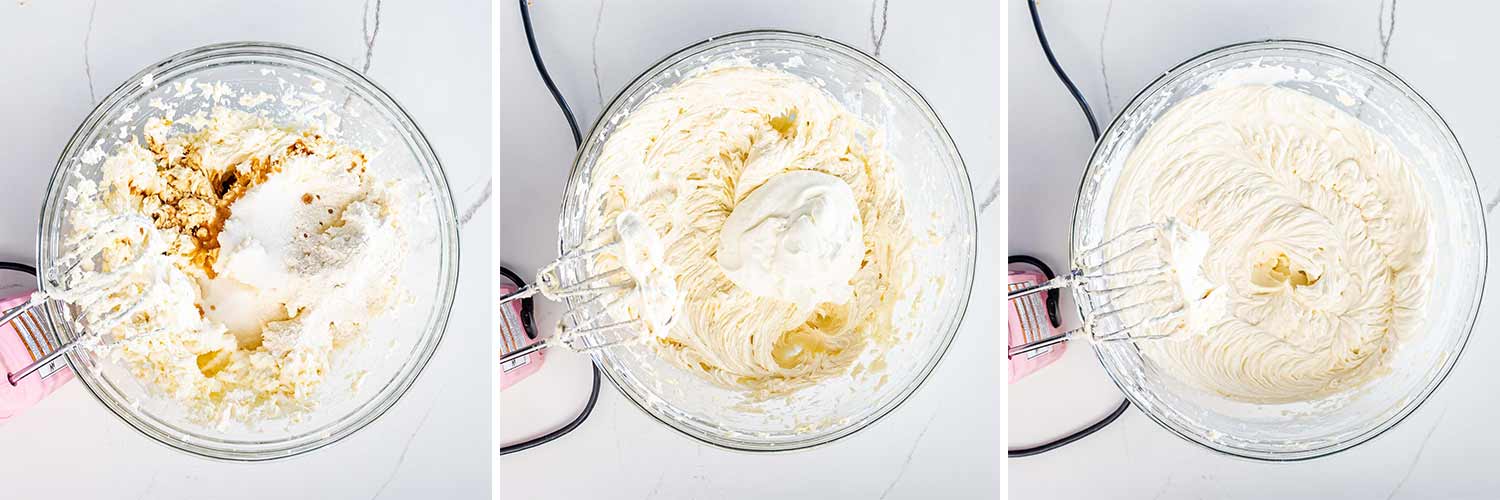
In a large bowl, beat the cream cheese, sugar, flour, and vanilla until completely smooth and creamy. Add the sour cream and mix until just combined. The batter should look glossy and lump free.
Add The Eggs And Finish The Batter
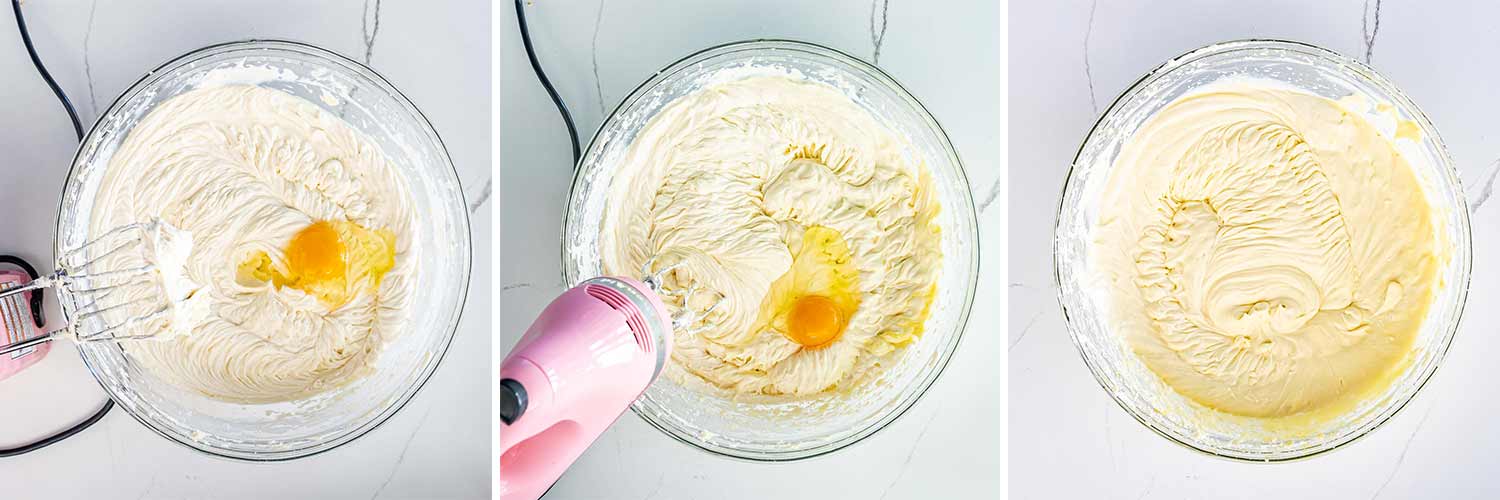
Add the eggs one at a time, mixing on low speed after each addition. Scrape down the sides of the bowl to make sure everything is evenly incorporated. Stop mixing as soon as the eggs are blended to avoid adding too much air.
Seal The Pan
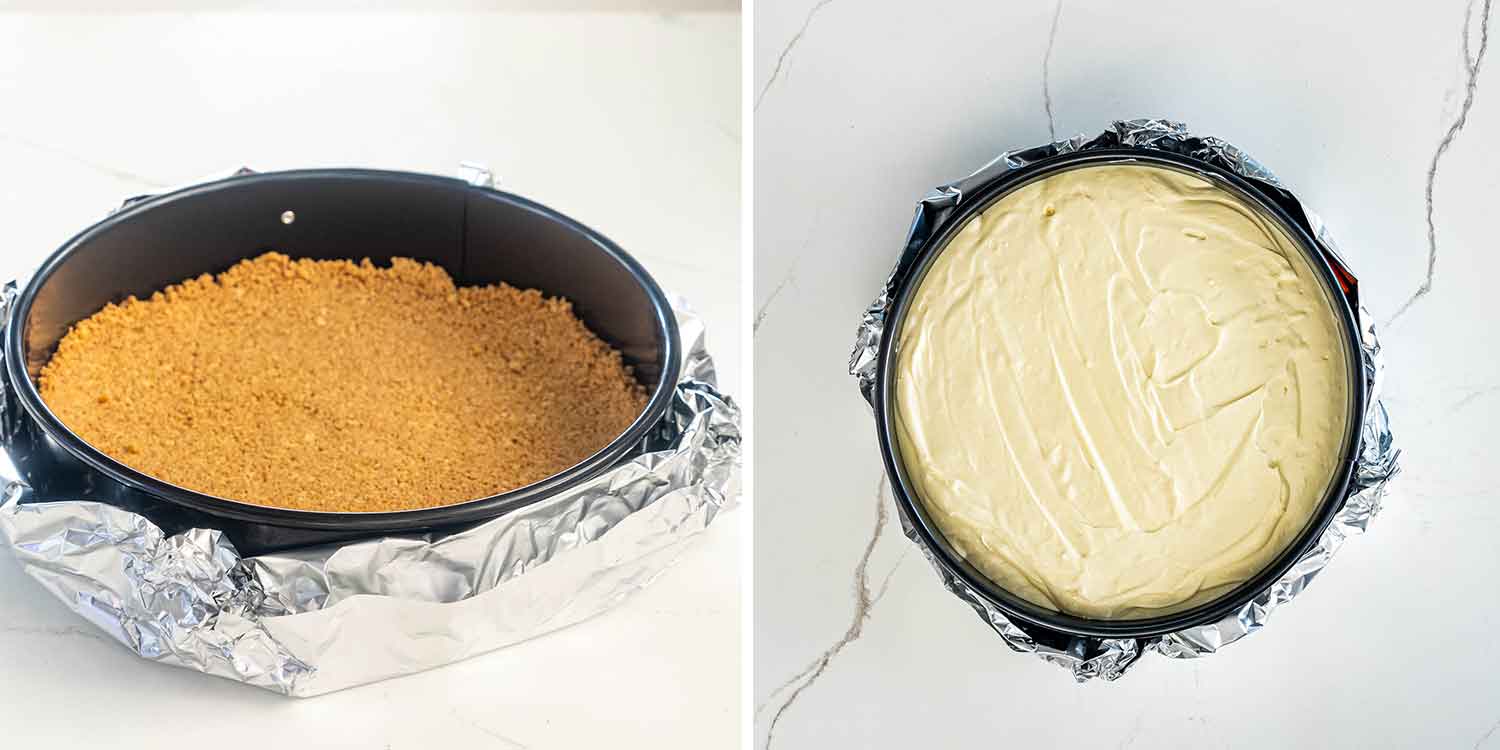
Wrap the outside of the springform pan in two layers of foil to seal it. Pour the cheesecake batter over the crust.
Make A Water Bath

Place it inside a large roasting pan and pour in hot water until it reaches halfway up the sides of the springform pan.
Bake The Cheesecake
Transfer the roasting pan carefully to the oven and bake for 1 hour and 10 minutes. The edges should be set, but the center should still have a slight wobble when you gently shake the pan.
Rest In The Oven

Turn off the oven and crack the door open slightly. Let the cheesecake cool in the oven until it reaches room temperature. This prevents cracks and gives the texture time to settle.
Let The Cheesecake Set
Once cooled, cover the cheesecake with plastic wrap and refrigerate for at least 4 hours, but overnight is even better.
Add The Cherry Topping And Serve
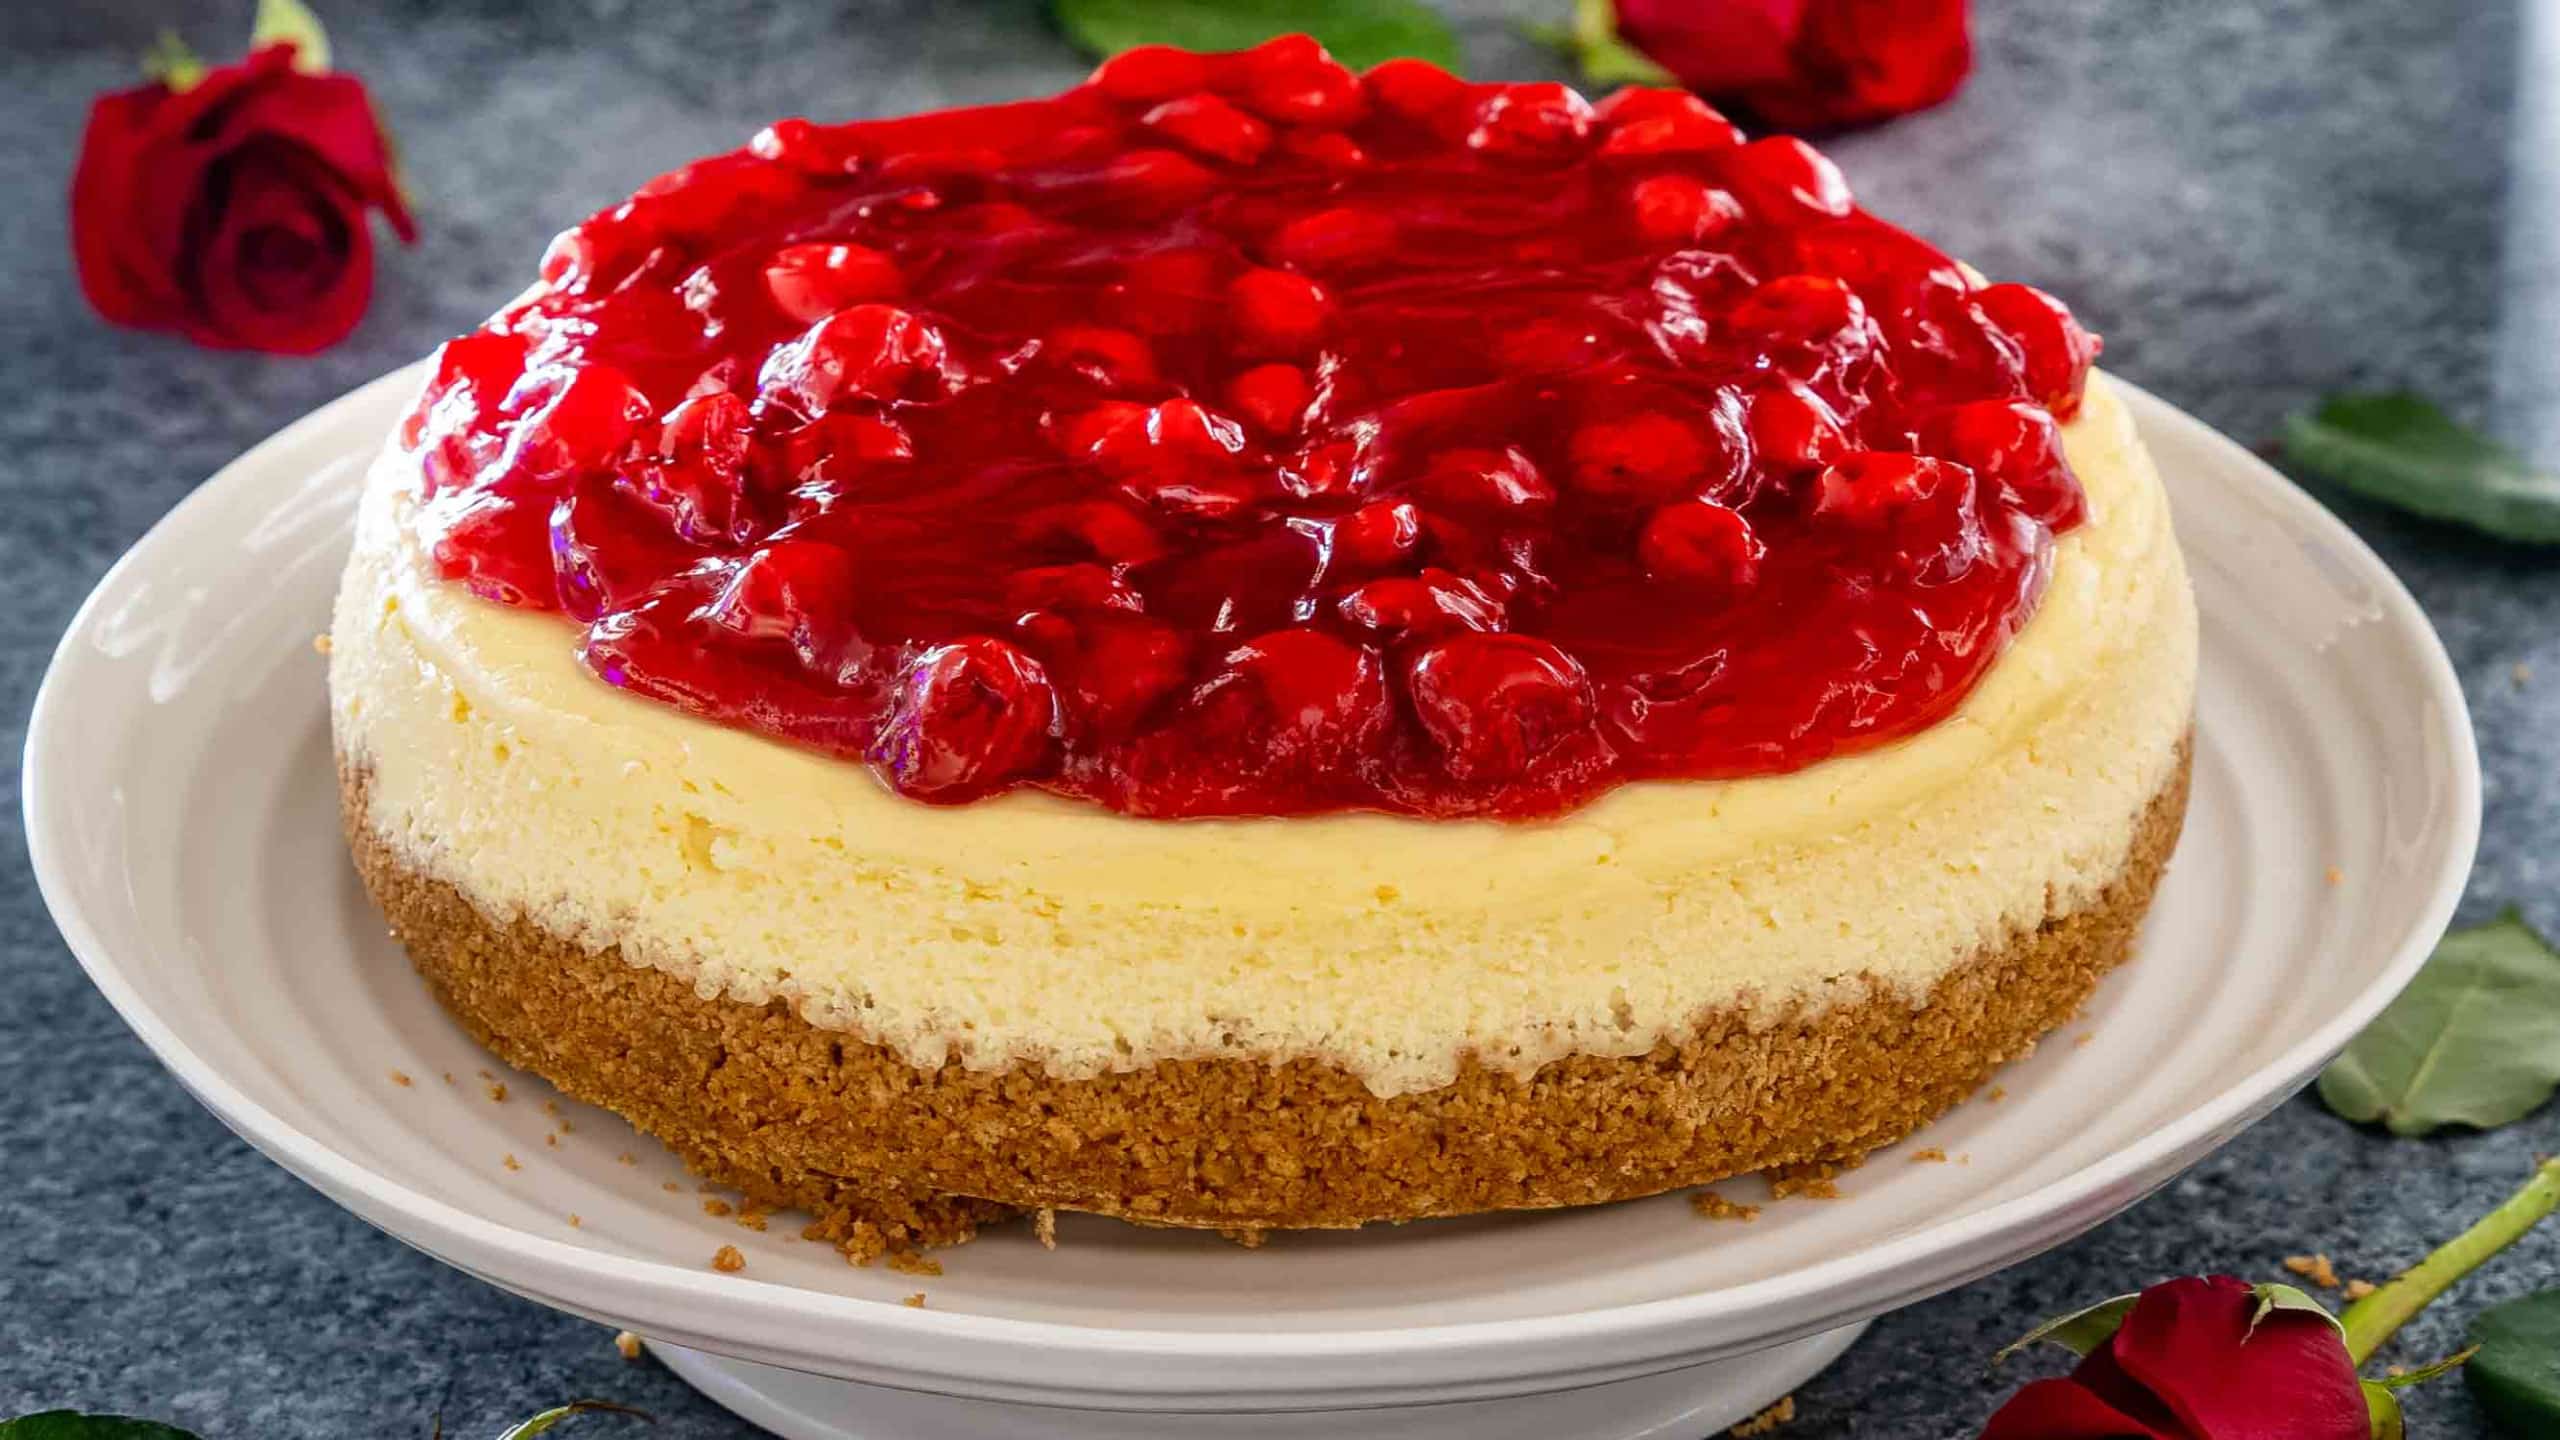
When fully chilled, spoon cherry pie filling over the top. Slice with a clean, hot knife for perfect edges and serve.
How to Keep Your Cheesecake from Cracking
- Use a water bath. Moisture is your cheesecake’s best friend. The steam from the water bath keeps the surface from drying out and cracking. It also helps the cheesecake bake evenly from edge to center.
- Don’t overmix. Once you add the eggs, mix gently and stop as soon as they’re combined. Overmixing traps air in the batter, and that air expands in the oven, creating cracks as the cheesecake cools.
- Avoid sudden temperature changes. After baking, let the cheesecake cool slowly in the oven with the door slightly open. Rapid cooling makes the top contract too quickly, which leads to cracking.
- Bake just until set. The center should still jiggle slightly when you move the pan. It will firm up as it cools. Overbaking dries out the surface and almost always causes cracks.
- Run a knife around the edge. Once it’s out of the oven, gently run a thin knife between the cake and the pan to loosen it. This keeps the sides from pulling and cracking as it cools and shrinks slightly.
- Be patient. Cheesecake needs time to chill and settle. Let it rest overnight in the fridge and it’ll slice cleanly and stay perfectly smooth.
Frequently Asked Questions
Can I use low-fat cream cheese?
No. You’ll end up with a thinner batter and a cheesecake that tastes more chalky than creamy. Always use full-fat cream cheese for that rich, velvety texture.
Do I really need a water bath?
Yes, if you want that perfect smooth texture with no cracks. The steam keeps the cheesecake moist and bakes it evenly. If you skip it, you risk dry edges and a cracked top.
How do I know when my cheesecake is done?
Give the pan a gentle shake. The edges should be set and the center should still have a slight wobble. It will firm up as it cools. If it looks dry in the middle, it’s overbaked.
What if my cheesecake cracks anyway?
Don’t panic. It’ll still taste amazing. You can always hide cracks with whipped cream, fruit topping, or ganache. Nobody will know, and nobody will care once they taste it.
Can I make it ahead?
Yes, and you should. Cheesecake actually tastes better the next day after it’s had time to chill and the flavors have settled. Make it up to two days ahead and keep it covered in the fridge.
Can I freeze cheesecake?
Absolutely. Wrap individual slices tightly in plastic and freeze for up to 3 weeks. Thaw overnight in the fridge or just a few hours on the counter. It tastes just as good as fresh.
How do I slice cheesecake cleanly?
Dip your knife in hot water, wipe it dry, then cut. Clean the blade between each slice for those perfect bakery-style edges.
Can I use a store-bought crust?
Yes, if you’re short on time. But making your own graham cracker crust only takes 10 minutes, and the buttery homemade flavor is worth it.
More Delicious Cheesecake Recipes To Try
- Hawaiian Cheesecake Bites
- Goat Cheese Cheesecake with Figs
- Pecan Pie Cheesecake
- Mini Salted Caramel Cheesecakes
- Pumpkin Ricotta Cheesecake
- Salted Caramel Apple Pie Cheesecake Bars
- Matcha Mini Cheesecakes
- No Bake Cheesecake
- Lemon Cheesecake
Before You Begin! If you make this, please leave a review and rating letting us know how you liked this recipe! This helps our business thrive & continue providing free recipes.

Cheesecake Recipe
Video
Ingredients
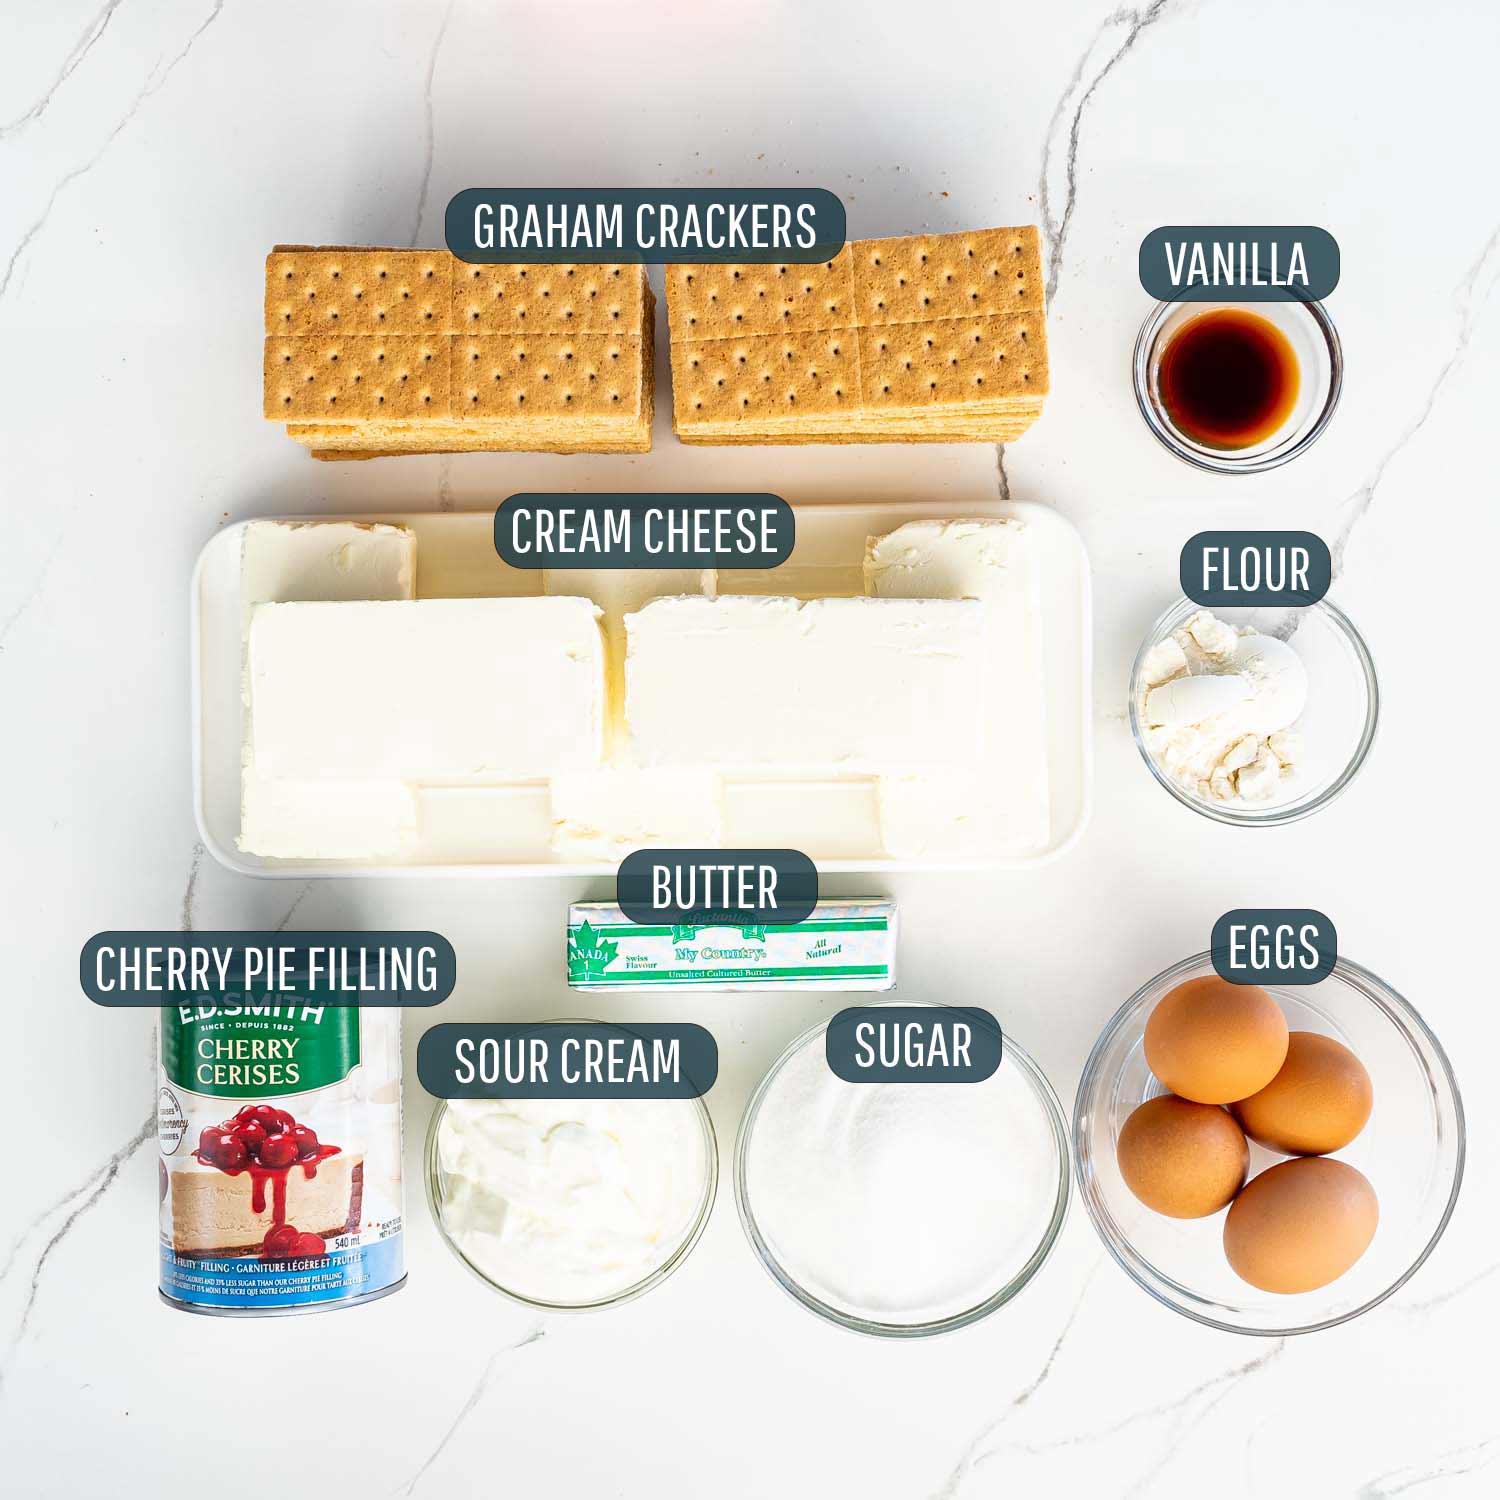
- 2 cups graham cracker crumbs
- ½ cup butter (unsalted, melted)
- 40 ounces cream cheese (softened, at room temperature (5 packages of 8 oz each))
- 1 cup sugar (granulated)
- 3 tablespoons all-purpose flour
- 1 tablespoon vanilla extract
- 1 cup sour cream
- 4 large eggs
- 19 fluid ounce cherry pie filling ((1 can))
Before You Begin! If you make this, please leave a review and rating letting us know how you liked this recipe! This helps our business thrive & continue providing free recipes.
Instructions
- Preheat oven to 325°F.
- Add the graham crackers to a food processor and pulse a few times until crumbs form. Add the melted butter and pulse a few more times. Transfer the crumb mixture to a 9-inch springform pan and press firmly onto the bottom of the pan. Use a measuring cup to firmly press the crumbs into the pan, it’s much easier.
- Place the pan into the preheat oven and bake for 10 minutes.
- Beat the cream cheese, sugar, flour, and vanilla in a large bowl until smooth and there are no visible clumps. Mix in the sour cream.
- Add the eggs, one at a time and mix on low speed until well blended. Do not over mix. Scrape down the sides of the bowl and remix as necessary. Pour this batter over the baked crust.
- Make a water bath: The prevent the cheesecake from leaking, wrap the bottom of the springform pan with aluminum foil. Cut two long pieces (about 20 inches) of foil and place them on top of each other perpendicularly. Place the springform pan on top of the foil and fold up and crimp the sides to cover the bottom of the pan. (See video)
- Place the springform pan into a larger roasting pan and fill the pan halfway with boiling water, make sure it doesn’t go over the foil.
- Transfer the big roasting pan into the oven and bake for 1 hour and 10 minutes. To check if the cake is done, shake the pan and the cake should pretty much be set, except for the center which should still jiggle slightly.
- Turn off the oven and leave the oven door open. Let the cake cake cool in the oven until it comes to room temperature. This should prevent cracks.
- Once the cake is cooled completely, refrigerate for at least 4 hours to overnight. This helps the cake set.
- Top the cheesecake with the cherry pie filling. Slice and serve.
Notes
- You won’t be able to use an 8-inch springform pan since there is too much batter and it won’t fit, but you can use a 10-inch or a 9-inch.
- Store your cheesecake in the refrigerator for up to 3 days, wrapped with plastic. If you have an airtight container, it will last up to 5 days.
- To freeze cheesecake, it’s best to freeze individual slices. Wrap individual slice in plastic wrap or foil then place them in a ziploc bag. Place the ziploc bag in the freezer. Cheesecake will last up 3 weeks in freezer. You can also freeze an entire cheesecake, wrapped properly and it will last up to 6 weeks.
- Thaw cheesecake overnight in the refrigerator.
Nutrition Information
Notice: Nutrition is auto-calculated for your convenience. Where relevant, we recommend using your own nutrition calculations.
