Strawberry Scones
This post may contain affiliate links. Please read my disclosure policy.

Start your morning the right way with fresh Strawberry Scones. This recipe will give you the flaky, tender, and perfectly sweetened scones. Pair with a cup of your favorite tea or coffee to complete your café-at-home experience.

I found these gorgeous strawberries on sale at the grocery store and knew I had to find a good use for them. I’ve been craving some warm, homemade scones lately! Every once in a while I get a serious hankering for this flaky and delicously tender treat. The strawberries spoke to me, and I answered in scone.
You all know by now that I absolutely love to bake. It’s therapeutic! I know baking can be very intimidating as it’s not very forgiving like other recipes can be. I have for you detailed instructions paired with step photos to guarantee perfect scones even for a novice baker.
Ingredients

- Strawberries – Cut into small pieces. Blueberries and/or raspberries can be used too.
- Flour – All-purpose flour.
- Sugar – Regular granulated sugar.
- Baking powder – Don’t substitute with baking soda otherwise you’ll end up with an odd aftertaste.
- Salt – Use more or less as you prefer.
- Egg – To be mixed into the scones and as an egg wash before baking.
- Butter – COLD! Shortening can be used instead.
- Milk – And type of milk, including non-dairy alternatives, will work.
- Turbinado sugar – I love a good sugary crunch on top of my scones. You can leave the sugar out if you prefer.
Can I use frozen strawberries?
While I used fresh strawberries, you can use frozen if that’s what you have handy. The only issue with frozen strawberries is that once they thaw, they’re incredibly soft. You’ll need to work with them while frozen to ensure they don’t squish into the batter and make it extra wet.
Let the strawberries thaw just enough that you can get a knife through them and cut them into small pieces. Then, spread the pieces out on a large plate and freeze them for another 30 minutes before working them into the scone dough.
How to make strawberry scones
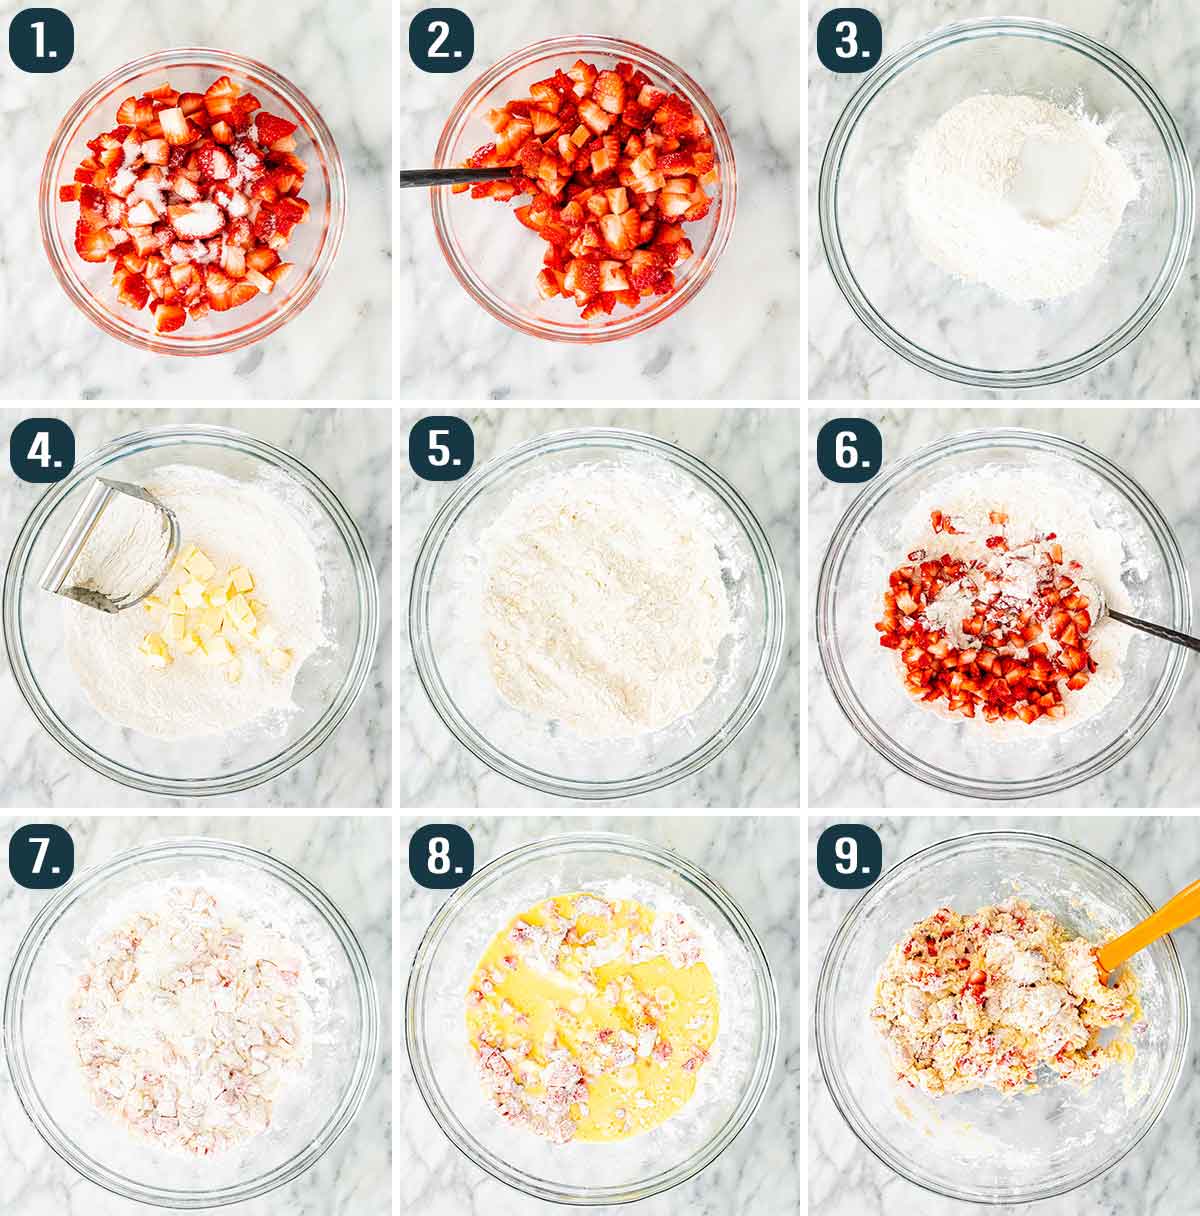
- Prep: Preheat oven to 400F. Cut the strawberries into small pieces and toss them with 1 tbsp of the sugar.
- Start the dough: In a large bowl, add the flour, salt, baking powder and remaining sugar. Add the cold butter and using 2 knives or a pastry cutter start cutting the butter into the dry ingredients. Use your hands if necessary but the mixture needs to resemble small peas. Keep in mind though, if using your hands, they will melt the butter so work quickly.
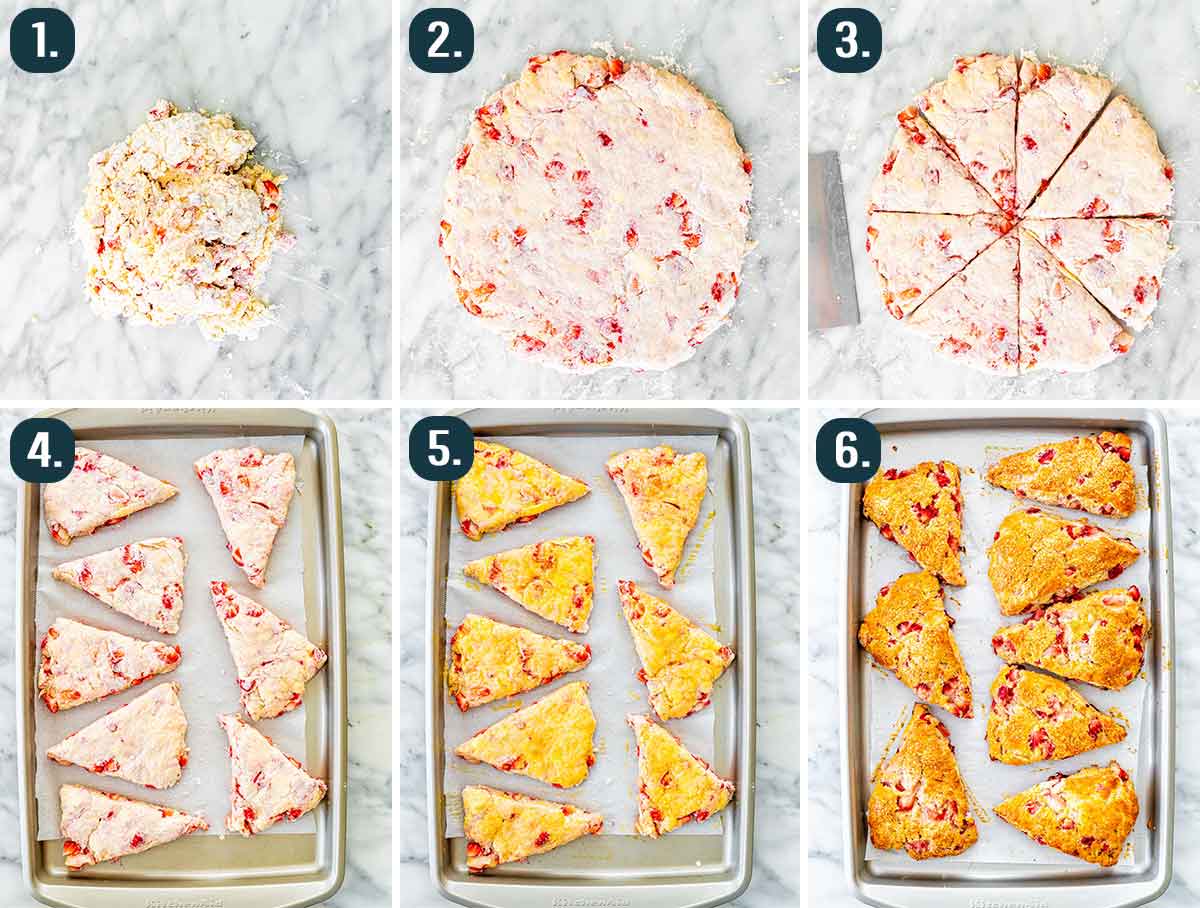
- Finish the dough: Add the strawberries to the bowl and toss them well with the flour mixture. In a small bowl whisk the egg with the milk together, then pour into the flour bowl. Use a spatula to mix everything well. Add more flour if needed if the dough is too wet and sticky. Turn dough out onto a floured surface and shape into a round 10 inch disk.
- Shape the scones: Cut the dough into 8 triangles, just like you would cut pizza. Place the triangles on a sheet pan lined with parchment paper or a silpat. Brush the scones with the egg wash and sprinkle with Turbinado sugar.
- Bake: Transfer the sheet pan to the oven and bake 20 to 30 minutes or until golden brown.

Tips for making perfect strawberry scones
- Work with cold butter. After cutting it into cubes, you can even let them sit in the freezer for 5 minutes before starting.
- Don’t overwork the dough. You want the butter to still be in pieces to keep your scones flaky and light.
- Get yourself a pastry cutter. It’ll make the process of cutting the butter into the dry ingredients much easier.
- Mix the dough slowly and carefully as to not squish the strawberry pieces.
- You want the dough to be sticky, so flour your hands and work surface as needed so that you can still handle it.

How to store scones
Store your scones in an airtight container, bread box, or large freezer bag to keep them from drying out. They will last 1-2 days at room temperature or up to a week stored in the fridge. You can microwave your scones for 5-10 second intervals to enjoy them as they’re fresh out of the oven!
You can also freeze your scones. Once completely cooled down to room temperature, wrap them each with both plastic wrap and foil. They will last 2-3 months frozen. They will thaw after about 1 hour at room temperature, or you can microwave them for 10 seconds at a time until thawed.

Looking for more recipes like this?
- Strawberry Chocolate Scones
- Lemon Buttermilk Scones
- Ricotta Drop Scones
- Banana Buzz Scones
- Lemon Blueberry Scones
- Strawberry Rhubarb Crisp
- Butter Biscuits
- Strawberry Cookies
- Strawberry Pretzel Salad
- Strawberry Cobbler
Before You Begin! If you make this, please leave a review and rating letting us know how you liked this recipe! This helps our business thrive & continue providing free recipes.

Strawberry Scones
Video
Ingredients
Strawberry scones
- 2 cups strawberries (stemmed and cut into small pieces)
- 2¼ cups all-purpose flour (use more if dough is too sticky)
- 3 tablespoon sugar
- 1 tablespoon baking powder
- ¼ teaspoon salt
- 1 large egg
- 6 tablespoon butter (cold, unsalted and cut into small cubes)
- ⅔ cup milk
- 1 egg ( for egg wash)
- 1 tablespoon Turbinado sugar (optional)
Lemon icing
- 1½ cups icing sugar (same as confectioners sugar or powdered sugar)
- 2 tablespoon lemon juice
Before You Begin! If you make this, please leave a review and rating letting us know how you liked this recipe! This helps our business thrive & continue providing free recipes.
Instructions
- Prep: Preheat oven to 400℉. Line a baking sheet with parchment paper. Cut the strawberries into small pieces and toss them with 1 tbsp of the sugar.
- Start the dough: In a large bowl, add the flour, salt, baking powder and remaining sugar. Add the cold butter and using 2 knives or a pastry cutter start cutting the butter into the dry ingredients. Use your hands if necessary but the mixture needs to resemble small peas. Keep in mind though, if using your hands, they will melt the butter so work quickly.
- Finish the dough: Add the strawberries to the bowl and toss them well with the flour mixture. In a small bowl whisk the egg with the milk together, then pour into the flour bowl. Use a spatula to mix everything well. Add more flour if needed if the dough is too wet and sticky. Turn dough out onto a floured surface and shape into a round 10 inch disk.
- Shape the scones: Cut the dough into 8 triangles, just like you would cut pizza. Place the triangles onto the prepared baking sheet. Brush the scones with the egg wash and sprinkle with Turbinado sugar.
- Bake: Transfer the sheet pan to the oven and bake 20 to 30 minutes or until golden brown.
- Lemon icing: Whisk the icing sugar with the lemon juice until smooth. Add more or less lemon juice or icing sugar until you receive desired consistency. Drizzle icing over scones and enjoy!
Equipment
Notes
- Flour: The amount of flour depends on your environment. For example I live in a very dry area, therefore I usually need more liquid when I’m baking, in this case more milk, if you live in a very humid area, you will need less liquid or more flour. So what works for one person may not work for another. This dough is a bit sticky but make sure you add enough flour just until you can shape and cut the dough into scones, it’s important to not over work the dough.
- Nutrition: Nutritional information is per scone and includes lemon icing.
- Storage: Store your scones in an airtight container, bread box, or large freezer bag to keep them from drying out. They will last 1-2 days at room temperature or up to a week stored in the fridge. You can microwave your scones for 5-10 second intervals to enjoy them as they’re fresh out of the oven!
- Freezing: Once completely cooled down to room temperature, wrap them each with both plastic wrap and foil. They will last 2-3 months frozen. They will thaw after about 1 hour at room temperature, or you can microwave them for 10 seconds at a time until thawed.
Nutrition Information
Notice: Nutrition is auto-calculated for your convenience. Where relevant, we recommend using your own nutrition calculations.
