Sweet Cheese Buns (Poale-n brau)
This post may contain affiliate links. Please read my disclosure policy.

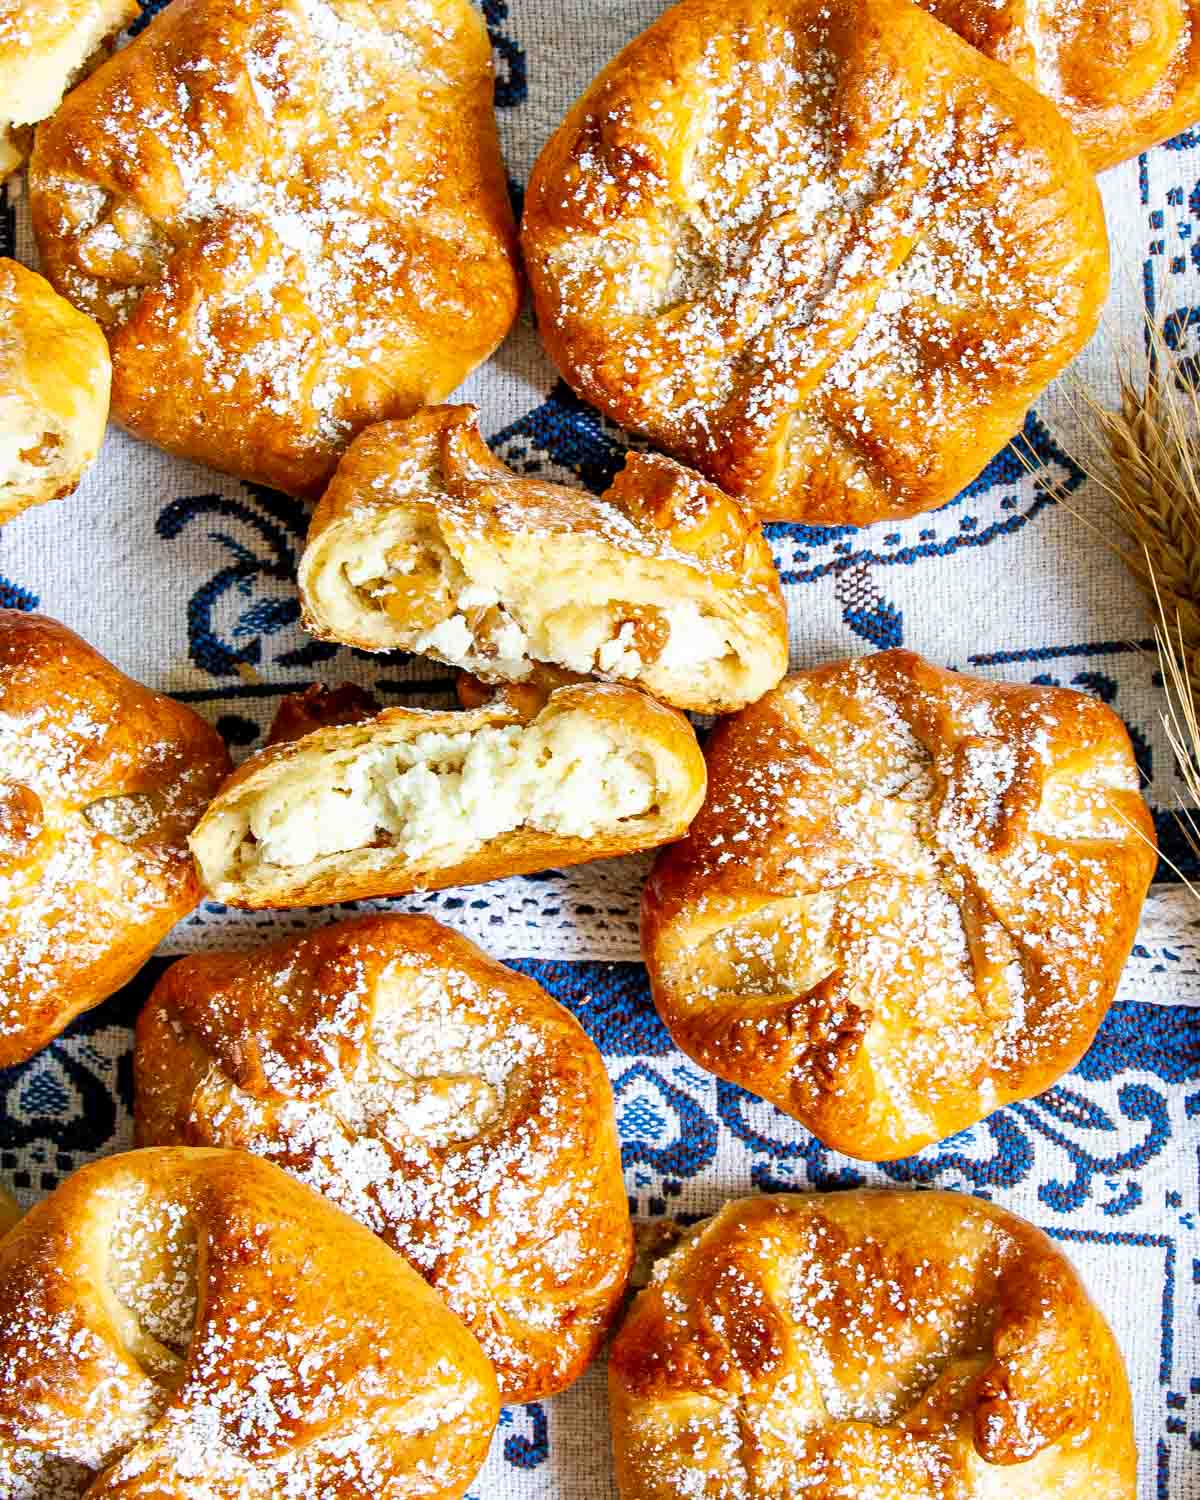
These beautiful Sweet Cheese Buns are loaded with golden raisins and a creamy ricotta cheese filling, encompassed by an irresistibly delicious bun.

Sweet Cheese Buns Recipe
I love cheese pies, cheese pastries, so much in fact, that I have many variations of these recipes on the blog, most of them being on the savory side, but I wanted to add a sweeter adaption to my repertoire! This is another one of those Romanian recipes that I love.
These little cheese buns are called “Poale-n Brau” in Romanian, which I couldn’t even translate if I wanted too! Something to do with waist, or hem or lap, I don’t think there’s a way to properly translate this. No matter what they’re called, they’re delicious.
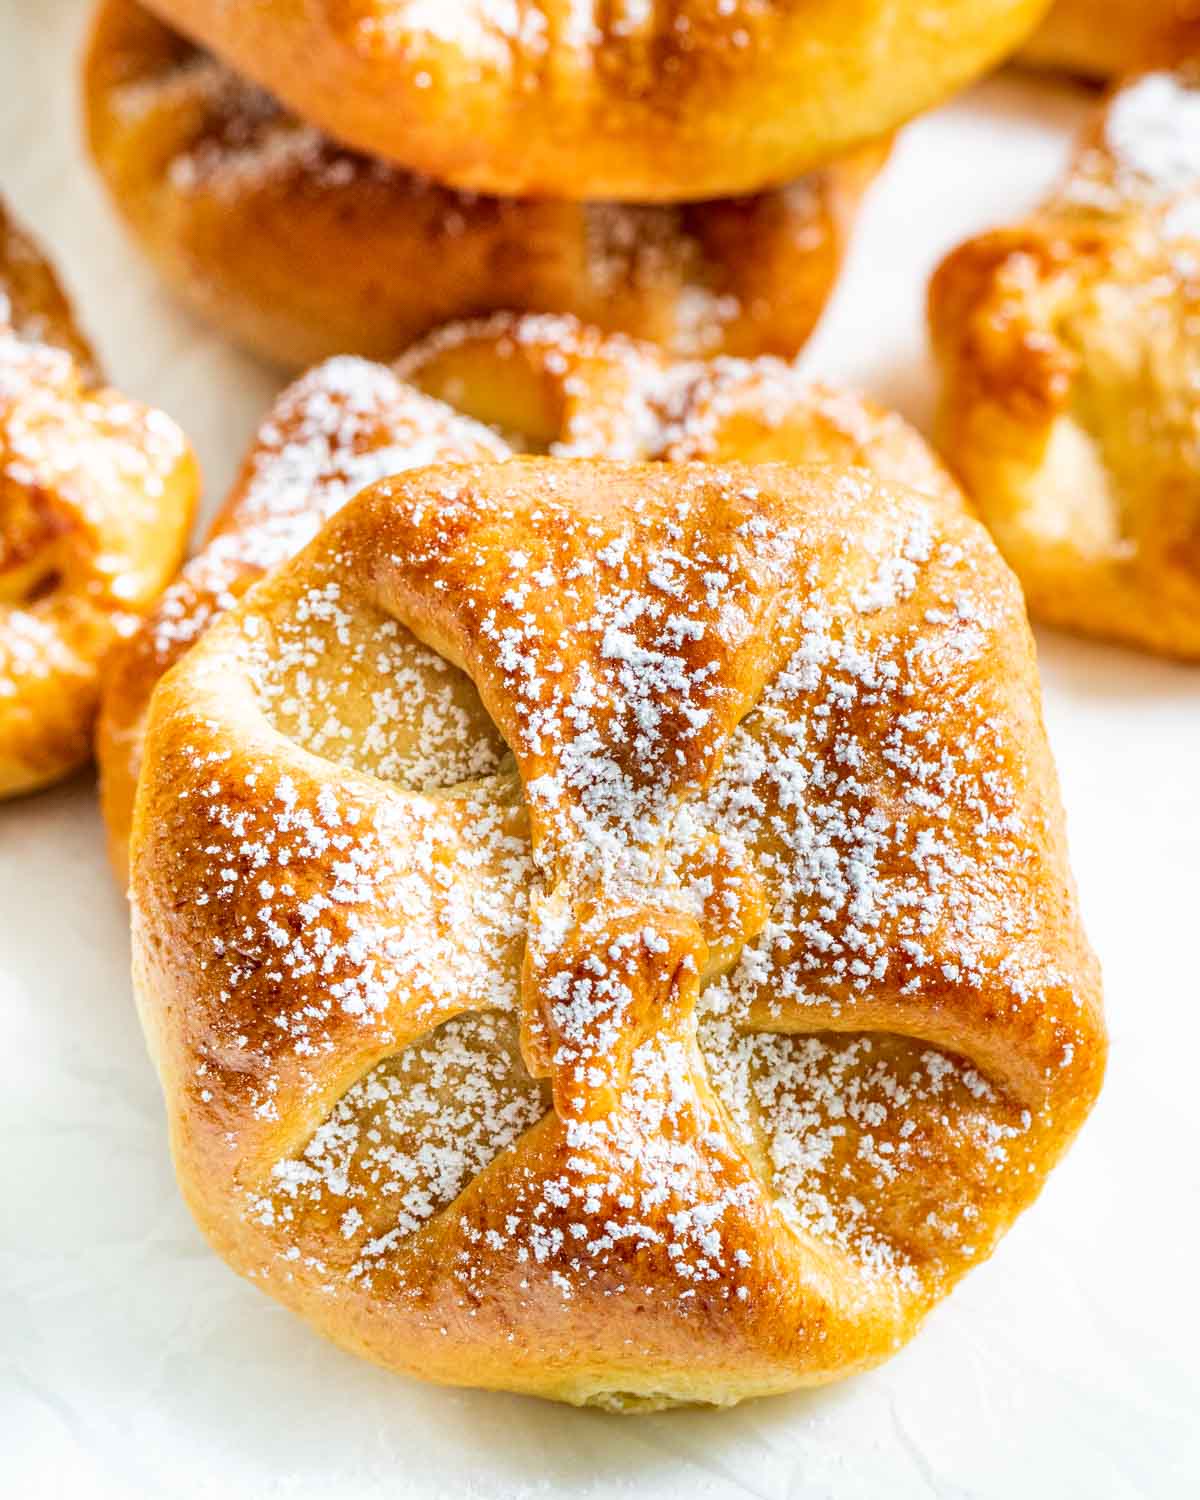
I struggled with what to call them in English but sweet cheese buns is what I settled on. A combination of golden raisins and creamy, dreamy ricotta spiked with a fresh zest of lemon fill these flaky delights!
Although they are a bit of work to make, there will be an abundance of baked goods to go around, making it all worth it. You can share with your loved ones or keep them all to yourself.
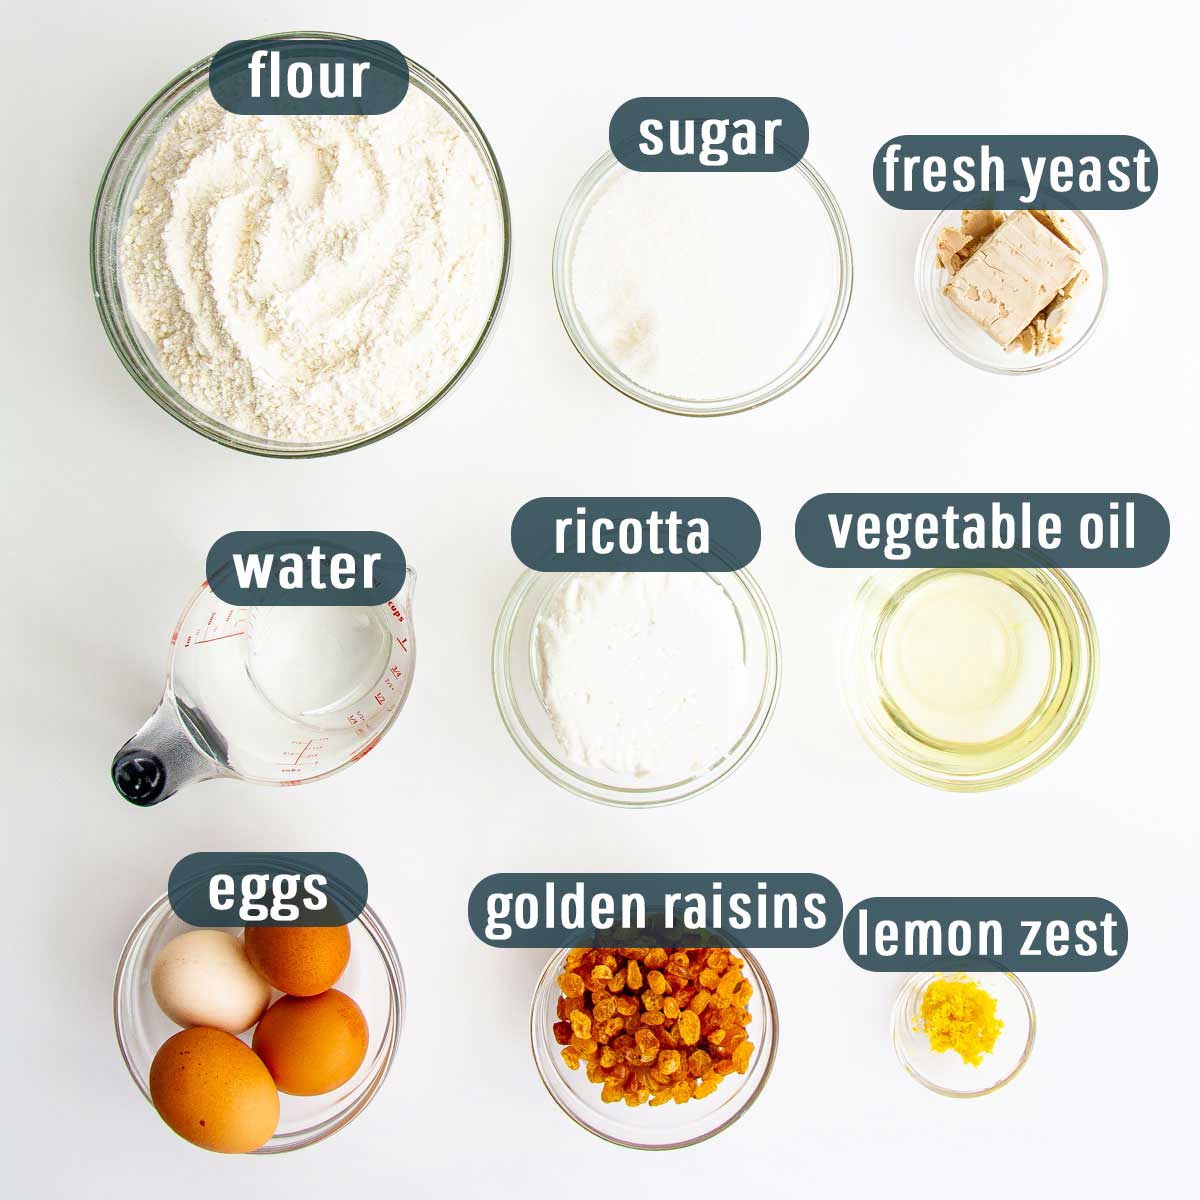
- Cheese – We are using ricotta cheese for that extra creamy and decadent filling.
- Flour – Regular all-purpose flour is your best friend when making these buns.
- Eggs – The eggs are going to help make our buns airy and fluffy.
- Sugar – We need a little bit of sweetness to balance the flavor of these cheese buns, granulated is fine.
- Water – Make sure it’s lukewarm! The best temperature of the water should be anywhere from 95 degrees to 105 degrees for this.
- Vegetable Oil – Substitute canola, sunflower, or safflower oil.
- Lemon – We want the zest from one fresh lemon to add a nice bright hint of citrus flavor to these pastries!
- Yeast – I chose to use fresh yeast for this recipe, but feel free to substitute with 1 package of active dry yeast!
- Raisins – I used golden raisins, you can use your preference!
- Optional: You don’t have to do this, but you can soak the raisins in some rum for about 1 hour, just for some extra flavor!
How to Make Sweet Cheese Buns
Prep the Dough:
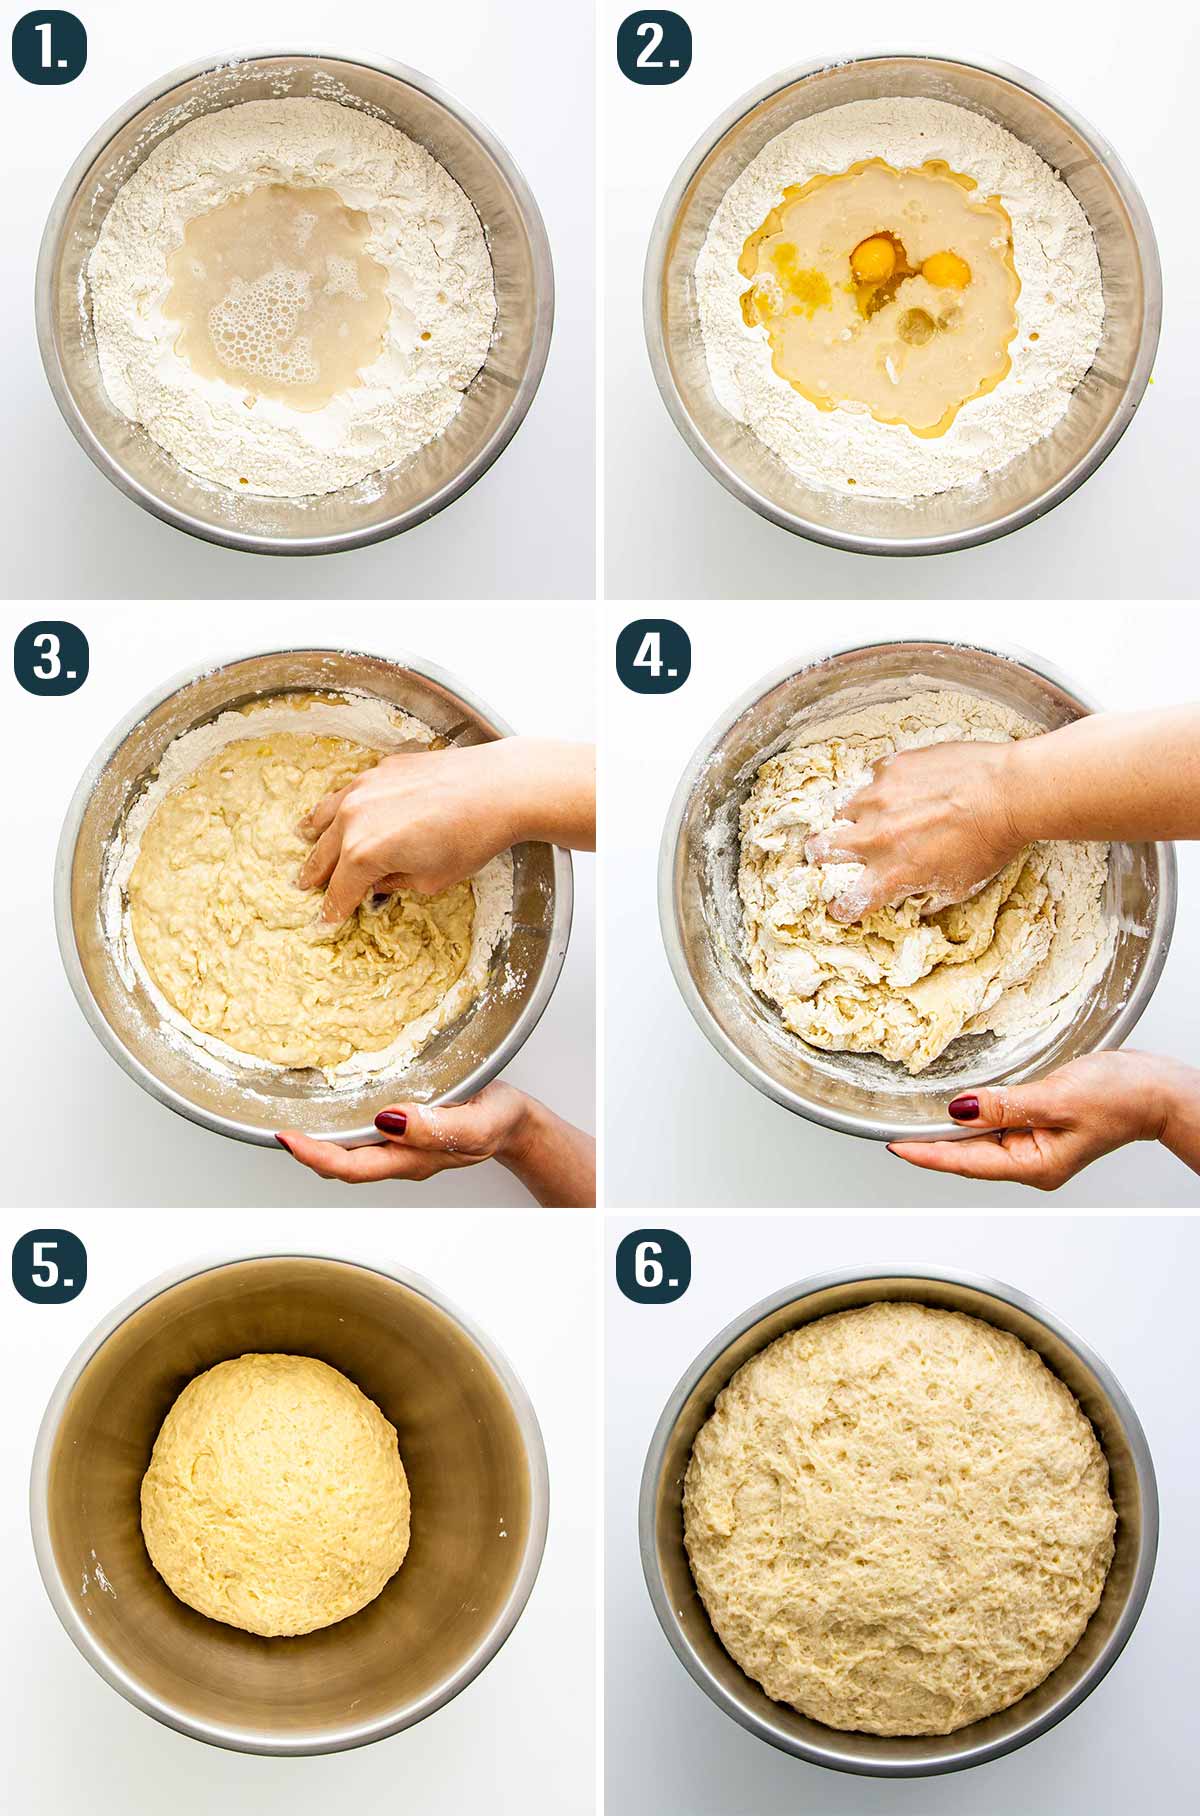
- Dissolve Yeast: In a big bowl, add the flour and form a well in the middle. Crumble up the fresh yeast and add it in the well. Pour the water over the yeast and stir it up until the yeast dissolves. If using active yeast, activate in a bowl with the lukewarm water and a tsp of the sugar.
- Mix Dough: Add the oil, 1/2 cup of the sugar, 2 eggs and half the lemon zest to the well. Using your hands mix everything together and continue kneading the dough for about 10 minutes. Alternatively you can do this in your stand mixer and mix on medium low until the dough is smooth and comes clean from the sides of the bowl.
- Let Rise: Place the dough in an oiled bowl, cover it up with a clean towel, or plastic wrap and let it double in size, in a warm place.
- Make Cheese Mixture: While the dough is rising, we can make the cheese mixture. In a medium bowl, add the ricotta cheese, raisins, remaining 1/2 cup of sugar, 1 egg, remaining lemon zest and mix it all together. Place the cheese mixture in the fridge while the dough is rising.
Shaping and Baking:
- Preheat Oven: Preheat oven to 350 F degrees.
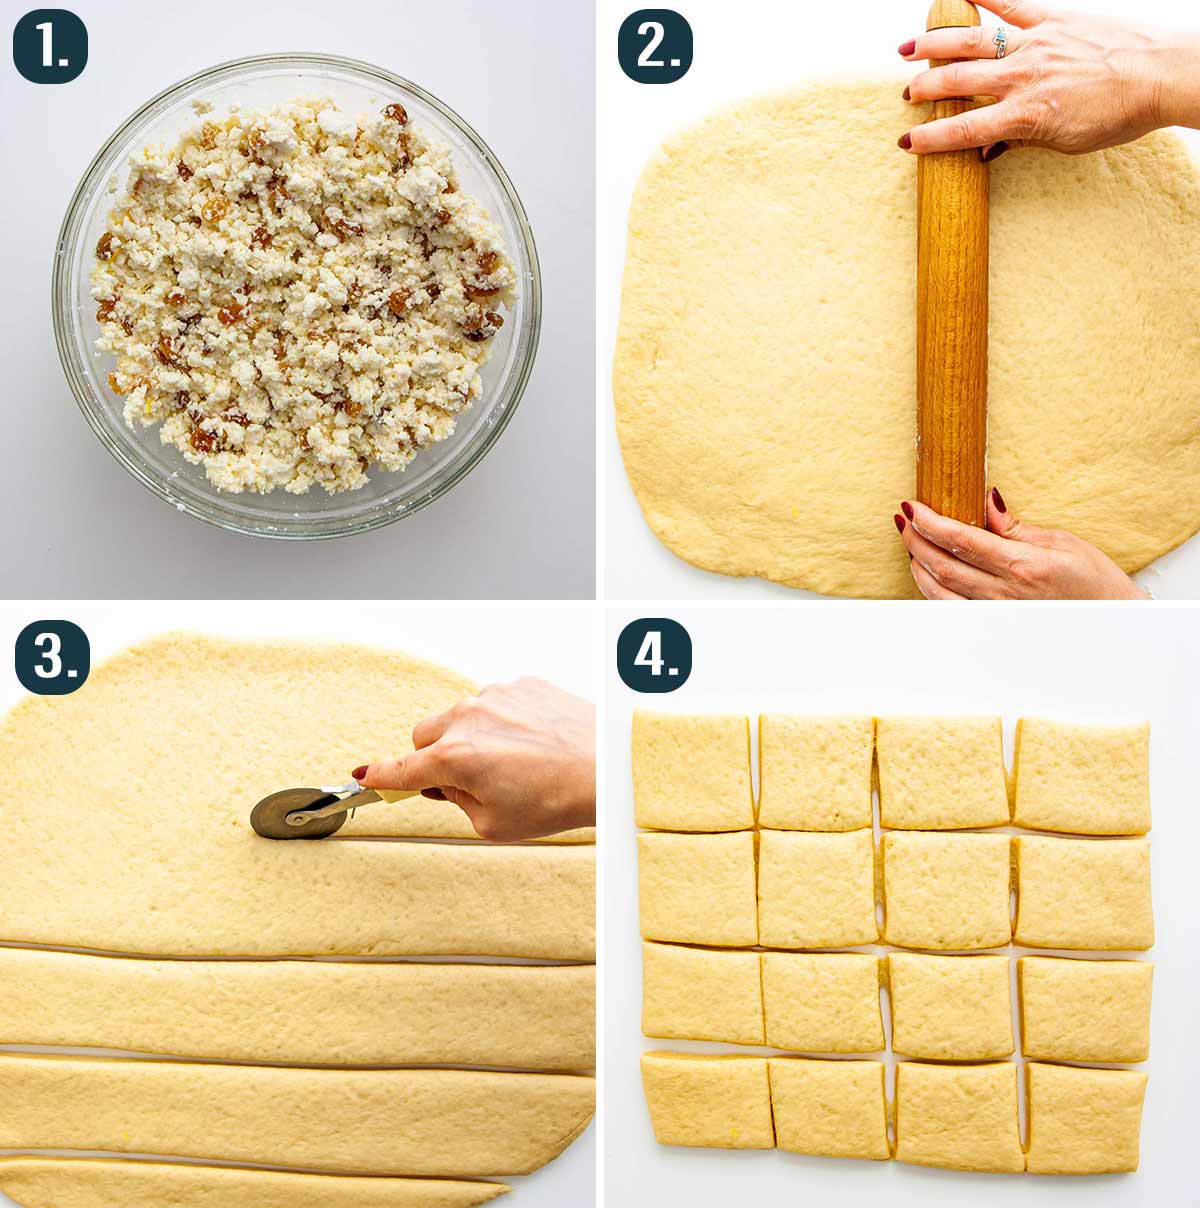
- Roll and Cut Dough: After the dough has doubled in size, roll it out in a long rectangular so that it’s about 1/4 inch in thickness. Using a pastry cutter cut it into squares that are 3″ x 3″.
- Roll it Out: Take each square and roll it up until it’s 6″ x 6″, it will be quite thin, but don’t worry as it will rise quite a bit more.
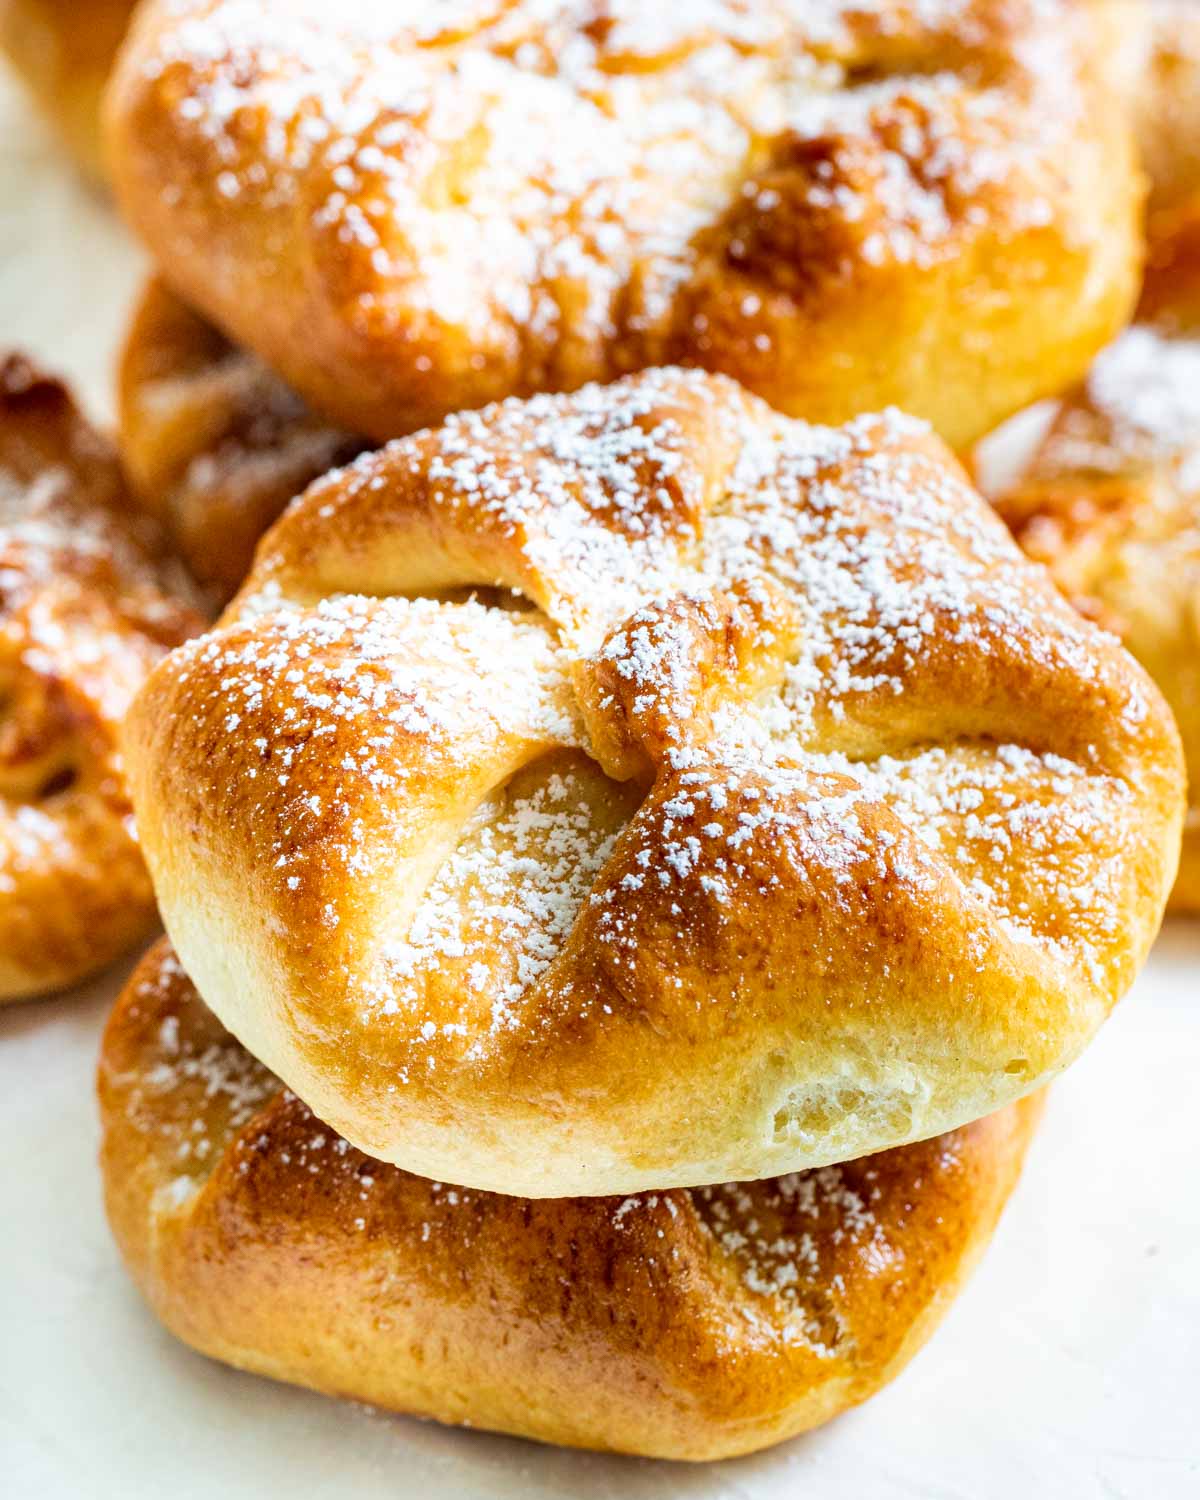
- Assemble: Place 2 tsp of the cheese mixture in the center of each square. Fold over each corner of the square over to the middle and pinch in the middle to make the dough stick. Now fold each newly formed corner over to the middle again and pinch it in the middle. Make sure you pinch it well, otherwise the dough will open up. Repeat with remaining dough and cheese mixture.
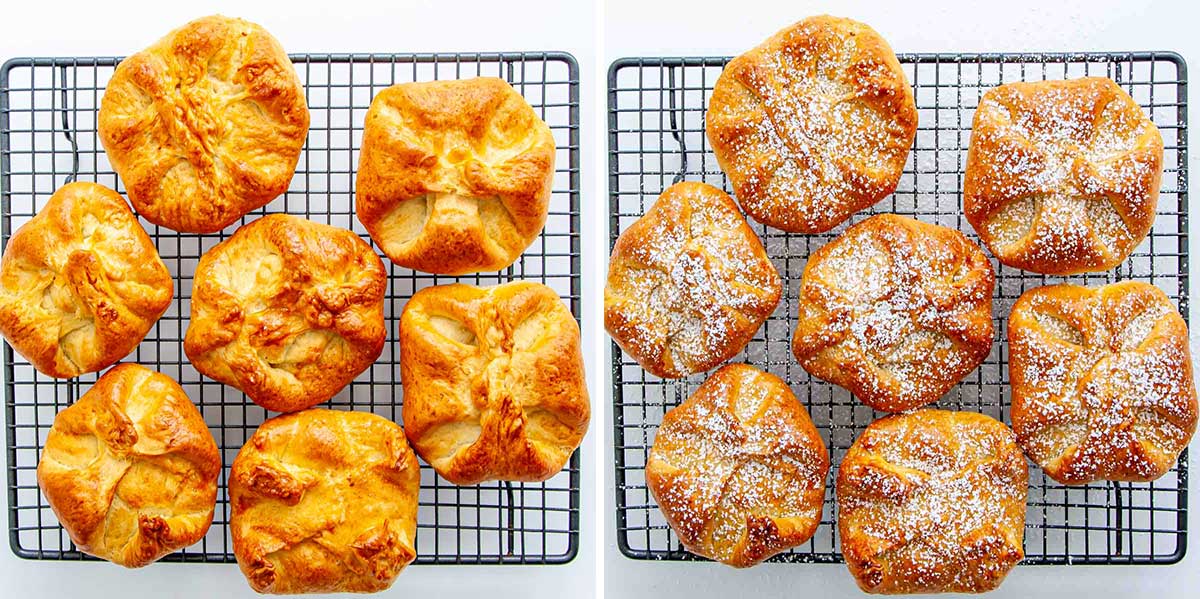
- Egg Wash: Brush the cheese buns with egg wash and let them sit out for another 10 minutes so they rise a bit more.
- Bake: Bake in the oven for about 30 or 35 minutes, or until golden brown.
- Finish and Serve: Cool on wire racks and sprinkle with powdered sugar if preferred.

Frequently Asked Questions
Do I Have To Use Fresh Yeast?
For these buns I used fresh yeast, however it’s not a must! You can alternatively use regular active dry yeast, you’ll need a package of active dry yeast or 2 1/4 tsp or 1/4 oz.
Where Can I Buy Fresh Yeast?
If you really want to use fresh yeast, you can usually get it from a bakery or if your grocery store has a bakery you can get it there from the baker, they usually sell it in blocks and it’s quite cheap.
What’s The Best Mixing Method?
When mixing this dough, you can use a wooden spoon, your hands or a mixer to mix everything together. Alternatively, you can save yourself all the work and mix it all in your mixer.
How to Serve
These sweet cheese buns great for breakfast with a cup of coffee, and not to mention they’re super portable, so you can take them with you on the go! I like to dust mine with a little extra powdered sugar for that little added sweetness.
Tips
- Before starting, ensure that your yeast is active!
- Make sure to brush the dough with egg wash before baking. This adds shine and will enhance the golden color of the buns.
- If you’d like, you can add your preference of mix-ins to the filling before baking. You can also top it with slivered almonds or a dusting of powdered sugar!
Storing Sweet Cheese Buns
These sweet cheese buns will stay fresh for up to 3 days, covered and stored at room temperature, but will keep for an additional week in the refrigerator, covered with foil, plastic wrap or in a plastic bag or airtight container.
Freezing
Wrap these sweet cheese buns tightly with aluminum foil or plastic freezer wrap, or place in heavy-duty freezer bag/airtight container. This will allow them to stay fresh for up to 1 month.
Let defrost at room temperature for about 2 to 3 hours when ready to serve or simply pop them in the microwave for 30 seconds to 1 minute.
More Delicious Recipes To Try
Before You Begin! If you make this, please leave a review and rating letting us know how you liked this recipe! This helps our business thrive & continue providing free recipes.

Sweet Cheese Buns
Ingredients
- 6 cups all-purpose flour
- 2 ounce fresh yeast (or 1 package of active dry yeast)
- 1 cup water (lukewarm)
- 1 cup vegetable oil
- 1 cup sugar (granulated, divided)
- 4 large eggs (at room temperature, divided)
- 1 tablespoon lemon zest
- 2 cups ricotta cheese
- ¾ cup golden raisins
Before You Begin! If you make this, please leave a review and rating letting us know how you liked this recipe! This helps our business thrive & continue providing free recipes.
Instructions
- Dissolve Yeast: In a big bowl, add the flour and form a well in the middle. Crumble up the fresh yeast and add it in the well. Pour the water over the yeast and stir it up until the yeast dissolves. If using active yeast, activate in a bowl with the lukewarm water and a tsp of the sugar.x
- Mix Dough: Add the oil, ½ cup of the sugar, 2 eggs and half the lemon zest to the well. Using your hands mix everything together and continue kneading the dough for about 10 minutes. Alternatively you can do this in your stand mixer and mix on medium low until the dough is smooth and comes clean from the sides of the bowl.
- Let Rise: Place the dough in an oiled bowl, cover it up with a clean towel, or plastic wrap and let it double in size, in a warm place.
- Make Cheese Mixture: While the dough is rising, we can make the cheese mixture. In a medium bowl, add the ricotta cheese, raisins, remaining ½ cup of sugar, 1 egg, remaining lemon zest and mix it all together. Place the cheese mixture in the fridge while the dough is rising.
- Preheat oven: Preheat oven to 350°F.
- Roll and Cut Dough: After the dough has doubled in size, roll it out in a long rectangular so that it's about ¼ inch in thickness. Using a pastry cutter cut it into squares that are 3" x 3". Repeat with remaining dough.
- Roll it Out: Take each square and roll it up until it's 6" x 6", it will be quite thin, but don't worry as it will rise quite a bit more.
- Assemble: Place 2 tsp of the cheese mixture in the center of each square. Fold over each corner of the square over to the middle and pinch in the middle to make the dough stick. Now fold each newly formed corner over to the middle again and pinch it in the middle. Make sure you pinch it well, otherwise the dough will open up. Repeat with remaining dough and cheese mixture.
- Egg Wash: Beat the remaining egg and brush the cheese buns with it. Let them sit out for another 10 minutes so they rise a bit more.
- Bake: Bake in the oven for about 30 or 35 minutes, or until golden brown.
- Finish and Serve: Cool on wire racks and sprinkle with powdered sugar if preferred.
Equipment
Notes
- Before starting, ensure that your yeast is active!
- Make sure to brush the dough with egg wash before baking. This adds shine and will enhance the golden color of the buns.
- If you’d like, you can add your preference of mix-ins to the filling before baking. You can also top it with slivered almonds or a dusting of powdered sugar!
- These sweet cheese buns will stay fresh for up to 3 days, covered and stored at room temperature, but will keep for an additional week in the refrigerator, covered with foil, plastic wrap or in a plastic bag or airtight container.
- Wrap these sweet cheese buns tightly with aluminum foil or plastic freezer wrap, or place in heavy-duty freezer bag/airtight container. This will allow them to stay fresh for up to 1 month.
- Let defrost at room temperature for about 2 to 3 hours when ready to serve or simply pop them in the microwave for 30 seconds to 1 minute.
Nutrition Information
Notice: Nutrition is auto-calculated for your convenience. Where relevant, we recommend using your own nutrition calculations.
