Chicken Kiev
This post may contain affiliate links. Please read my disclosure policy.

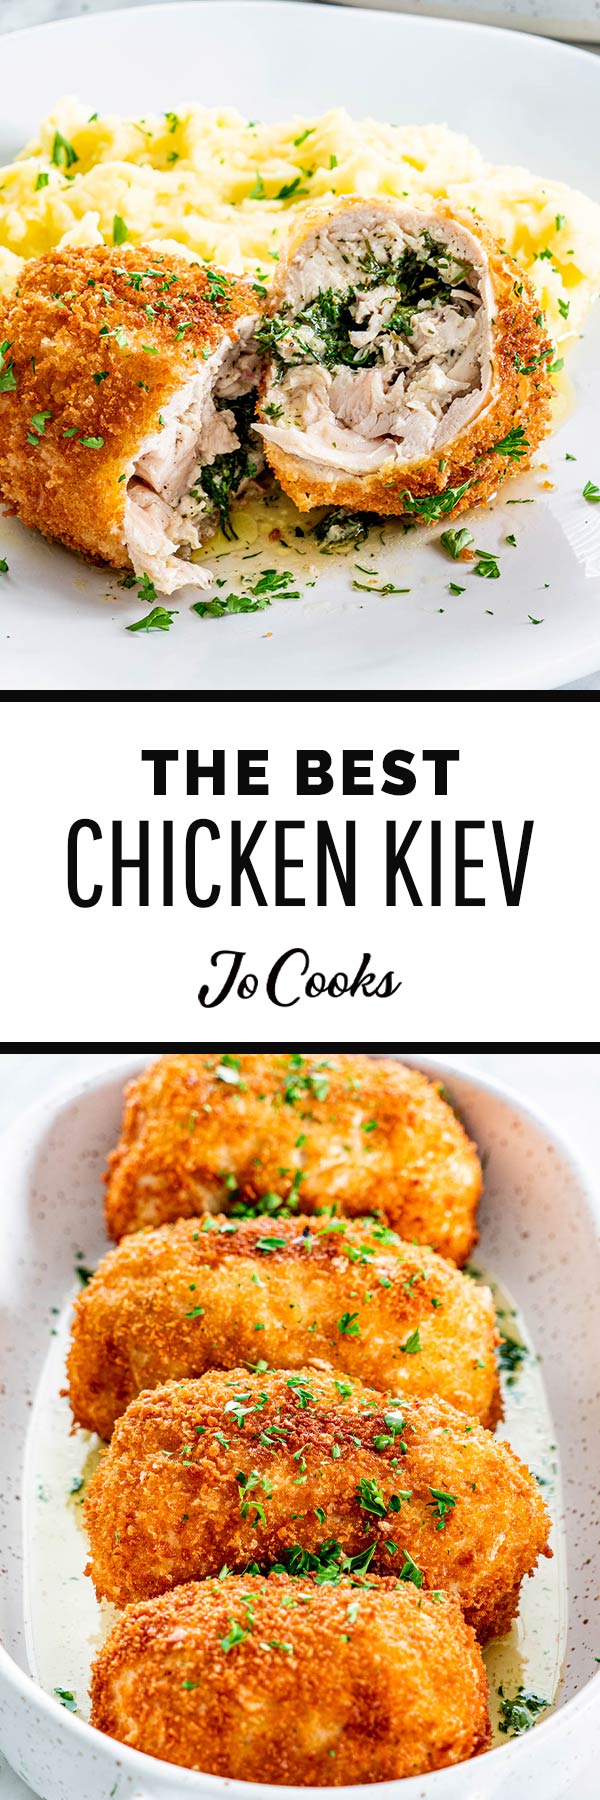
Chicken Kiev – crispy, golden chicken stuffed with garlic herb butter that melts as soon as you cut into it.


Crispy Chicken Stuffed with Garlic Butter. Enough Said.
There are chicken dinners and then there’s this. Chicken Kiev has been one of those dishes I’ve always loved but didn’t always love making, until I got the method down. It’s buttery, it’s crispy, and when you slice into that golden crust and see that garlic herb butter melt out? Yeah. That moment alone makes the effort totally worth it.
I won’t sugarcoat it, this one takes a bit of time. You’ve got some freezing, some frying, a little praying that the butter doesn’t leak out all over your pan. But trust me, once you’ve made it start to finish, it’ll go into the “impress-everyone-and-feel-like-a-champion” rotation. I serve it with mashed potatoes and maybe a glass of wine if I feel like it. It’s rich, cozy, and exactly the kind of dinner I pull out when I want to remind everyone I can cook when I want to.
Why You’ll Love This Chicken Kiev
- That garlic herb butter? It melts into the chicken and makes every bite ridiculously flavorful.
- Crispy, golden exterior without any fancy tools or ingredients. Just good old-fashioned frying and baking.
- It looks impressive, but it’s totally doable, I break it down step by step.
- Perfect for special dinners, but let’s be honest, I’ve made this on a Wednesday just because.
- You can prep it ahead, freeze it, and look like a rockstar when guests show up.

Before You Start: Tips & Ingredient Notes
- Flatten the chicken evenly, not paper thin. You want the chicken to be thin enough to roll but thick enough to hold the filling. I use a meat mallet or my cast iron pan (yes, really) and pound from the center out to get a nice even layer. Uneven = undercooked spots or blowouts.
- Freeze the chicken rolls before breading. I know it adds extra time, but this step is non-negotiable if you want to keep that glorious garlic butter inside the chicken. Freezing helps the seams hold together while frying, and gives the butter just enough time to warm gently in the oven, so you get that perfect molten center without a full-on butter explosion in your pan. I usually wrap them tight in plastic wrap and freeze for at least 2 hours.
- Freeze your garlic butter solid. I’ve tested this every which way, and if the butter isn’t frozen rock hard, it’ll leak out before your chicken ever hits the plate. I usually make the butter log the night before and let it freeze overnight, less stress, no mess.
- Use panko for best crunch. I’ve tried every breadcrumb out there, and nothing beats panko. It gives you that deep fried restaurant-style crust, even at home. Regular breadcrumbs will work, but they just don’t bring the same texture.
- Season every single layer. Here’s a chef-y trick that makes all the difference: season the flour, season the eggs, season the breadcrumbs. It’s how you get flavor in every bite, not just on the outside.
- Fry smart: neutral oil, high heat. Go with vegetable, canola, or sunflower oil, something with a high smoke point. This isn’t the place for olive oil (trust me, it’ll smoke up your kitchen before your chicken’s even golden).
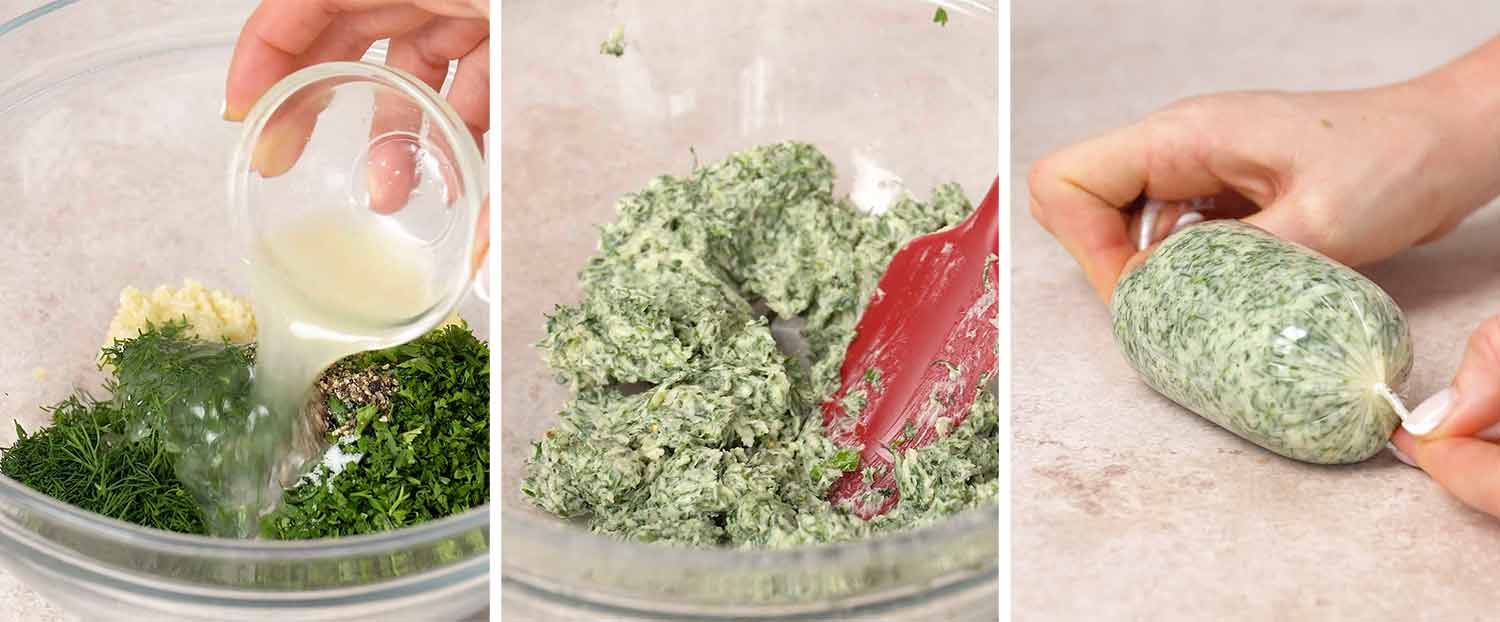
Mix the softened butter with garlic, parsley, dill, lemon juice, salt, and pepper. Once it’s all mashed together, plop it onto plastic wrap, roll it into a log, and freeze until solid, at least 30–40 minutes. I usually make this part ahead and forget about it until the chicken’s ready.
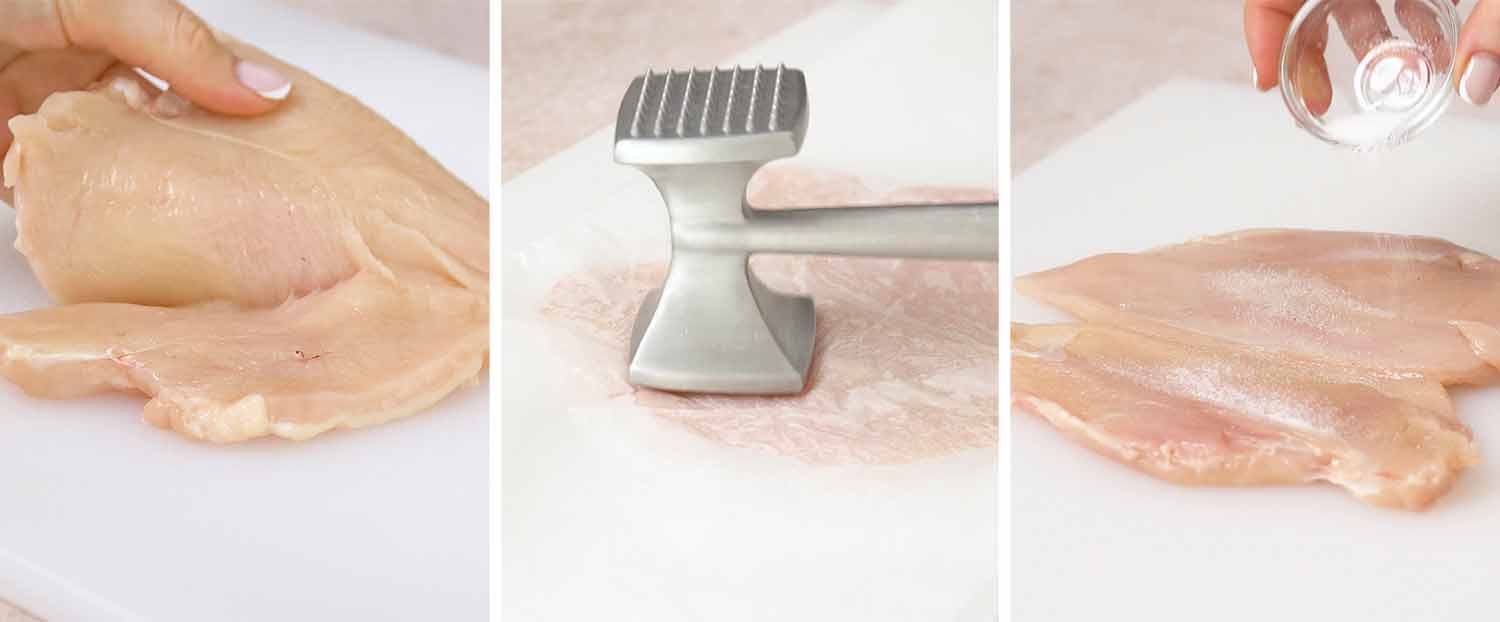
Butterfly each chicken breast, then place it between two sheets of parchment or plastic wrap and pound it out to about ½-inch thick. You want it nice and even, not see through. Season both sides generously with salt and pepper.
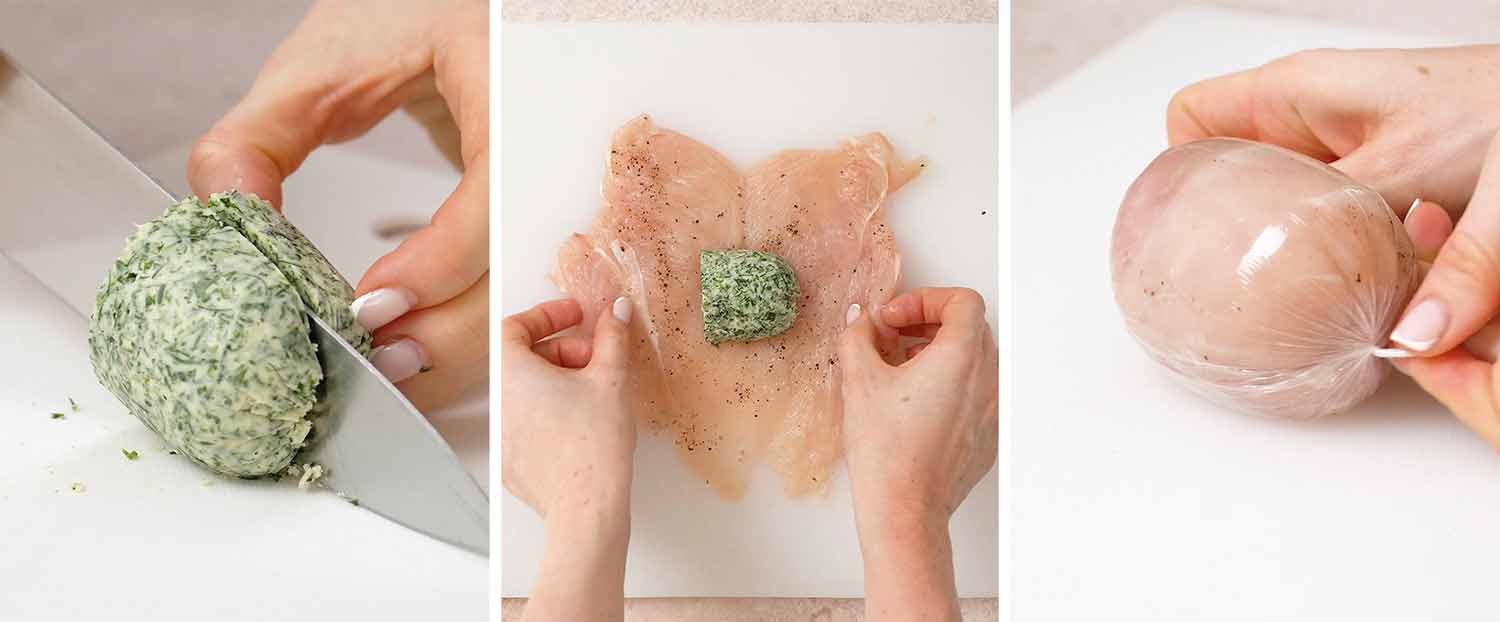
Cut the frozen butter into four equal pieces. Place one in the center of each flattened chicken breast, then fold the chicken over it, tuck the sides in like you’re wrapping a burrito. Wrap each one tightly in plastic wrap and twist the ends. Freeze for 2 hours, minimum. This is what keeps all that delicious butter inside where it belongs.
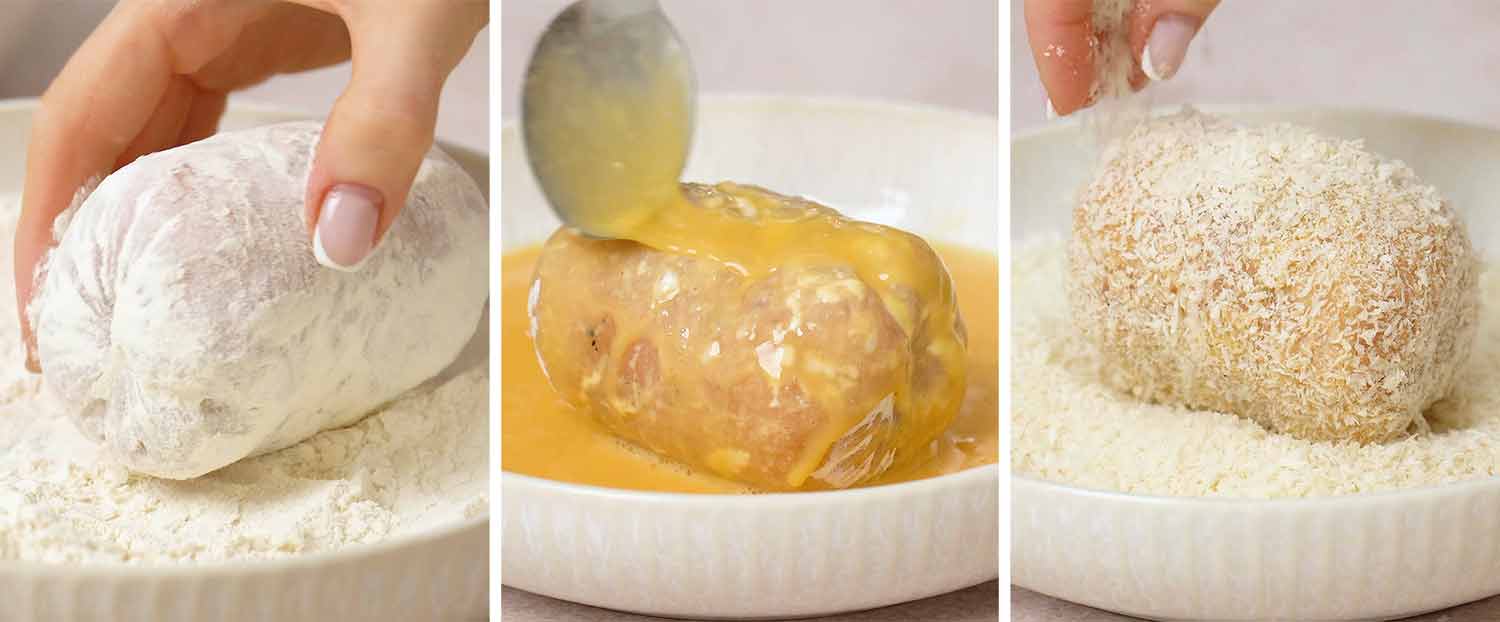
Set up your breading station: flour in one shallow bowl, beaten eggs in another, panko breadcrumbs in a third. Roll the frozen chicken first in the flour (shake off the excess), then in the egg, and finally coat it generously in breadcrumbs. Press them on to help them stick.
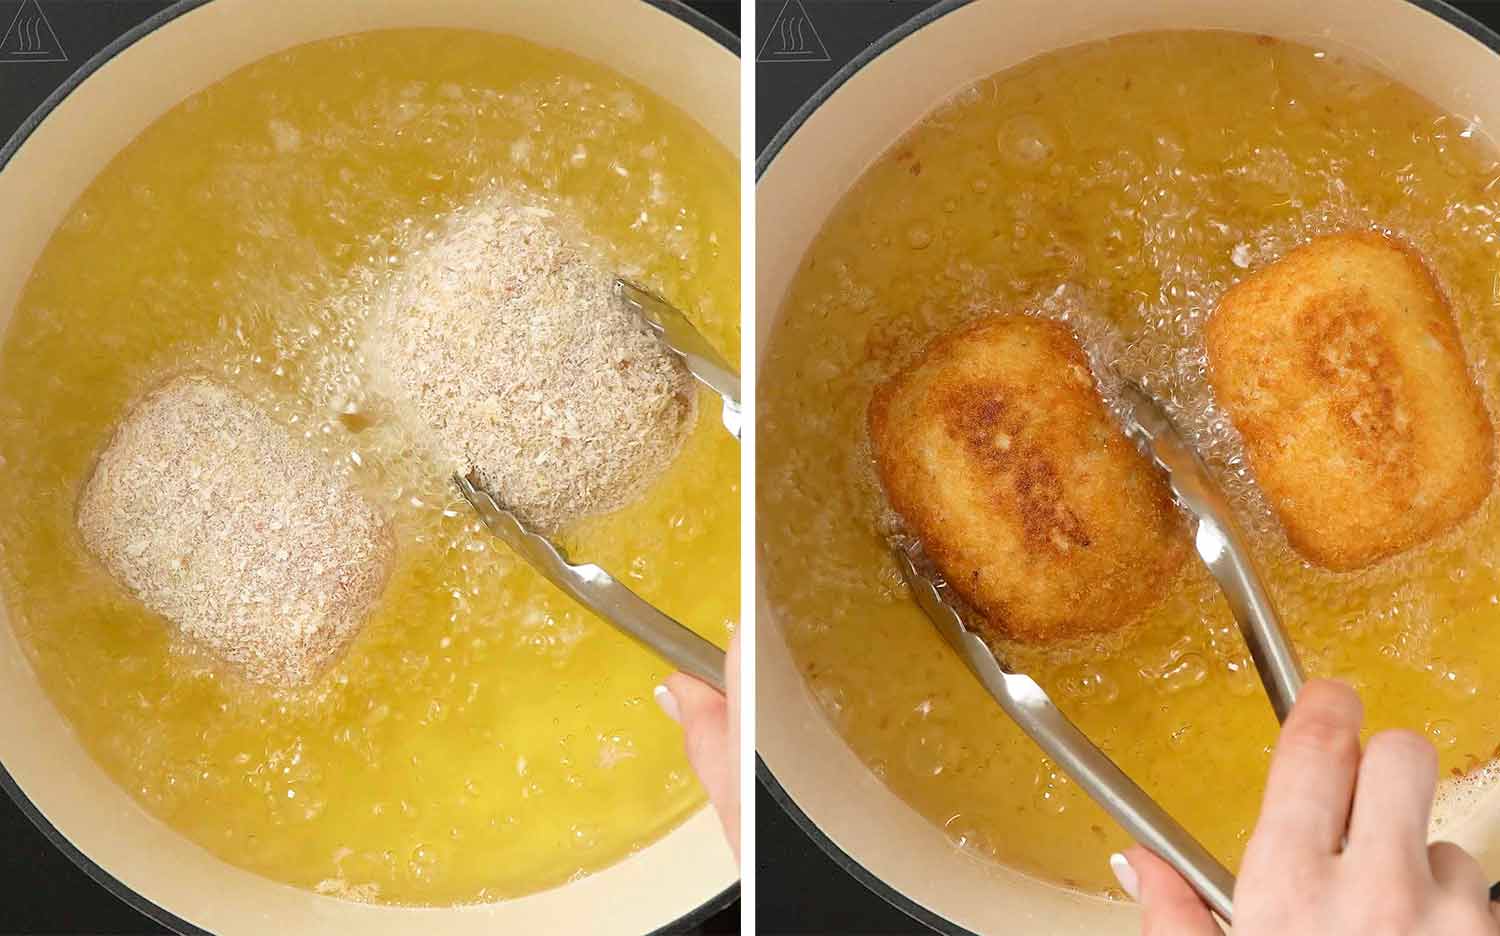
Heat about 2 inches of oil in a large saucepan or Dutch oven to 350℉. Carefully fry each piece for 2–3 minutes, just until golden all over. We’re not cooking them through here, just setting the crust.
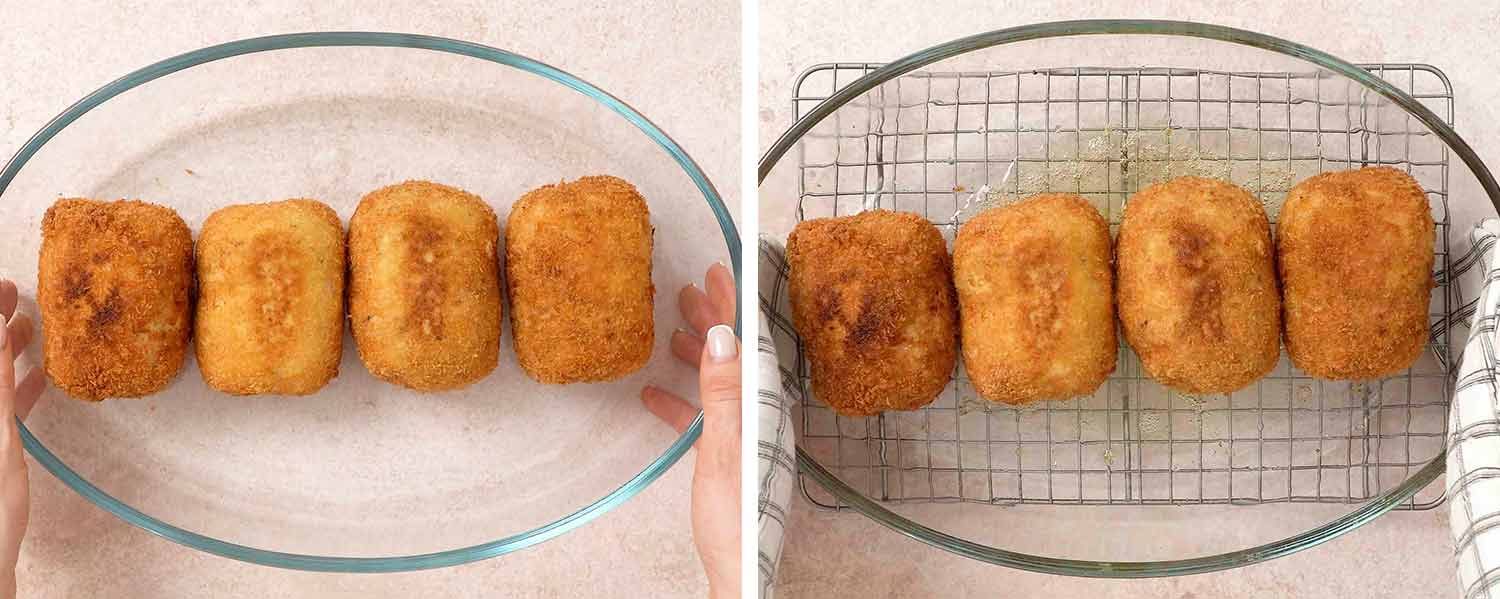
Transfer the fried chicken rolls to a baking dish and bake at 400℉ for 20–25 minutes. You want the chicken fully cooked and the butter inside hot and melted, but still intact.
Serving Suggestions
Chicken Kiev is rich, crispy, buttery, it begs for something creamy or carby on the side to soak up that garlic butter. Here’s what I usually serve it with (depending on how ambitious I’m feeling):
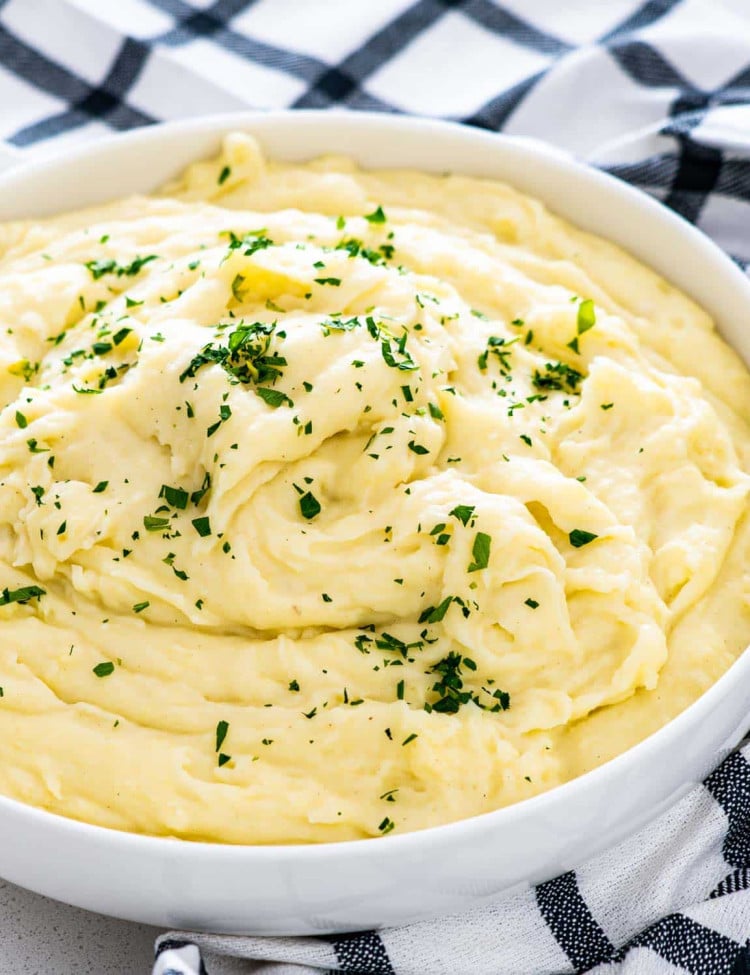
Mashed Potatoes

Loaded Scalloped Potatoes
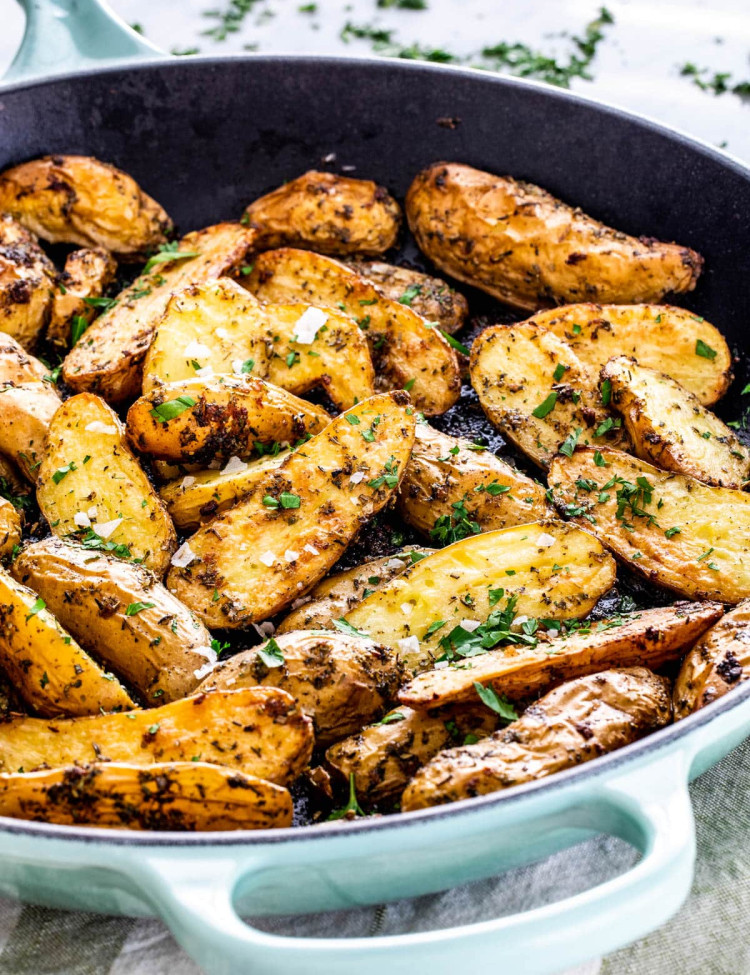
Roasted Fingerling Potatoes

Roasted Asparagus and Tomatoes

Frequently Asked Questions
Can I skip the frying and just bake it?
Technically, yes, but you’ll miss out on that crispy golden shell that makes Chicken Kiev so good. You can bake from frozen at 400℉ for about 35–40 minutes, but don’t expect the same crunch.
How do I stop the butter from leaking out?
Three things: freeze the butter solid, wrap the chicken tightly, and freeze the assembled rolls again before breading. If you rush those steps, the butter will find its way out. I’ve learned that the hard way more than once.
Can I make it ahead of time?
Yes! You can prep and freeze the assembled (but unbreaded) chicken rolls for up to 2 months. Just thaw slightly, then bread and cook when you’re ready.
What if I don’t have panko?
Regular breadcrumbs will still work, but the texture won’t be as crisp. You can also blitz up some cornflakes or toast your own bread for a DIY version.
How do I know when the chicken is done?
It should hit 165℉ in the thickest part. I always check with a meat thermometer, especially with stuffed chicken where it’s harder to tell just by looking.
Can I use chicken thighs instead?
Boneless, skinless thighs work, but they’re trickier to roll. You’ll still need to pound them thin and wrap them tightly, but they won’t hold the shape quite as neatly as breasts.

More Chicken Recipes To Try:
Originally shared August 2019. Updated with new step-by-step photos, an improved video, and clearer instructions to help you get it just right.
Before You Begin! If you make this, please leave a review and rating letting us know how you liked this recipe! This helps our business thrive & continue providing free recipes.

Chicken Kiev
Video
Ingredients
Garlic Butter
- 8 tablespoons butter (unsalted, softened)
- 6 cloves garlic (minced well)
- ½ cup fresh parsley (chopped)
- ¼ cup fresh dill (chopped)
- ½ teaspoon salt (or to taste)
- ½ teaspoon pepper (or to taste)
- 2 tablespoons lemon juice (freshly squeezed)
Chicken Kiev
- 4 chicken breasts (boneless and skinless)
- ½ cup all-purpose flour
- 2 large eggs (beaten)
- 1 ½ cups breadcrumbs (such as Panko)
- ½ teaspoon salt (or to taste)
- ½ teaspoon pepper (or to taste)
- vegetable oil (for frying)
Before You Begin! If you make this, please leave a review and rating letting us know how you liked this recipe! This helps our business thrive & continue providing free recipes.
Instructions
- Mix all the garlic butter ingredients together using a fork or a spatula. Place it onto a piece of plastic wrap and roll into a log. Place it in the freezer for 30-40 minutes to freeze. It needs to be firm so that we can slice it.
- Lay each breast flat onto your work surface. Butterfly the chicken breast by slicing it horizontally. Place the chicken breast opened between two pieces of parchment paper or plastic wrap and then flatten using a meat mallet. If you don't have a meat mallet you can also use the back of a heavy frying pan such as a cast iron skillet. Season each breast fillet with salt and pepper on both sides.
- Cut the frozen butter into 4 equal pieces. Place a frozen piece of garlic butter in the centre of a chicken fillet, fold the chicken over the garlic butter, gathering the sides to the center to form either a round ball or a log. Wrap each chicken piece in plastic wrap and twist the ends to make sure it's wrapped tightly. Place the wrapped chicken pieces in the freezer for about 2 hours until the seams have frozen.
- Add the flour onto a shallow plate, crack the eggs in another shallow plate and whisk, and in a third bowl the breadcrumbs. Roll the frozen chicken first into the flour and make sure it is coated evenly, then roll it into the eggs and finally roll it through the breadcrumbs. Repeat with all the chicken pieces.
- Heat the oil into a large saucepan or Dutch oven to 350℉. Preheat your oven to 400℉. Deep fry each piece of chicken for 2-3 minutes until golden brown on all sides. Transfer the fried chicken into a baking dish such as a 9×13-inch casserole dish, then transfer to the oven and bake for 20 to 25 minutes.
Equipment
Notes
- Make-ahead tip: You can prep the garlic butter and freeze it days in advance. You can even assemble the chicken rolls, freeze them, and bread/fry/bake later when you’re ready to impress.
- Avoid leaks: Don’t skip the freeze. It helps seal everything together and keeps the butter inside where it belongs.
- Use a thermometer: The chicken should hit 165℉ internally. And if you hear sizzling inside your oven, that might be butter on the move.
- Storage: Leftovers can be stored in the fridge for 3–4 days, but the breading will soften. To crisp it back up, reheat in the oven at 350℉.
- Freezer-friendly: Once fully cooked, these freeze well for up to 3 months. Reheat straight from frozen in a 375℉ oven for about 25 minutes.
Nutrition Information
Notice: Nutrition is auto-calculated for your convenience. Where relevant, we recommend using your own nutrition calculations.
