Italian Breaded Pork Chops
This post may contain affiliate links. Please read my disclosure policy.

These Italian Breaded Pork Chops are a classic Italian entree. Perfectly golden brown and crispy on the outside but moist and packed full on flavor on the inside, these are about to become your newest favorite mid week meal.

Easy Italian Breaded Pork Chops Recipe
I don’t think pork chops get enough love. They’re totally juicy and moist, packed full of flavor, and such a perfect protein punch when prepared correctly. If you’ve never tried to bread pork chops before, then do I ever have the most perfectly scrumptious dinner for you!
Crispy on the outside, juicy on the inside – what could possible be better? If you have some chops taking up space in your freezer and you want a way to prepare them that will get the entire family salivating, this recipe is the only answer you need.
Now this recipe is by no means new, it is a classic Italian way to prepare chops, dating back more generations than I can count! You may not see this dish on Italian menus when you go out to eat, but believe me it’s the main event in its own right.

Why This Recipe Works
- Flavorful Coating: The mixture of Italian breadcrumbs, Parmesan cheese, and our blend of seasonings creates a flavorful, crispy exterior that pairs beautifully with the juicy pork.
- Easy Preparation: This recipe is simple, and it’s perfect for both weeknight dinners and special occasions. You’ll be amazed by how something so straightforward can yield such delicious results.
- Versatile: These pork chops can be paired with a variety of sides, from mashed potatoes to a fresh salad, making this a versatile addition to your culinary repertoire.

- Pork Chops: The star of the show. We’re using boneless chops here for easy eating, but bone-in chops would also work and could yield an even juicier result.
- Italian Breadcrumbs & Parmesan: This combo creates a crispy, cheesy coating that’s full of flavor. You could use plain breadcrumbs, but the Italian variety adds extra seasoning.
- Italian Seasoning & Garlic Powder: These seasonings infuse our pork chops with a burst of herby, aromatic flavor.
- Eggs & Milk: They help the breadcrumb mixture stick to our pork chops effectively.
- Olive Oil: For pan-frying our chops to a beautiful golden brown.
Making these Italian Breaded Pork Chops couldn’t be easier. It’s all about creating a rich, flavorful coating and pan-frying to perfection.
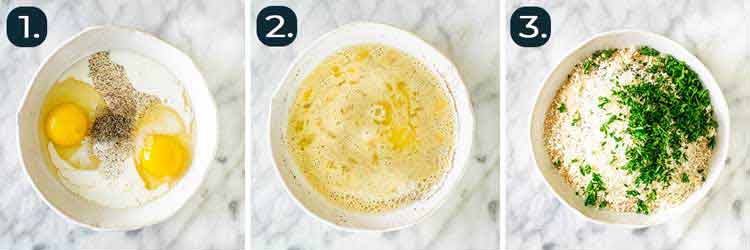
You’ll begin by whisking the eggs and milk, before preparing a separate mix of breadcrumbs, parmesan, and seasonings.
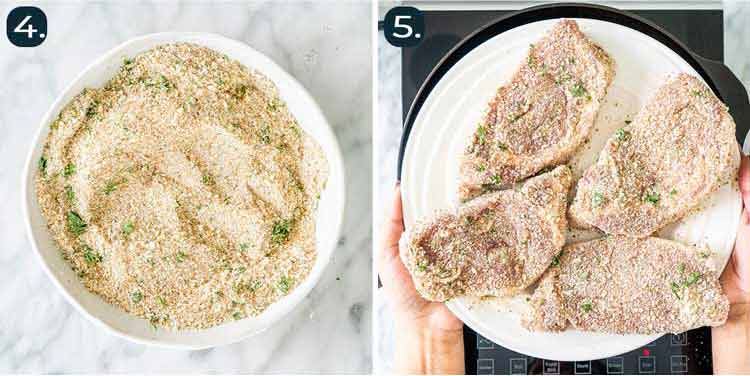
Then, it’s just a matter of dipping each chop into the egg mixture, followed by the breadcrumb mix.
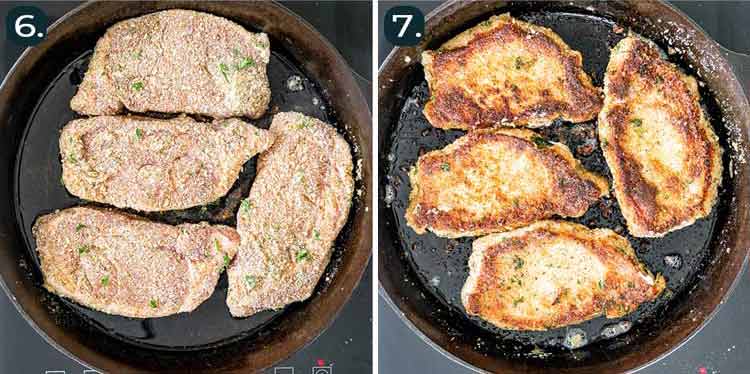
Finally, you’ll pan-fry the chops until golden, checking for the ideal internal temperature. The result? Crispy, juicy pork chops that are sure to impress!
Frequently Asked Questions
Can I use another cut of pork?
While this recipe calls for pork chops, you could also use pork loin or tenderloin cuts.
What if I don’t have Italian breadcrumbs?
You can make your own by adding Italian seasoning to regular breadcrumbs, or use panko breadcrumbs for a crunchier texture.
Can I bake these instead of frying?
Yes, you can bake them at 375°F for about 25-30 minutes or until they reach an internal temperature of 145°F.
What temperature should pork be cooked to be safe to eat?
According to the USDA, pork should be cooked to a minimum internal temperature of 145°F (63°C) and allowed to rest for at least three minutes before cutting or consuming. This ensures that it’s safe to eat while still being juicy and tender. Always use a meat thermometer to check the internal temperature for the best results.

Expert Tips
- Choosing Pork: Opt for bone-in chops if you want a slightly juicier result.
- Coating: For an extra thick, crunchy crust, consider double-dipping: coat in egg and breadcrumbs, then repeat before frying.
- Resting Time: Allow your pork chops to rest after frying. This helps the juices redistribute, keeping your chops succulent.
Serving Suggestions
These Italian Breaded Pork Chops pair wonderfully with a side of brown butter mashed potatoes or a crisp green salad. Complement them with a glass of dry white wine like a Pinot Grigio for an Italian-style feast. Here are some other sides I recommend
- Roasted Veggies
- Creamy Polenta
- White Beans with Bacon and Herbs
- Crispy Parmesan Potatoes
- Old Fashioned Green Beans
- Roasted Fingerling Potatoes
Leftovers
Store in an airtight container or ziploc bag. Make sure the pork chops have cooled down before storing them. They will last 3-4 days in the fridge or 2-3 months in the freezer. To reheat, you can either heat on the stovetop in a skillet over medium heat or in the oven at 375°F. Keep in mind that reheating cooked pork will cause it to dry out and it is best served fresh.

There you have it – a classic Italian Breaded Pork Chops recipe that’s simple, satisfying, and perfect for any day of the week. I can’t wait for you to give it a try! Don’t forget to share your culinary creations and any variations you made in the comments section.
Discover More Pork Chops Recipes
- Korean Pork Chops
- Ranch Pork Chops
- Pork Chops with Pistachio Salmuera
- Mustard Balsamic Pork Chops with Rosemary
- Apple Bacon and Blue Cheese Stuffed Pork Chops
- Smothered Pork Chops
- Easy Oven Baked Pork Chops
- Creamy Ranch Pork Chops
Before You Begin! If you make this, please leave a review and rating letting us know how you liked this recipe! This helps our business thrive & continue providing free recipes.

Italian Breaded Pork Chops
Video
Ingredients
- 2 medium eggs
- 2 tablespoon milk
- 1 cup breadcrumbs (Italian breadcrumbs)
- ½ cup parmesan cheese
- 1 tablespoon Italian seasoning
- 1 teaspoon salt
- 1 teaspoon pepper
- 1 teaspoon garlic powder
- 2 tablespoon parsley (chopped)
- 4 pork chops (boneless, 1 inch in thickness)
- 2 tablespoon olive oil
Before You Begin! If you make this, please leave a review and rating letting us know how you liked this recipe! This helps our business thrive & continue providing free recipes.
Instructions
- In a small bowl, beat together the eggs, the milk, ½ teaspoon of the salt and ½ teaspoon of the pepper. In a separate small bowl, mix the breadcrumbs, Parmesan cheese, Italian seasoning, garlic powder, parsley and remaining ½ teaspoon of salt and ½ teaspoon pepper.
- Heat the olive oil in a large, oven-proof skillet over medium heat. Dip each pork chop into the egg mixture, then into the bread crumb mixture, coating evenly. Place coated pork chops in the skillet, and brown abut 4 to 6 minutes on each side.
- If using a meat thermometer, check the internal temperature and cook until they reach 135℉. Transfer pork chops to a cutting board and let them rest for 10 minutes before slicing into them. The residual heat will bring the temperature up to 145℉.
Equipment
Notes
- If your pork chops are thicker, you may need to finish cooking them in an oven. To do so, place the skillet and pork chops in a 350℉ preheated oven, and cook 15 to 20 minutes, or to an internal temperature of 135℉(63℃). If using a meat thermometer, check the internal temperature and cook until they reach 135℉. Transfer pork chops to a cutting board and let them rest for 10 minutes before slicing into them. The residual heat will bring the temperature up to 145℉.
- Choice of Pork Chops: Either bone-in or boneless pork chops work well for this recipe. Bone-in may yield a juicier result.
- Breadcrumbs: You can substitute Italian breadcrumbs with plain ones, just add an extra 1/2 teaspoon of Italian seasoning for added flavor. Panko breadcrumbs can be used for a crunchier texture.
- Dipping Technique: Double-dipping the pork chops in the egg and breadcrumb mixture will give you an extra thick and crunchy crust.
- Resting Time: Don’t skip the resting time! Letting the cooked pork chops rest allows the juices to redistribute throughout the meat, ensuring a moist and flavorful chop.
- Storage: Store any leftovers in an airtight container in the refrigerator. They’re best enjoyed within 3 days.
Nutrition Information
Notice: Nutrition is auto-calculated for your convenience. Where relevant, we recommend using your own nutrition calculations.
